Back-End NodeJS Express & MySQL Part 2
ทบทวนการทำของ Part 1 https://www.glurgeek.com/education/backendexpressmysqlep1/
เตรียม Meterials ฝั่ง MySQL Database บน phpMyAdmin ก่อนเริ่มเรียน
(ถ้าทำของ Part 1 ไปแล้วสามารถข้ามขั้นตอนนี้ได้)
1. ติดตั้งโปรแกรม XAMPP
ศึกษาทาง https://www.glurgeek.com/education/startnodejs/ หัวข้อที่ 2 ติดตั้งโปรแกรม XAMPP สำหรับจำลองเครื่องคอมพิวเตอร์เป็น Server
2. เปิดโปรแกรม XAMPP
ไปที่ C:\xampp กด xampp-control.exe แล้วกด Start Server: Apache และ MySQL

3. เปิด Web Browser ทดสอบ Server
ไปที่ http://localhost/dashboard/

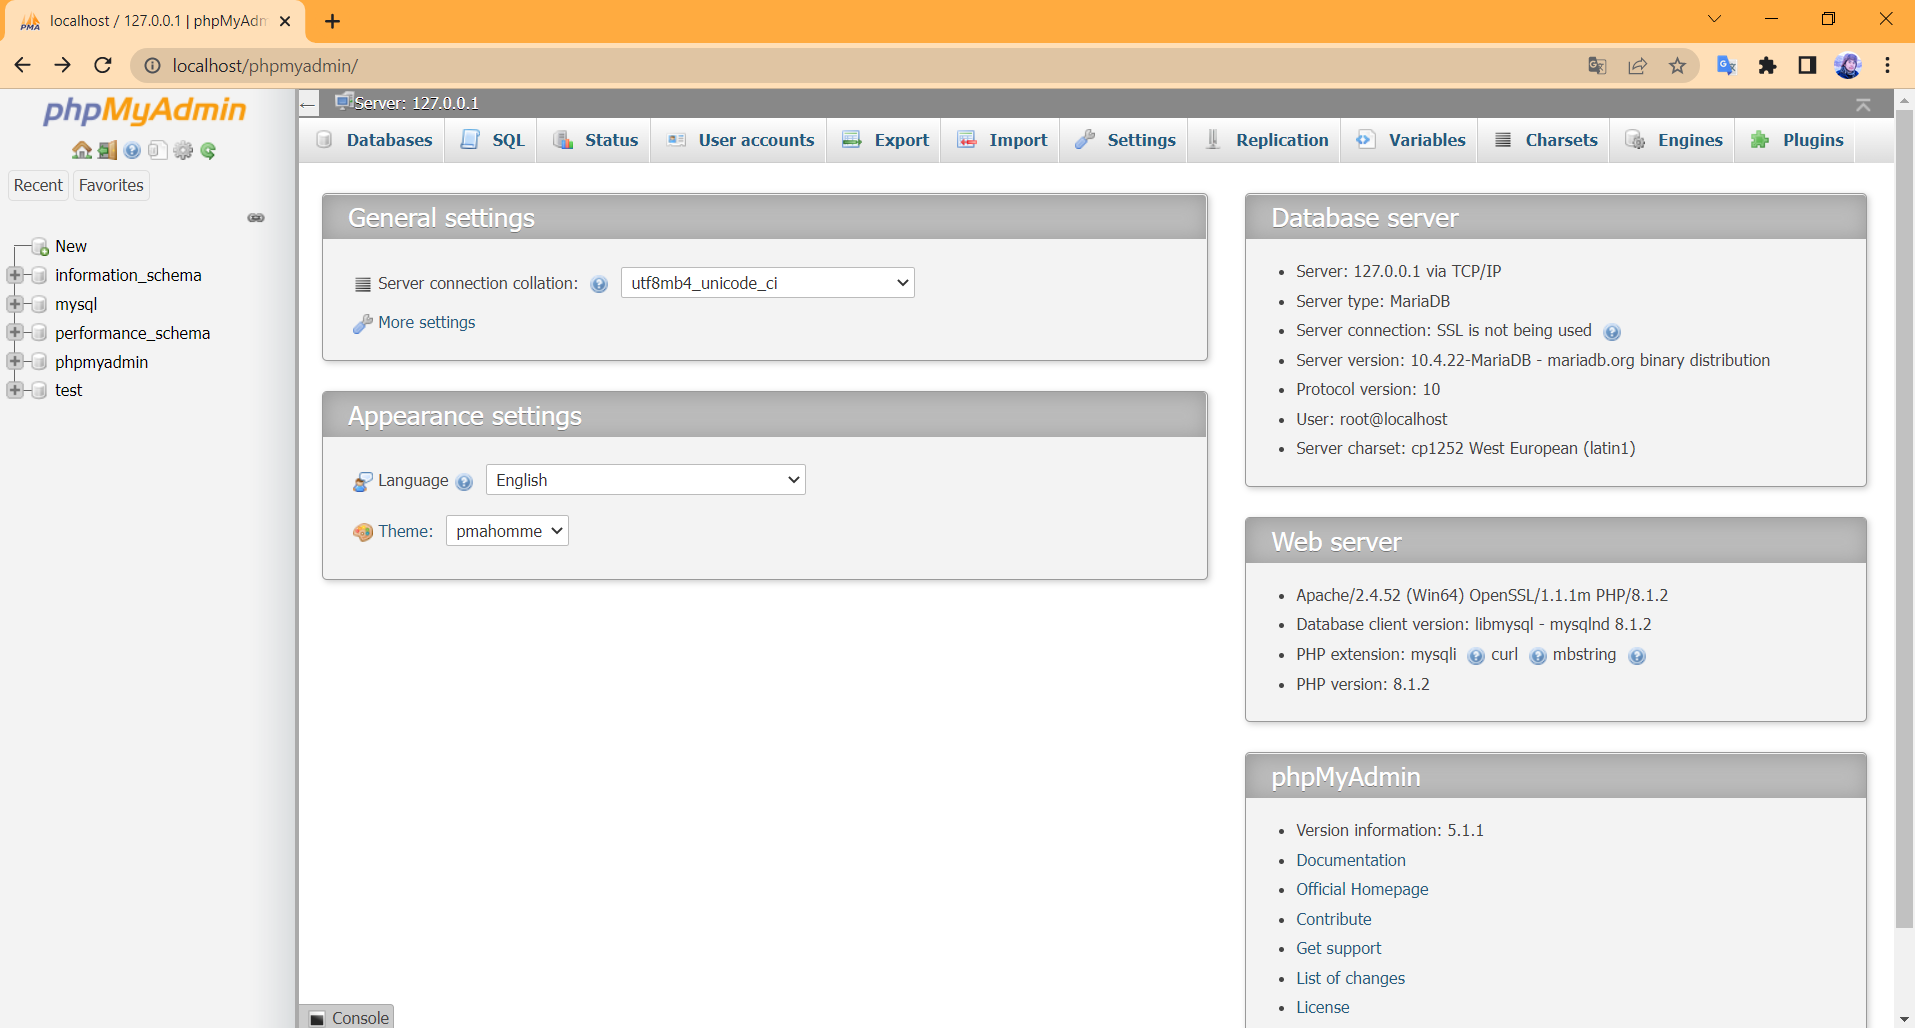
4. ให้กดที่เมนู phpMyAdmin เราจะใช้ User Interface นี้เรียนรู้การเขียนโปรแกรมใช้งาน Database พื้นฐานก่อน
3. ดาวน์โหลดไฟล์ Database ที่ใช้ beers.sql ในการเรียน
https://drive.google.com/file/d/1an9lctBKhGbkg1-fept7D720Epb2ITi3/view?usp=sharing
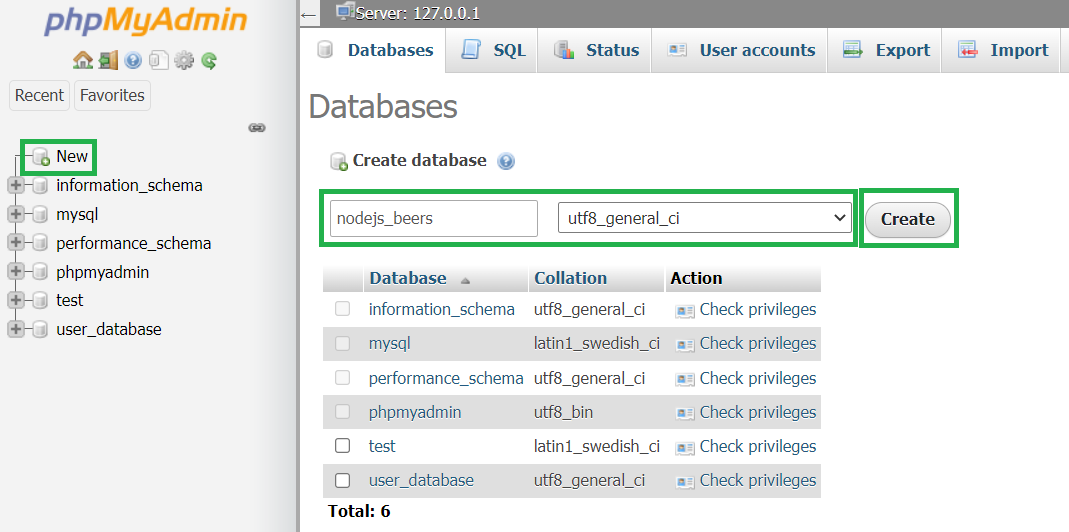
4. ทำการสร้าง Database –> New –> Create database ตั้งชื่อ nodejs_beers และ utf8_general_ci –> Create
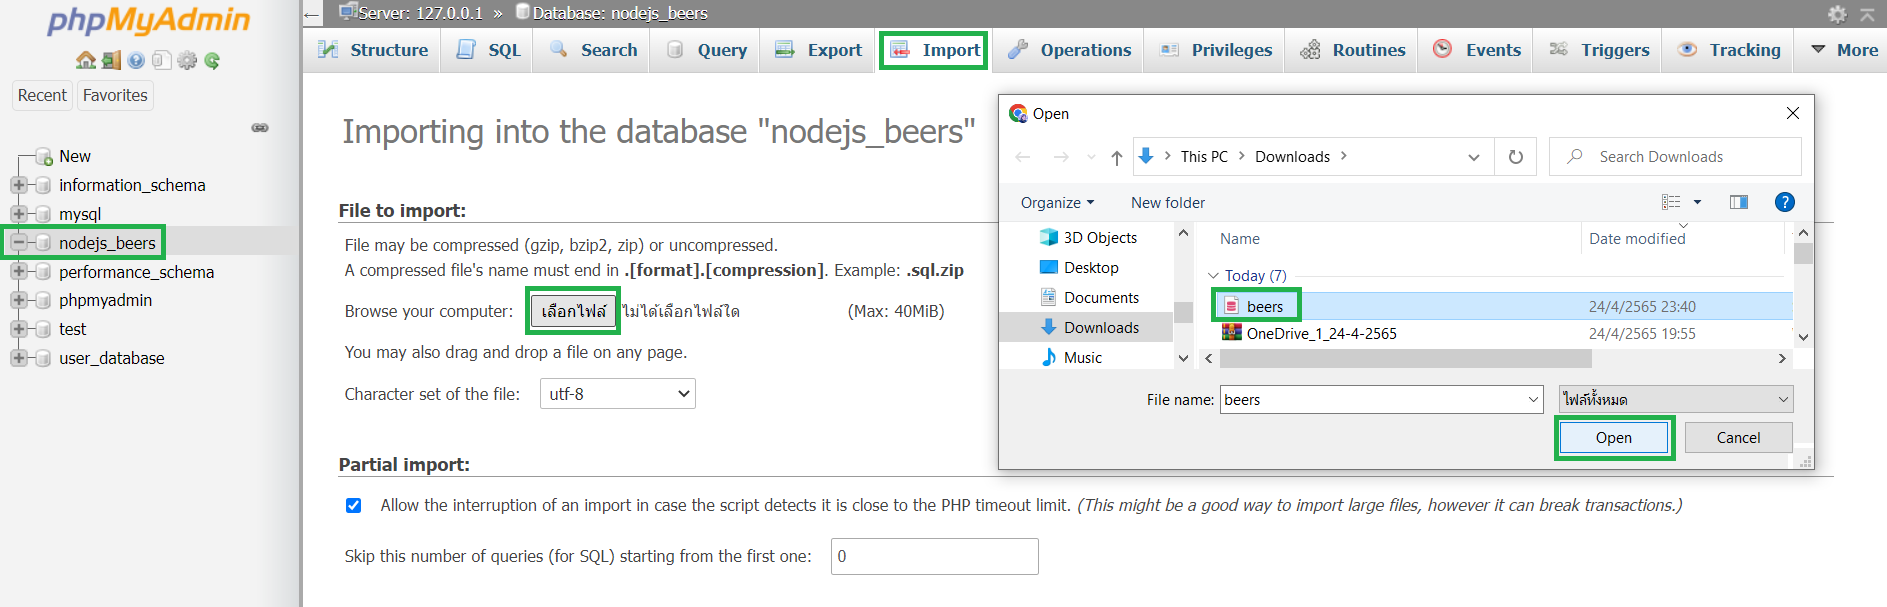
5. ทำการ Import ไฟล์ beers.sql
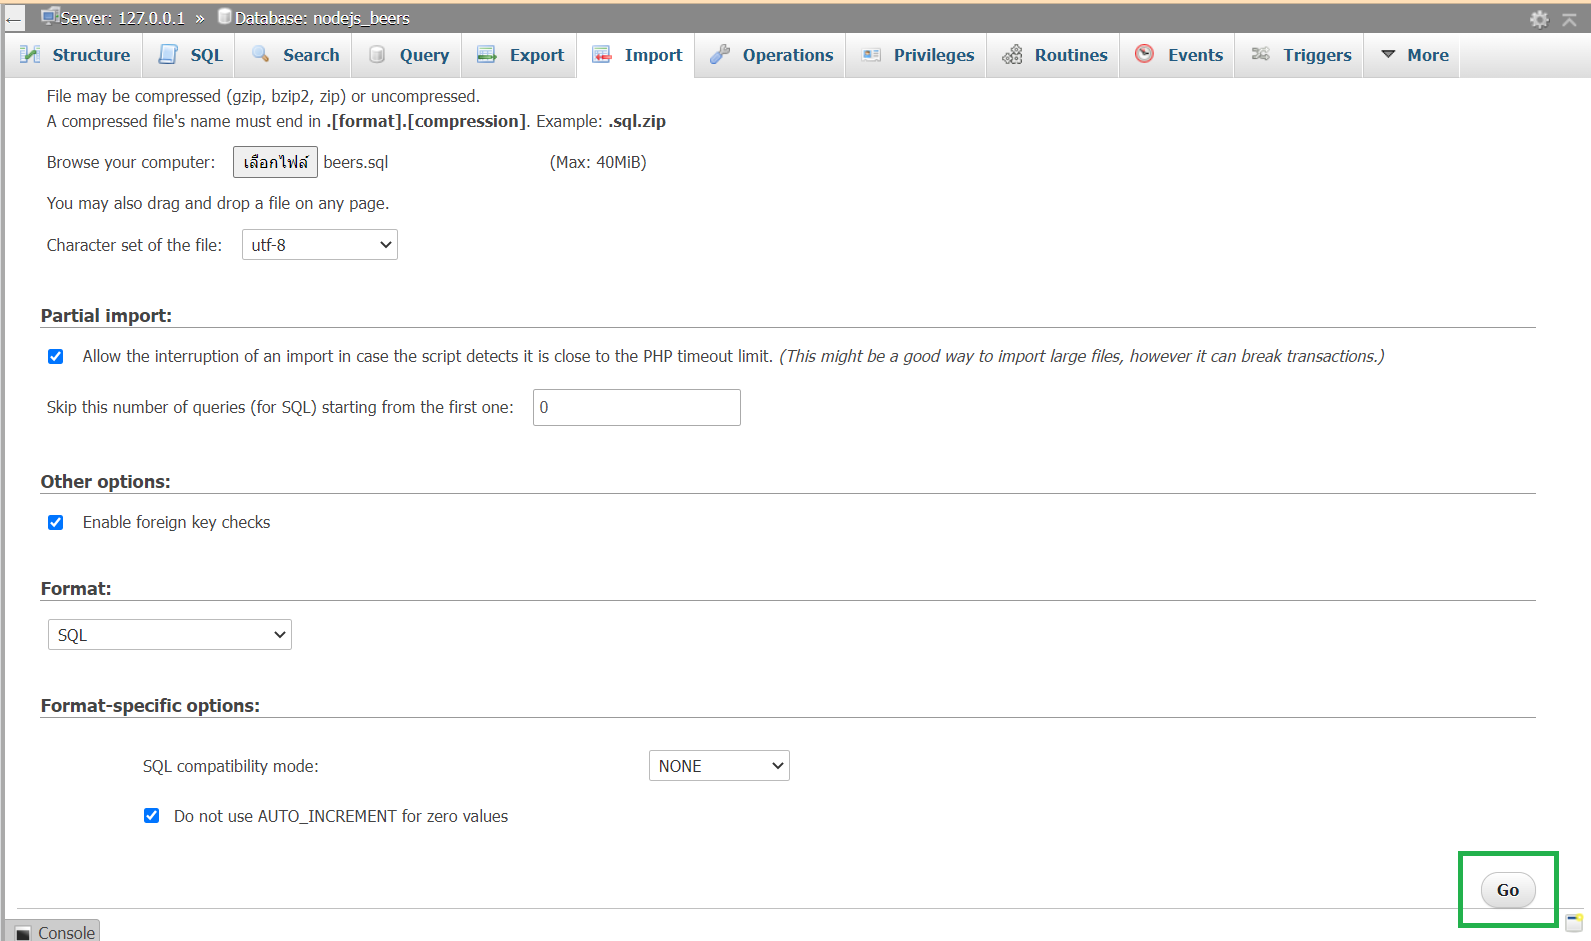
ไปที่ Import –> เลือกไฟล์ –> beers.sql –> Open –> Go

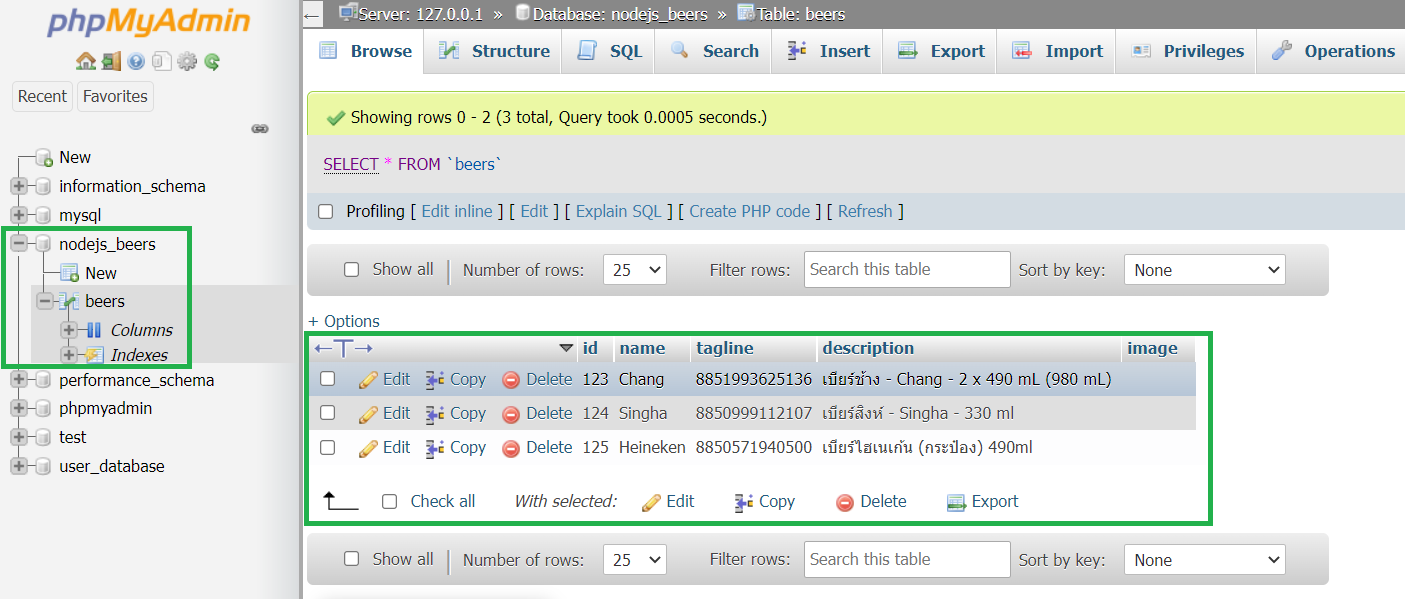
6. ได้ Database ของ beers.sql
เตรียม Meterials ฝั่ง NodeJS Web Server ก่อนเริ่มเรียน
(ถ้าทำของ Part 1 ไปแล้วสามารถข้ามขั้นตอนนี้ได้)
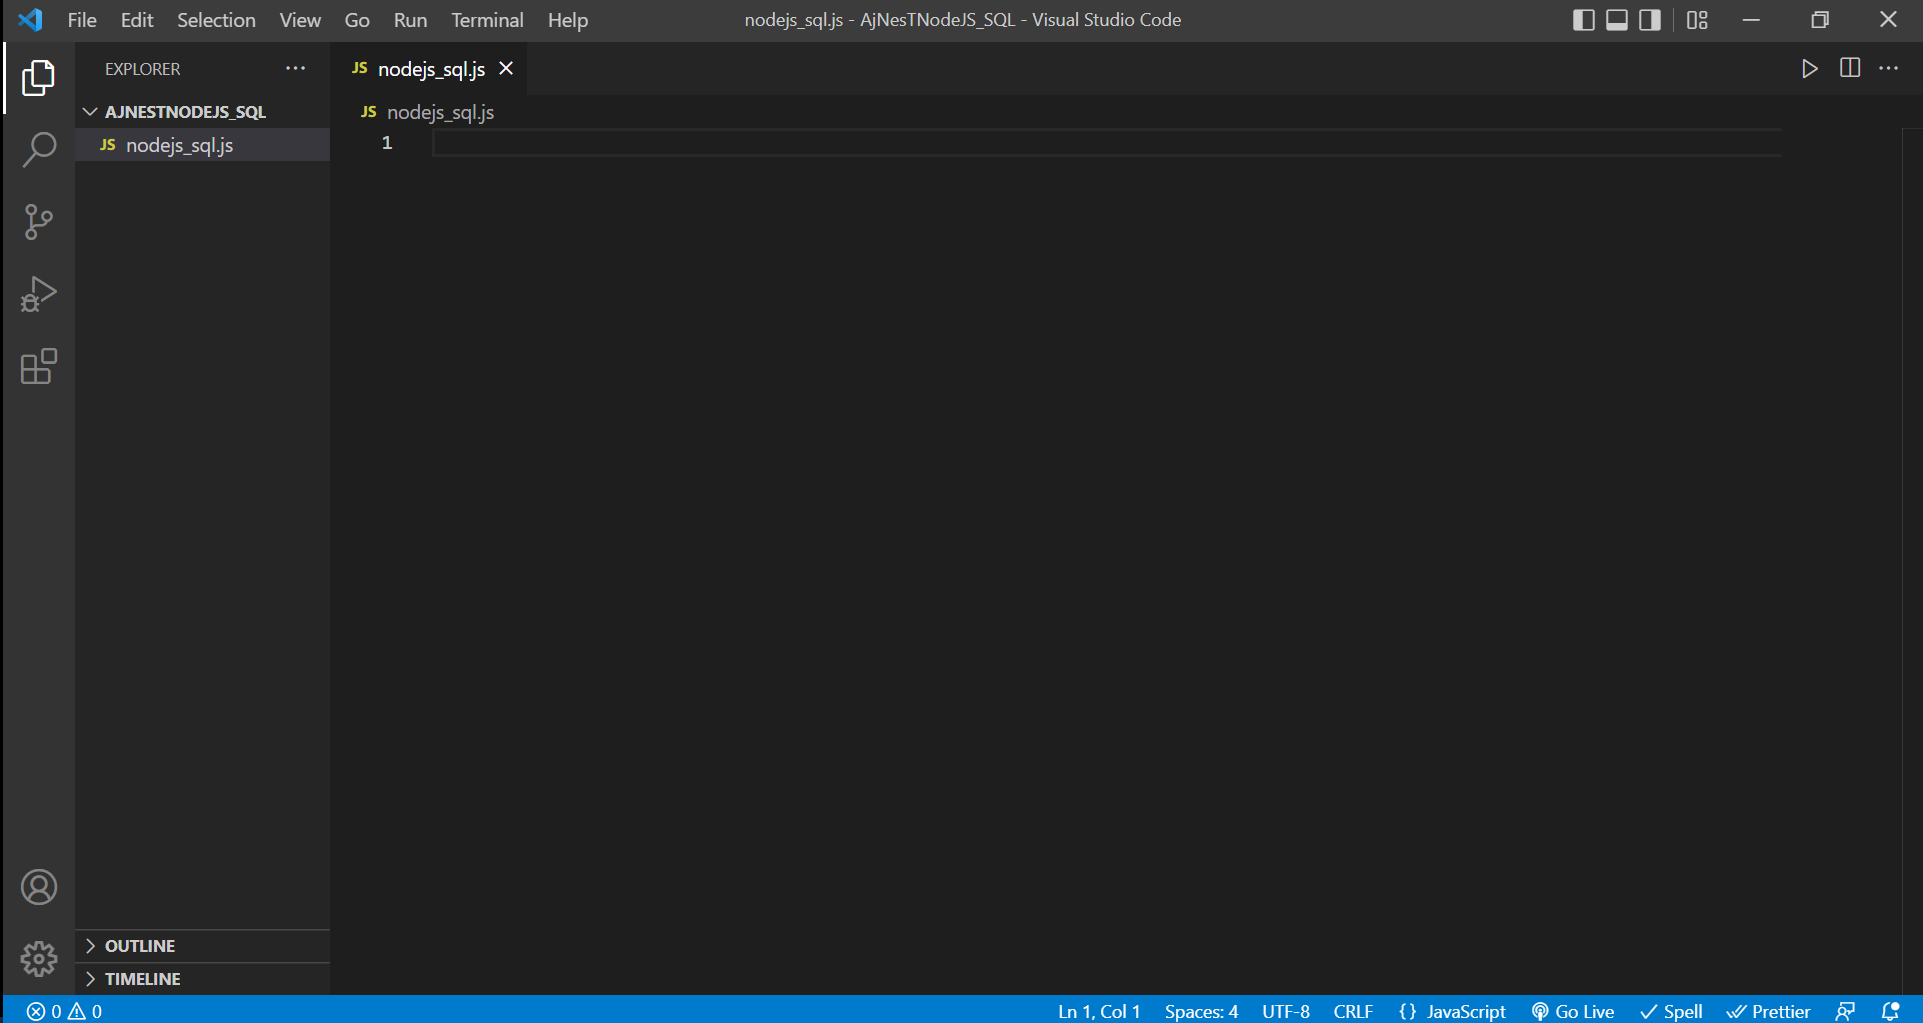
1. เปิดโปรแกรม Visual Studio Code สร้าง Folder แล้วลากเข้าใน VS Code แล้วสร้างไฟล์ชื่อ nodejs_sql.js
2. ทำให้ Project สามารถรัน NodeJS ได้
ไปที่ Terminal –> New Terminal
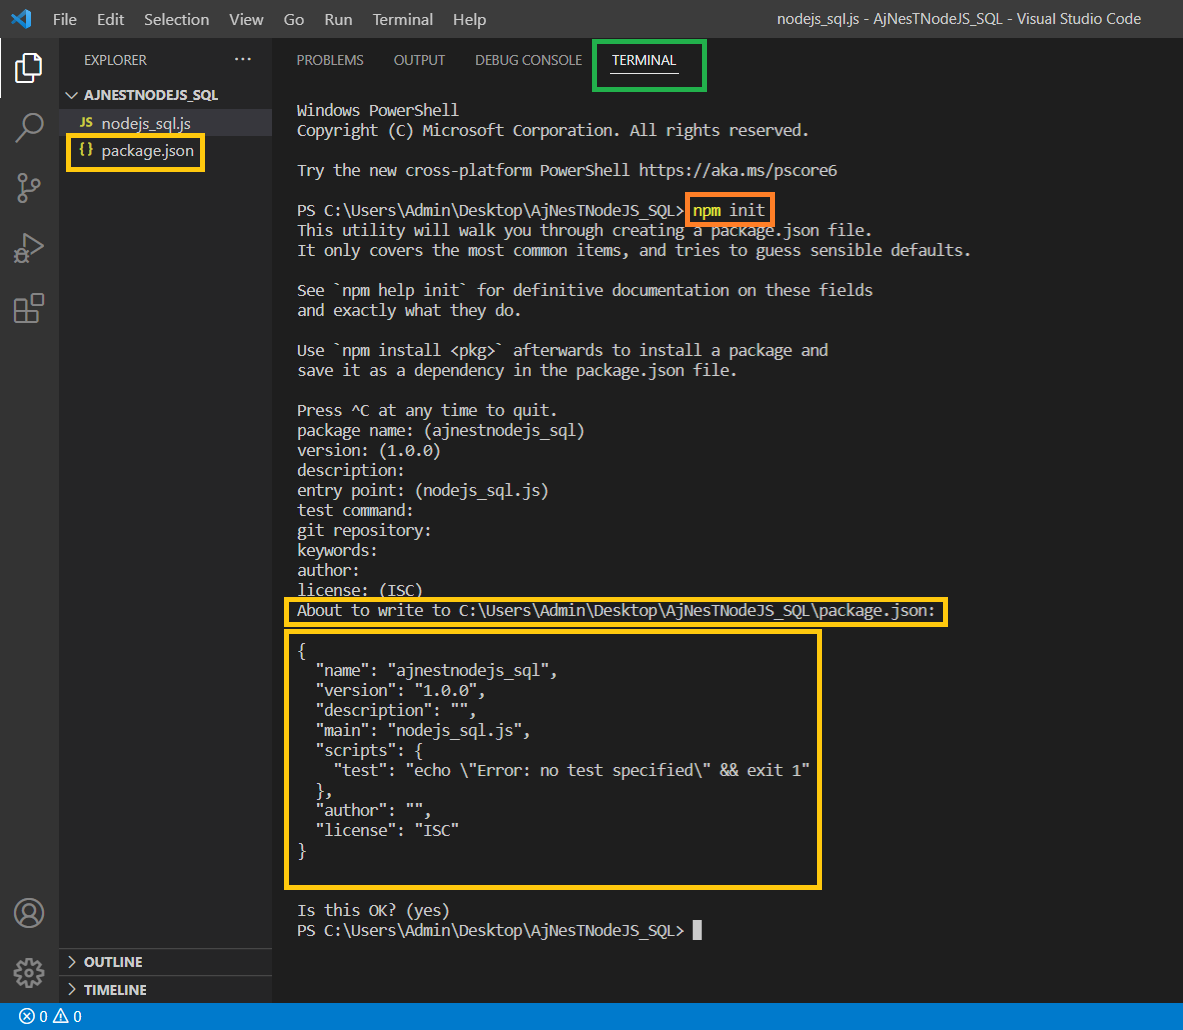
พิมพ์คำสั่ง npm init
หลังจากนั้นกด Enter ไปเรื่อย ๆ จนจบจะสร้างไฟล์ package.json ขึ้นมาให้
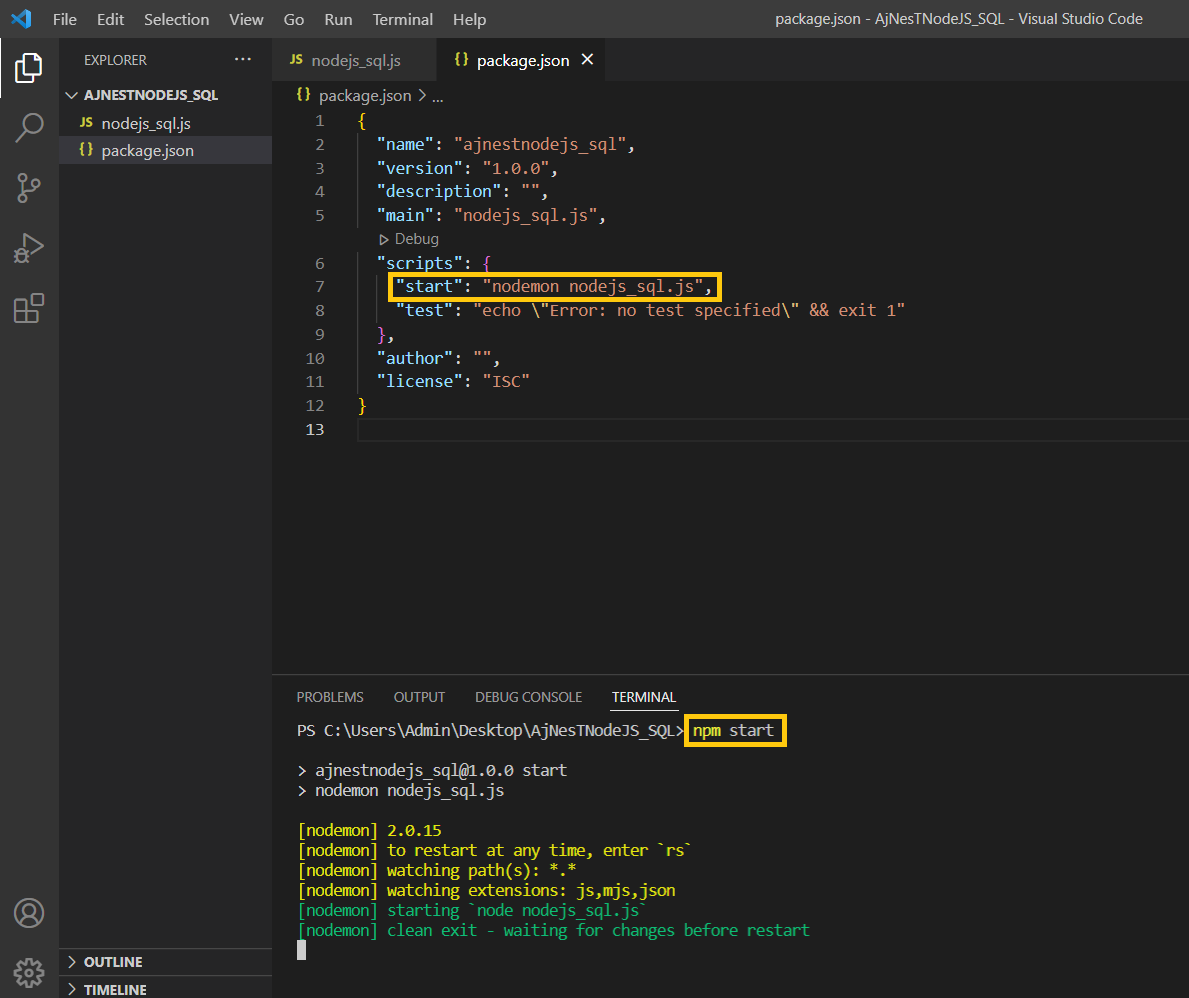
3. เปิดไฟล์ package.json เพิ่มบรรทัดที่ 7 เพื่อให้สามารถใช้งานคำสั่ง npm start เวลารัน Server จะได้สะดวกขึ้น
“start”: “nodemon nodejs_sql.js”,
Terminal พิมพ์คำสั่ง npm start จะทำการเรียกใช้งานคำสั่ง nodemon nodejs_sql.js (nodemon ชื่อไฟล์.js) เพื่อเปิด Server
กด Control + C หยุดการรัน
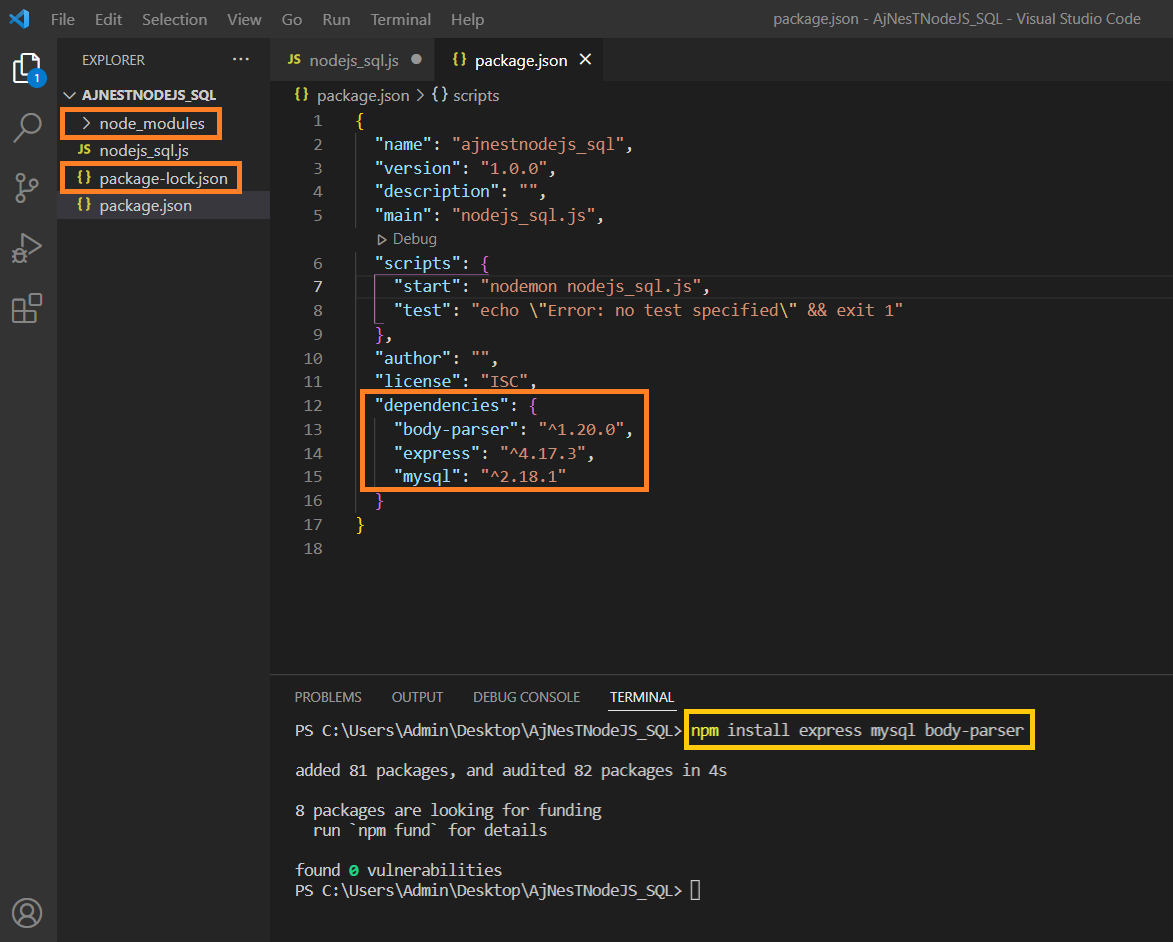
4. ติดตั้ง Express MySQL และ body-parser
ไปที่ Ternimal พิมพ์คำสั่ง npm install express mysql body-parser กด Enter
ทำการติดตั้ง Modules ต่าง ๆ ได้ไฟล์ ดังรูป
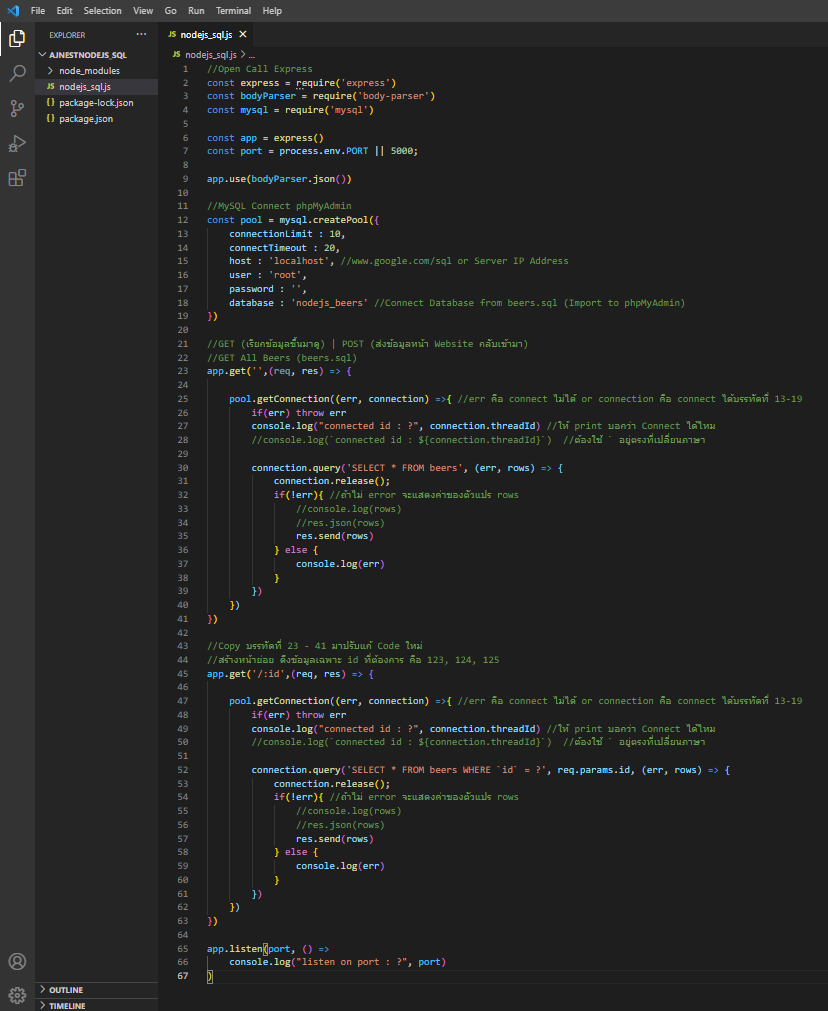
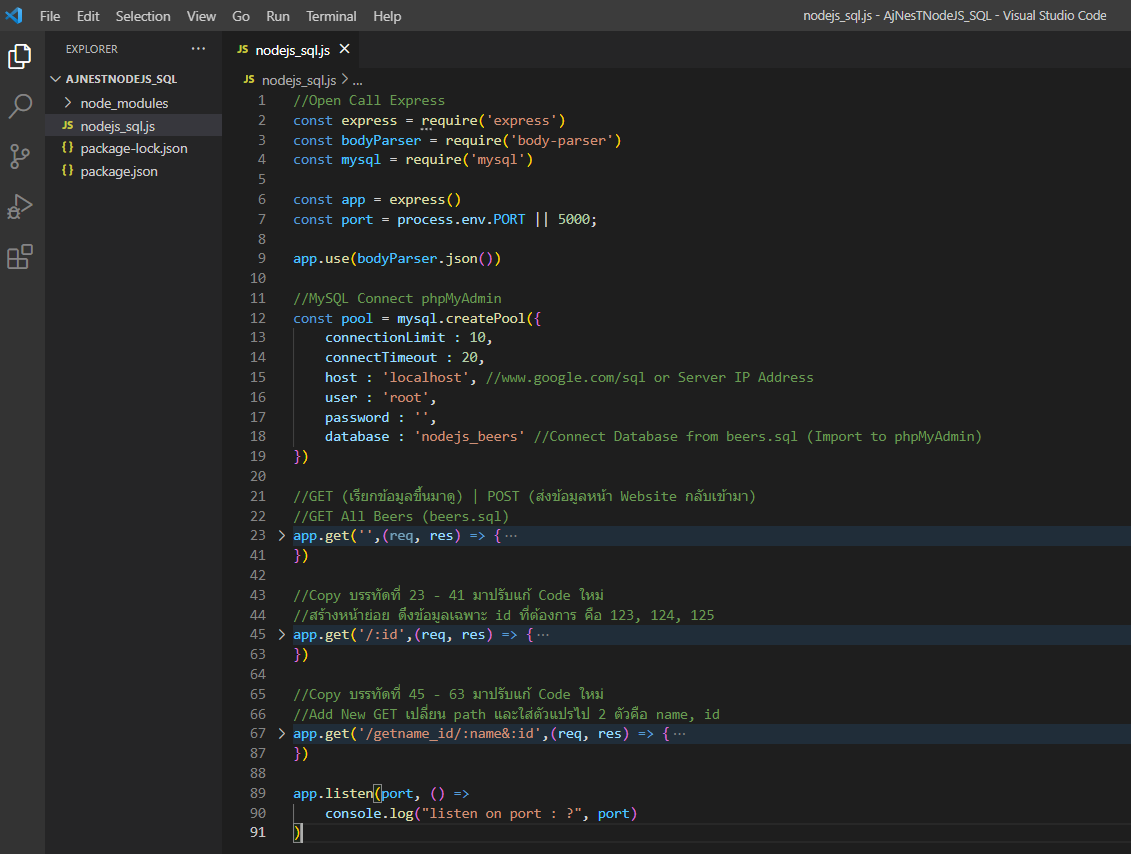
5. เขียนโปรแกรมสร้างการใช้งาน Express และการเชื่อม Database ของ MySQL (phpMyAdmin) และเรียนรู้การใช้งานคำสั่ง GET
ไฟล์ nodejs_sql.js
Download: https://drive.google.com/file/d/1JLEmcYqbKEFVJeLX0XqE0yOeaeuMw_x_/view?usp=sharing
//Open Call Express
const express = require('express')
const bodyParser = require('body-parser')

const mysql = require('mysql')

const app = express()
const port = process.env.PORT || 5000;

app.use(bodyParser.json())

//MySQL Connect phpMyAdmin
const pool = mysql.createPool({
    connectionLimit : 10,
    connectionTimeout : 20,
    host : 'localhost', //www.google.com/sql or Server IP Address
    user : 'root',
    password : '',
    database : 'nodejs_beers' //Connect Database from beers.sql (Import to phpMyAdmin)
})

//GET (เรียกข้อมูลขึ้นมาดู) | POST (ส่งข้อมูลหน้า Website กลับเข้ามา)
//GET All Beers (beers.sql)
app.get('',(req, res) => {

    pool.getConnection((err, connection) => {  //err คือ connect ไม่ได้ or connection คือ connect ได้ บรรทัดที่ 13-20
        if(err) throw err
        console.log("connected id : ?" ,connection.threadId) //ให้ print บอกว่า Connect ได้ไหม
        //console.log(`connected id : ${connection.threadId}`) //ต้องใช้ ` อยู่ตรงที่เปลี่ยนภาษา ใช้ได้ทั้ง 2 แบบ

        connection.query('SELECT * FROM beers', (err, rows) => {
            connection.release();
            if(!err){ //ถ้าไม่ error จะใส่ในตัวแปร rows
                //console.log(rows)
                //res.json(rows)
                res.send(rows)
            } else {
                console.log(err)
            }
         })
    })
})

//Copy บรรทัดที่ 24 - 42 มาปรับแก้ Code ใหม่
//สร้างหน้าย่อย ดึงข้อมูลเฉพาะ id ที่ต้องการ คือ 123, 124, 125
app.get('/:id',(req, res) => {

    pool.getConnection((err, connection) => {  //err คือ connect ไม่ได้ or connection คือ connect ได้ บรรทัดที่ 13-20
        if(err) throw err
        console.log("connected id : ?" ,connection.threadId) //ให้ print บอกว่า Connect ได้ไหม
        //console.log(`connected id : ${connection.threadId}`) //ต้องใช้ ` อยู่ตรงที่เปลี่ยนภาษา ใช้ได้ทั้ง 2 แบบ

        connection.query('SELECT * FROM beers WHERE `id` = ?', req.params.id, (err, rows) => {
            connection.release();
            if(!err){ //ถ้าไม่ error จะใส่ในตัวแปร rows
                res.send(rows)
            } else {
                console.log(err)
            }
         })
    })
})

app.listen(port, () =>
    console.log("listen on port : ?", port)
    )
5. เปิด Terminal พิมพ์คำสั่ง npm start ทดสอบการรันผล
เปิด Web Browser พิมพ์ http://localhost:5000/ ทดสอบการส่งข้อมูล

Web Browser พิมพ์ http://localhost:5000/123 ทดสอบการส่งข้อมูล ลองเปลี่ยนเป็น 124, 125

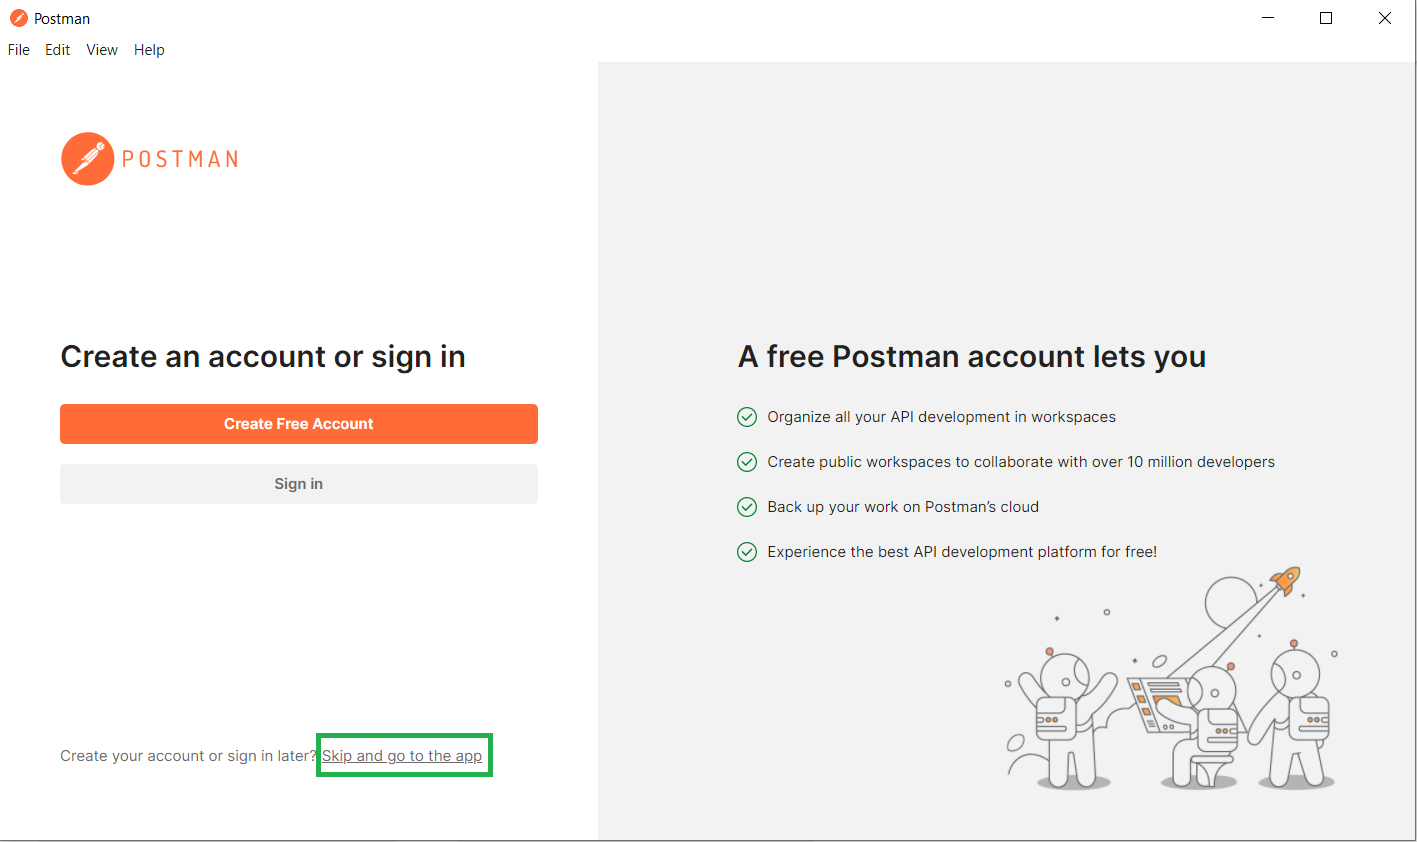
6. ทดสอบผ่านโปรแกรม Postman API สำหรับ Web Developre
ให้ทำการดาวน์โหลดโปรแกรม https://www.postman.com/downloads/
กด Skip and go to the app
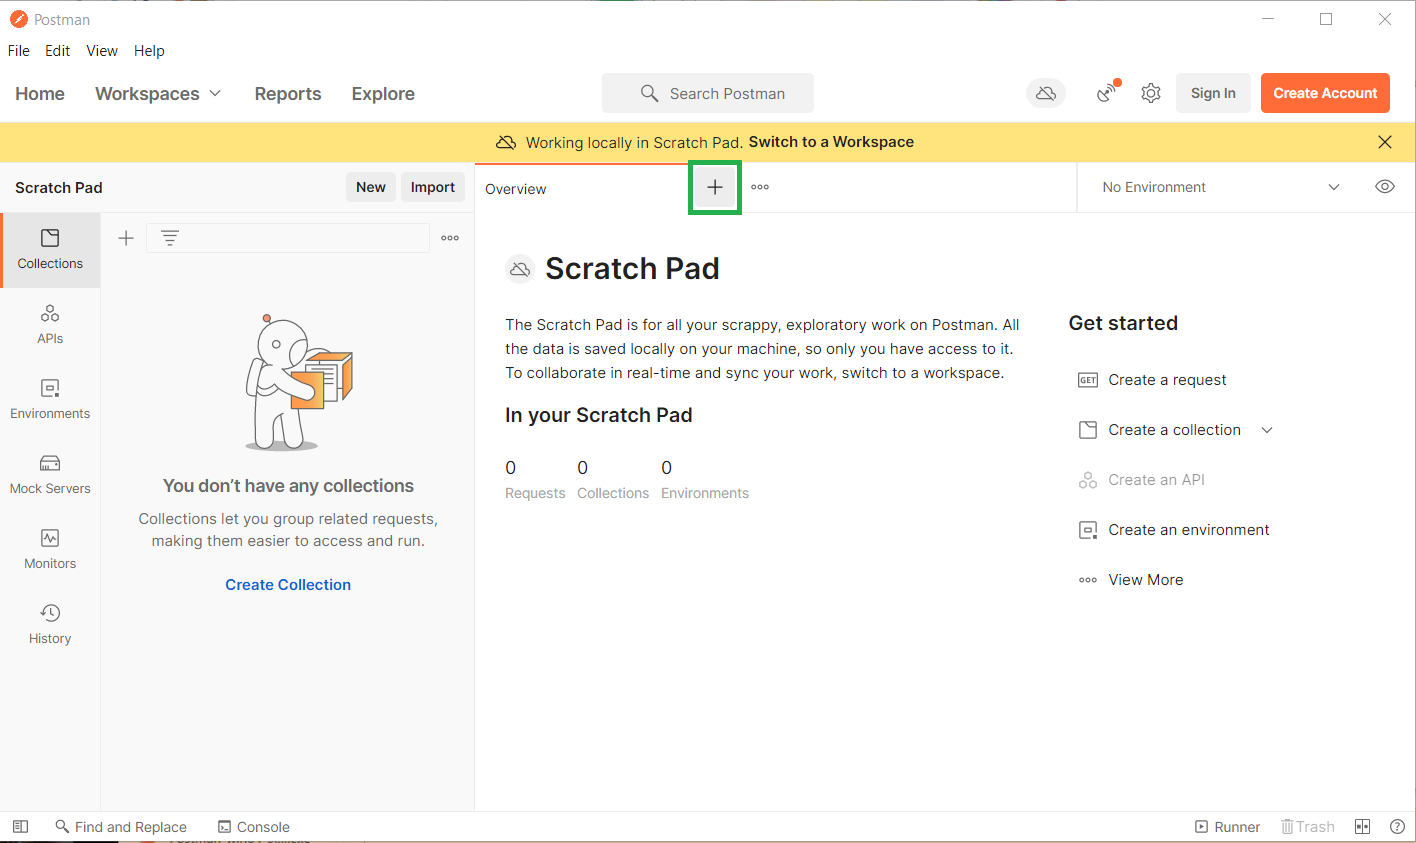
กด +
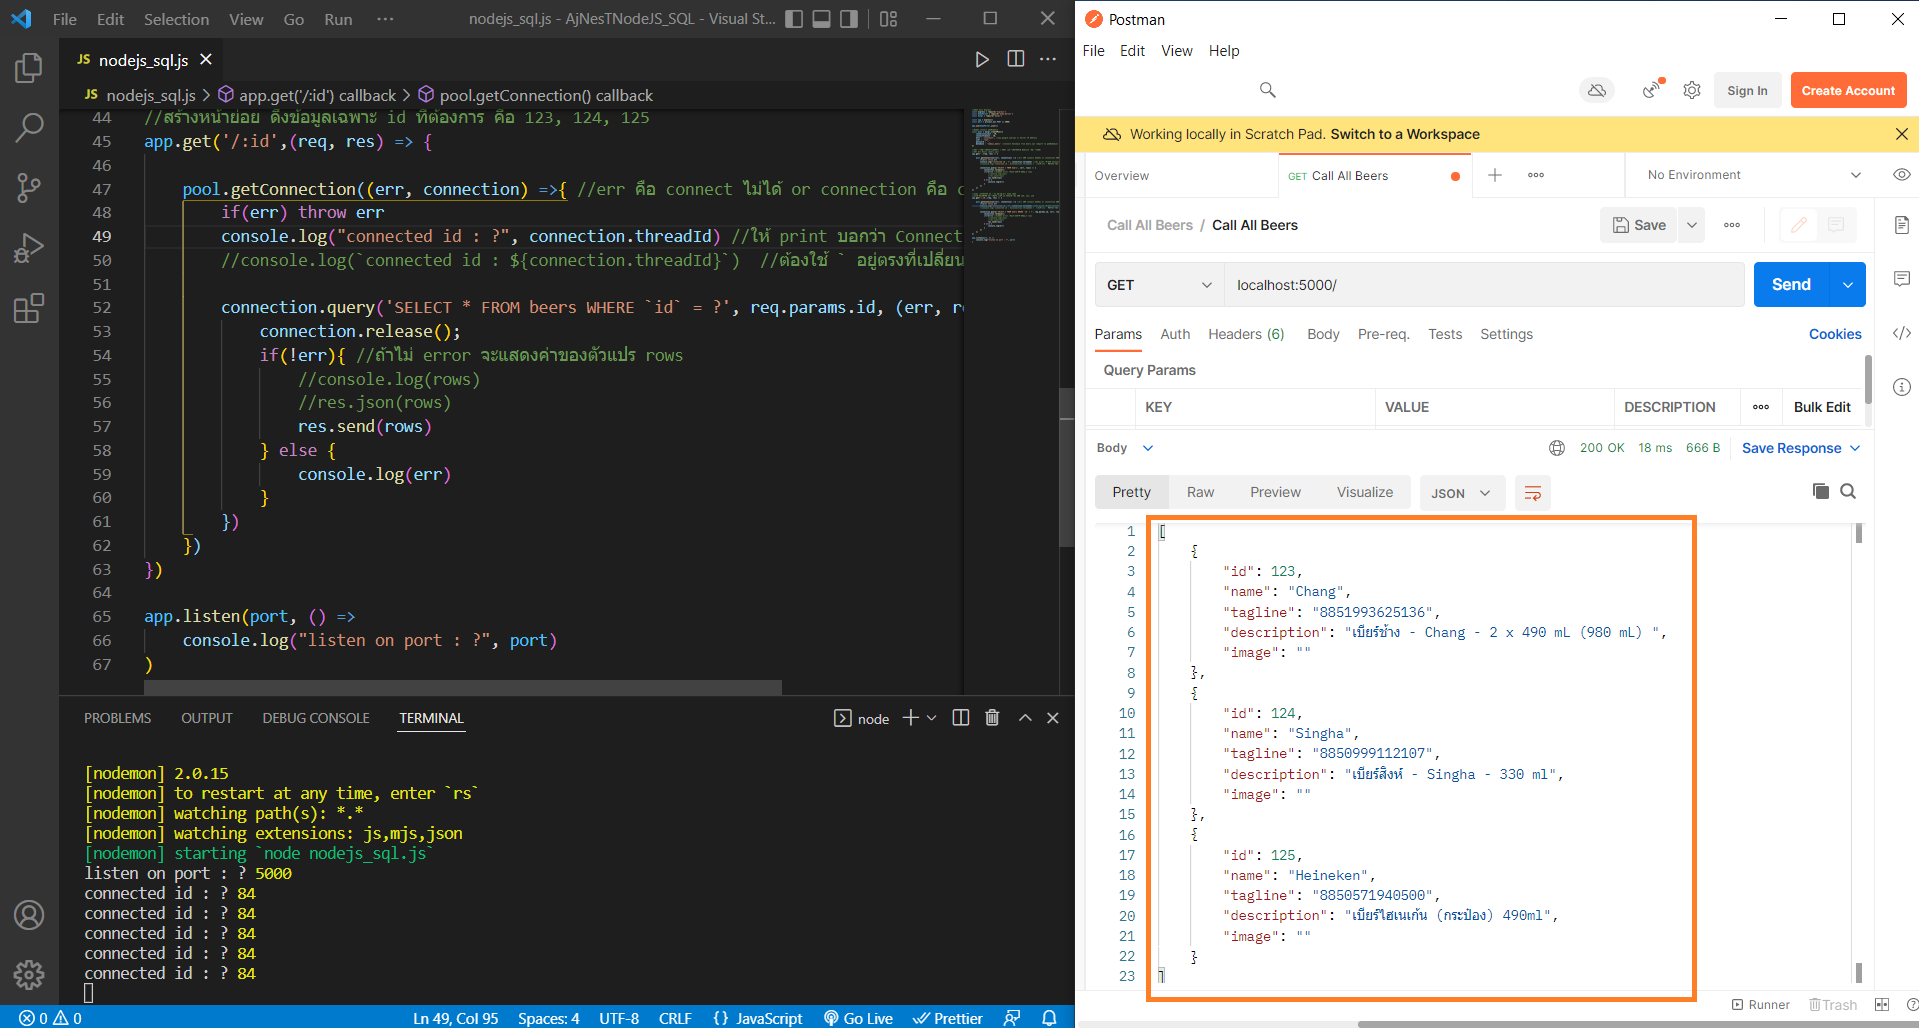
ทำการทดสอบ GET: localhost:5000/ –> กด Send
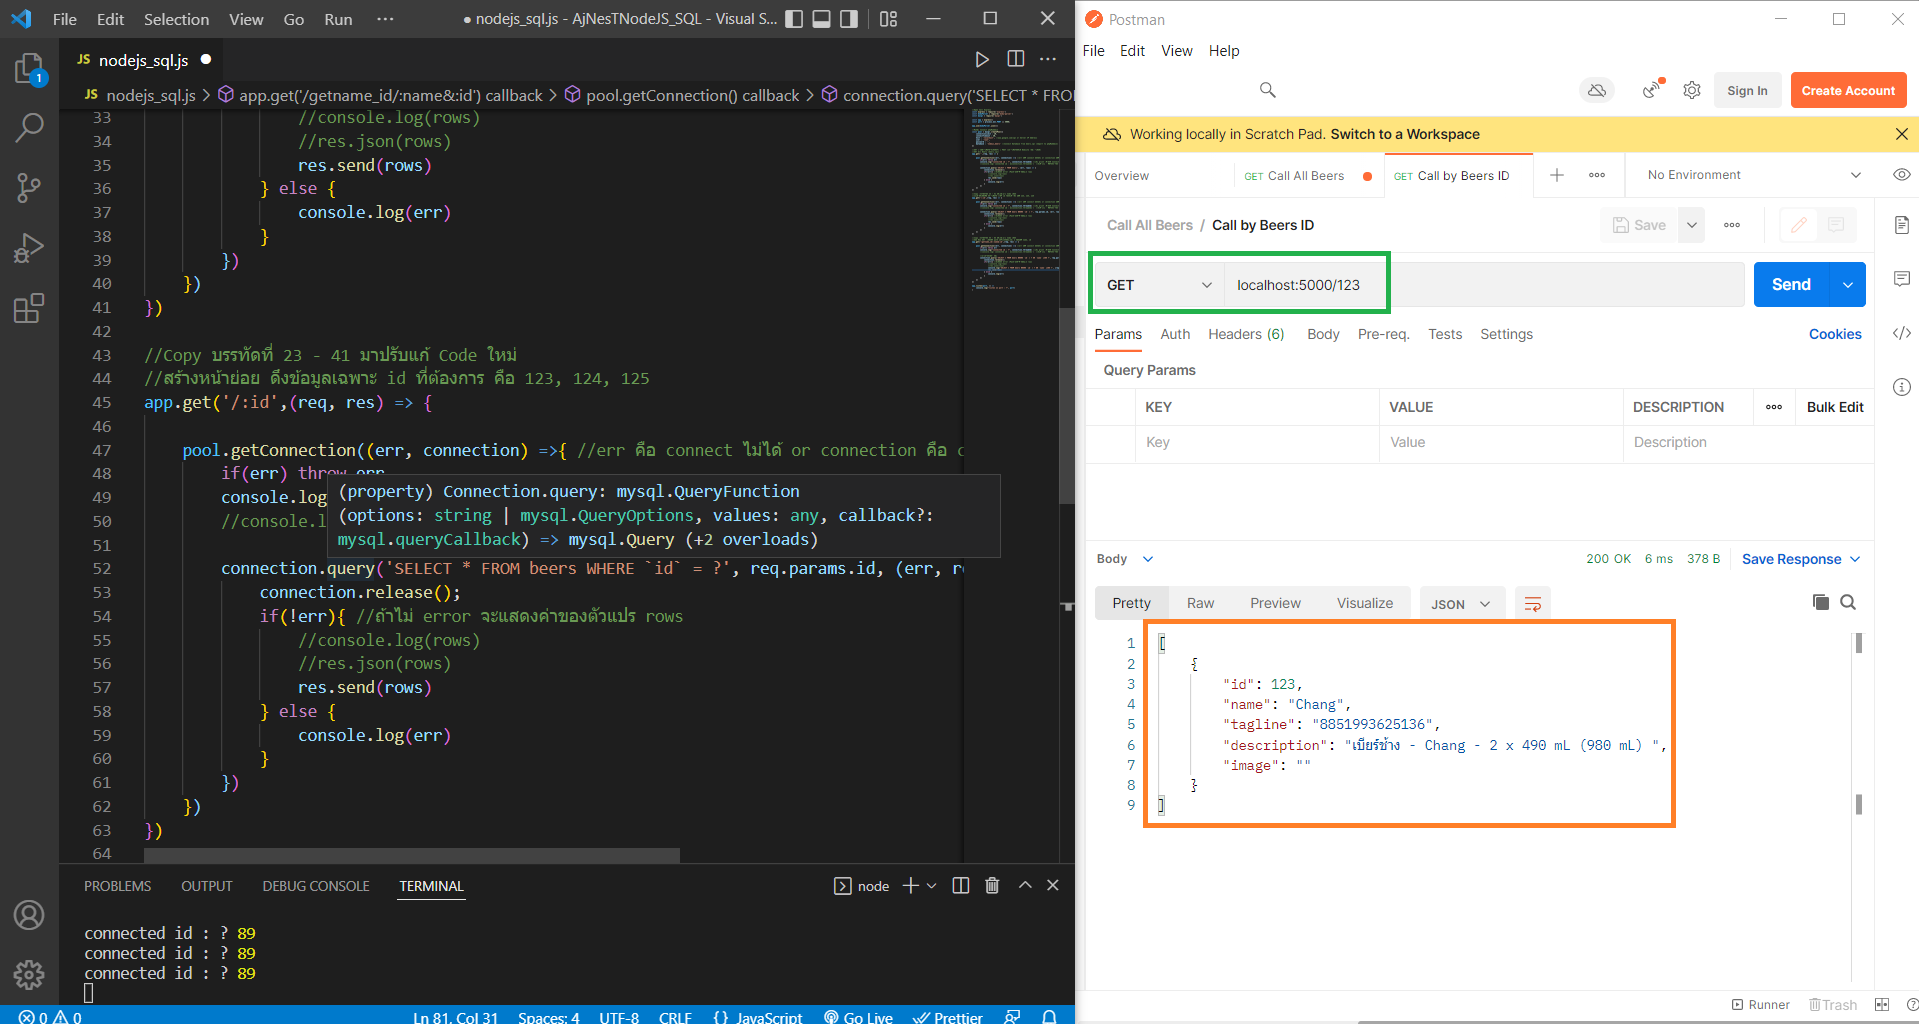
ทำการทดสอบ GET: localhost:5000/ 123 ลองเปลี่ยนเป็น 124, 125 –> กด Send
2. สร้าง Back-End NodeJS เชื่อมต่อฐานข้อมูล SQL
เรียนรู้การใช้งานคำสั่ง GET (ต่อจาก EP.1)
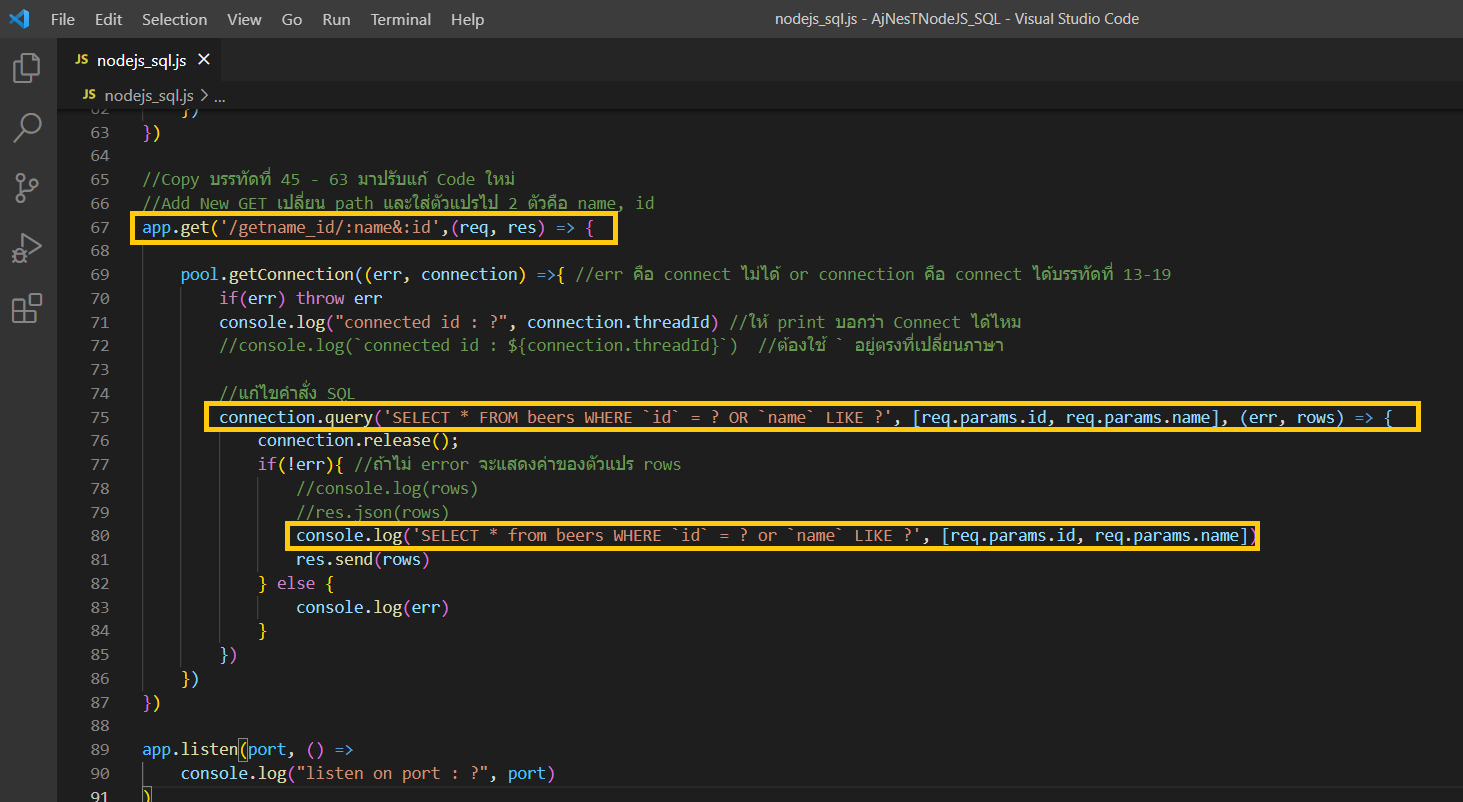
19. เพิ่มเติมจาก Part 1 เขียนคำสั่ง GET เพิ่มอีก 1 คำสั่ง ใช้ Path ‘/getname_id/:name&:id’ แสดง Parameters
//Copy บรรทัดที่ 45 - 63 มาปรับแก้ Code ใหม่
//Add New GET เปลี่ยน path และใส่ตัวแปรไป 2 ตัวคือ name, id
app.get('/getname_id/:name&:id',(req, res) => {

    pool.getConnection((err, connection) =>{ //err คือ connect ไม่ได้ or connection คือ connect ได้บรรทัดที่ 13-19
        if(err) throw err
        console.log("connected id : ?", connection.threadId) //ให้ print บอกว่า Connect ได้ไหม
        //console.log(`connected id : ${connection.threadId}`)  //ต้องใช้ ` อยู่ตรงที่เปลี่ยนภาษา

        //แก้ไขคำสั่ง SQL
        connection.query('SELECT * FROM beers WHERE `id` = ? OR `name` LIKE ?', [req.params.id, req.params.name], (err, rows) => {
            connection.release();
            if(!err){ //ถ้าไม่ error จะแสดงค่าของตัวแปร rows
                //console.log(rows)
                //res.json(rows)
                console.log('SELECT * from beers WHERE `id` = ? or `name` LIKE ?', [req.params.id, req.params.name])
                res.send(rows)
            } else {
                console.log(err)
            }
        })
    })
})
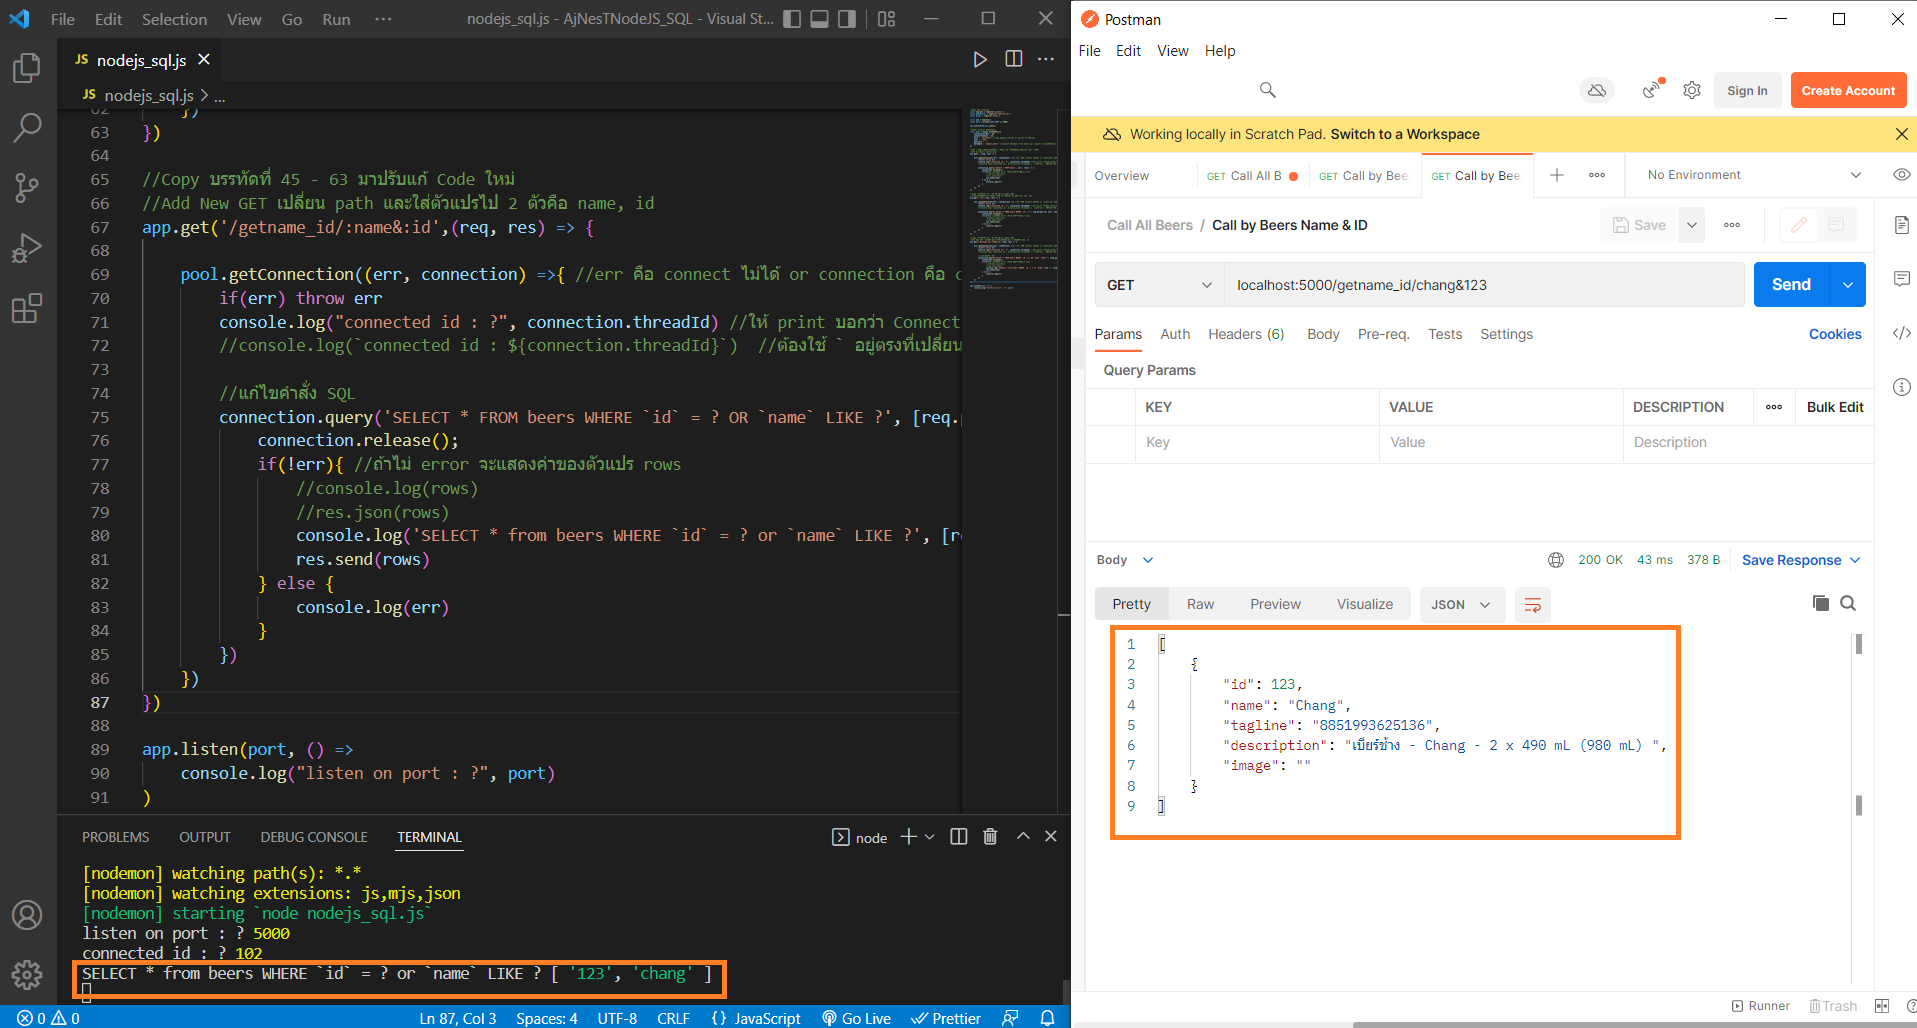
20. ทดลองแสดงผลผ่าน Postman GET: พิมพ์ localhost:5000/getname_id/chang&123
กด + เปิดหน้าใหม่
Save as ตั้งชื่อ Call by Beers Name & ID
เลือก GET: localhost:5000/getname_id/change&123
กด Send
จะดึงข้อมูลของ Database ออกมาแสดง
3. สร้าง Back-End NodeJS เชื่อมต่อฐานข้อมูล SQL
เรียนรู้การใช้งานคำสั่ง POST
1. เริ่มต้นไฟล์สำหรับใช้เขียนโปรแกรมสร้างการใช้งาน Express และการเชื่อม Database ของ MySQL (phpMyAdmin) ด้วยคำสั่ง POST (คำสั่ง GET ได้ Hide ไว้เฉย ๆ สามารถกดลูกศรเปิดได้ ทำเพื่อให้เห็นภาพโครงสร้างการเขียนโปรแกรมง่ายขึ้น)
ไฟล์ nodejs_sql.js เริ่มต้น
//Open Call Express
const express = require('express')
const bodyParser = require('body-parser')
const mysql = require('mysql')

const app = express()
const port = process.env.PORT || 5000;

app.use(bodyParser.json())

//MySQL Connect phpMyAdmin
const pool = mysql.createPool({
    connectionLimit : 10,
    connectTimeout : 20,
    host : 'localhost', //www.google.com/sql or Server IP Address
    user : 'root',
    password : '',
    database : 'nodejs_beers' //Connect Database from beers.sql (Import to phpMyAdmin)
})

//GET (เรียกข้อมูลขึ้นมาดู) | POST (ส่งข้อมูลหน้า Website กลับเข้ามา)
//GET All Beers (beers.sql)
app.get('',(req, res) => {

    pool.getConnection((err, connection) =>{ //err คือ connect ไม่ได้ or connection คือ connect ได้บรรทัดที่ 13-19
        if(err) throw err
        console.log("connected id : ?", connection.threadId) //ให้ print บอกว่า Connect ได้ไหม
        //console.log(`connected id : ${connection.threadId}`)  //ต้องใช้ ` อยู่ตรงที่เปลี่ยนภาษา

        connection.query('SELECT * FROM beers', (err, rows) => {
            connection.release();
            if(!err){ //ถ้าไม่ error จะแสดงค่าของตัวแปร rows
                //console.log(rows)
                //res.json(rows)
                res.send(rows)
            } else {
                console.log(err)
            }
        })
    })
})

//Copy บรรทัดที่ 23 - 41 มาปรับแก้ Code ใหม่
//สร้างหน้าย่อย ดึงข้อมูลเฉพาะ id ที่ต้องการ คือ 123, 124, 125
app.get('/:id',(req, res) => {

    pool.getConnection((err, connection) =>{ //err คือ connect ไม่ได้ or connection คือ connect ได้บรรทัดที่ 13-19
        if(err) throw err
        console.log("connected id : ?", connection.threadId) //ให้ print บอกว่า Connect ได้ไหม
        //console.log(`connected id : ${connection.threadId}`)  //ต้องใช้ ` อยู่ตรงที่เปลี่ยนภาษา

        connection.query('SELECT * FROM beers WHERE `id` = ?', req.params.id, (err, rows) => {
            connection.release();
            if(!err){ //ถ้าไม่ error จะแสดงค่าของตัวแปร rows
                //console.log(rows)
                //res.json(rows)
                res.send(rows)
            } else {
                console.log(err)
            }
        })
    })
})

//Copy บรรทัดที่ 45 - 63 มาปรับแก้ Code ใหม่
//Add New GET เปลี่ยน path และใส่ตัวแปรไป 2 ตัวคือ name, id
app.get('/getname_id/:name&:id',(req, res) => {

    pool.getConnection((err, connection) =>{ //err คือ connect ไม่ได้ or connection คือ connect ได้บรรทัดที่ 13-19
        if(err) throw err
        console.log("connected id : ?", connection.threadId) //ให้ print บอกว่า Connect ได้ไหม
        //console.log(`connected id : ${connection.threadId}`)  //ต้องใช้ ` อยู่ตรงที่เปลี่ยนภาษา

        //แก้ไขคำสั่ง SQL
        connection.query('SELECT * FROM beers WHERE `id` = ? OR `name` LIKE ?', [req.params.id, req.params.name], (err, rows) => {
            connection.release();
            if(!err){ //ถ้าไม่ error จะแสดงค่าของตัวแปร rows
                //console.log(rows)
                //res.json(rows)
                console.log('SELECT * from beers WHERE `id` = ? or `name` LIKE ?', [req.params.id, req.params.name])
                res.send(rows)
            } else {
                console.log(err)
            }
        })
    })
})

app.listen(port, () =>
    console.log("listen on port : ?", port)
)
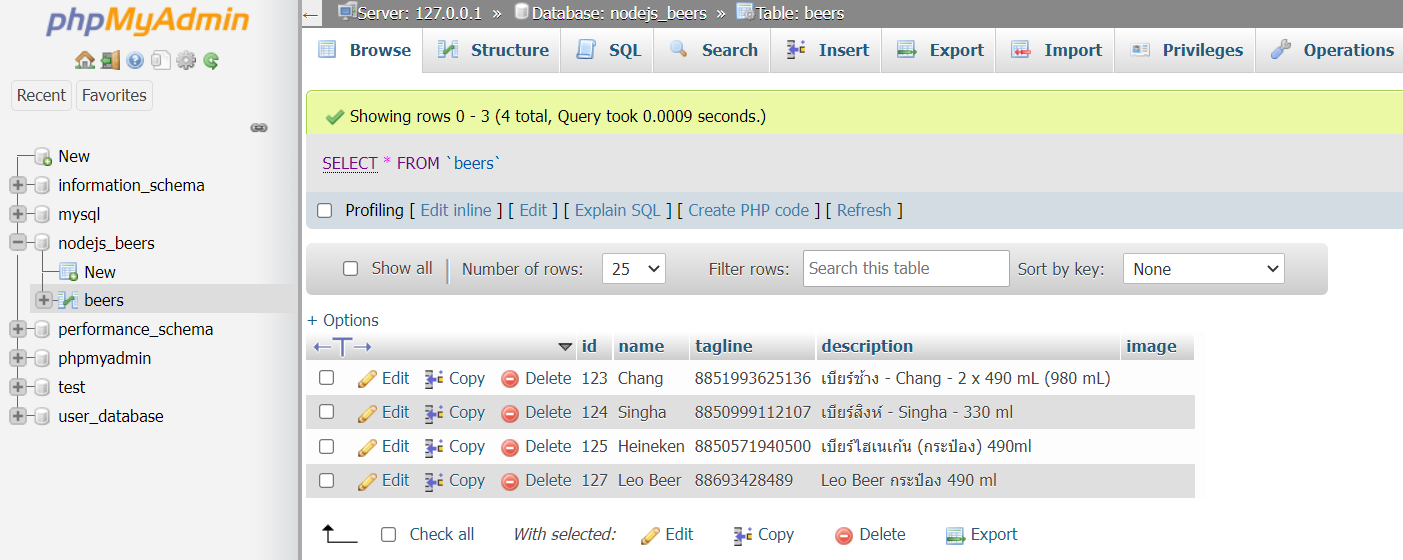
2. เปิด MySQL phpMyAdmin ไปที่ Database: nodejs_beers –> Table: beers
ไปที่ Browse ดูข้อมูลที่ import เข้ามา

ไปที่ Structure เรียนรู้เรื่องของข้อมูล
id ติ๊ก AUTO_INCREMENT (A.I.) จะรันตัวเลข Index ขึ้นมาอัตโนมัติ เริ่มต้นที่ 1 2 3 4 … หรือต่อจากลำดับล่าสุด

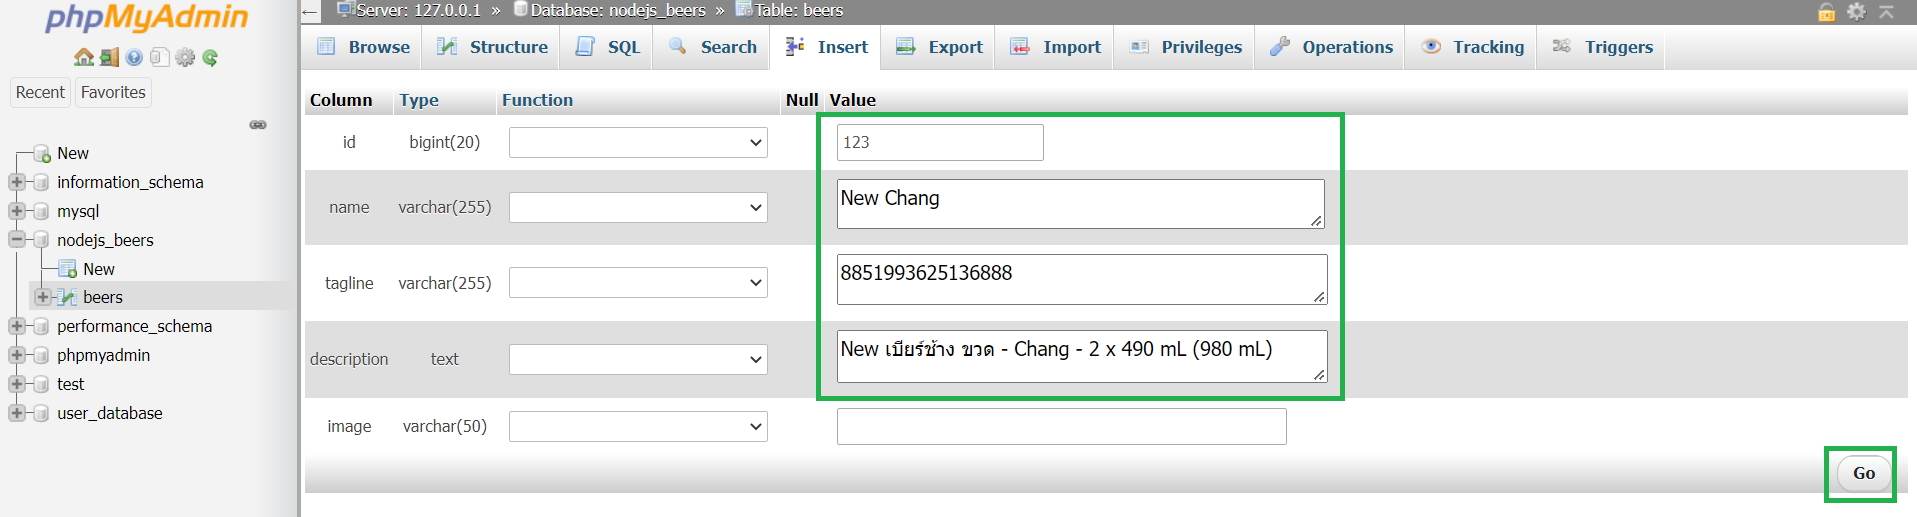
3. ไปที่ Insert ใส่ข้อมูลเพิ่มเติม id ไม่ต้องใส่ เพราะใช้ AUTO_INCREMENT หรือถ้าต้องการระบุก็ใส่ได้ กด Go
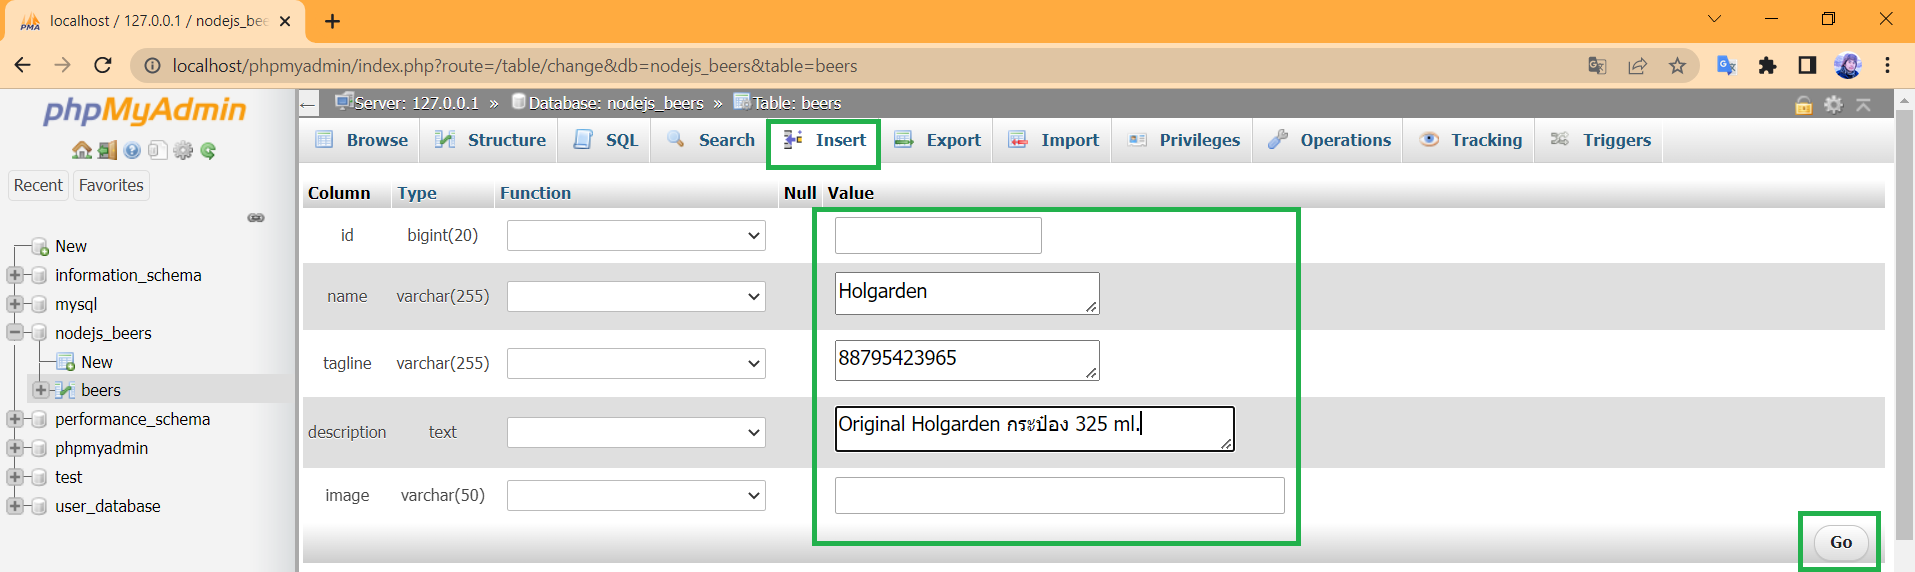
ได้ SQL Code สามารถนำมาใช้สำหรับเขียนโปรแกรมฝั่ง Back-End NodeJS Express เข้า Database ได้
INSERT INTO `beers` (`id`, `name`, `tagline`, `description`, `image`) VALUES (NULL, ‘Holgarden’, ‘88795423965’, ‘Original Holgarden กระป๋อง 325 ml.’, ”);

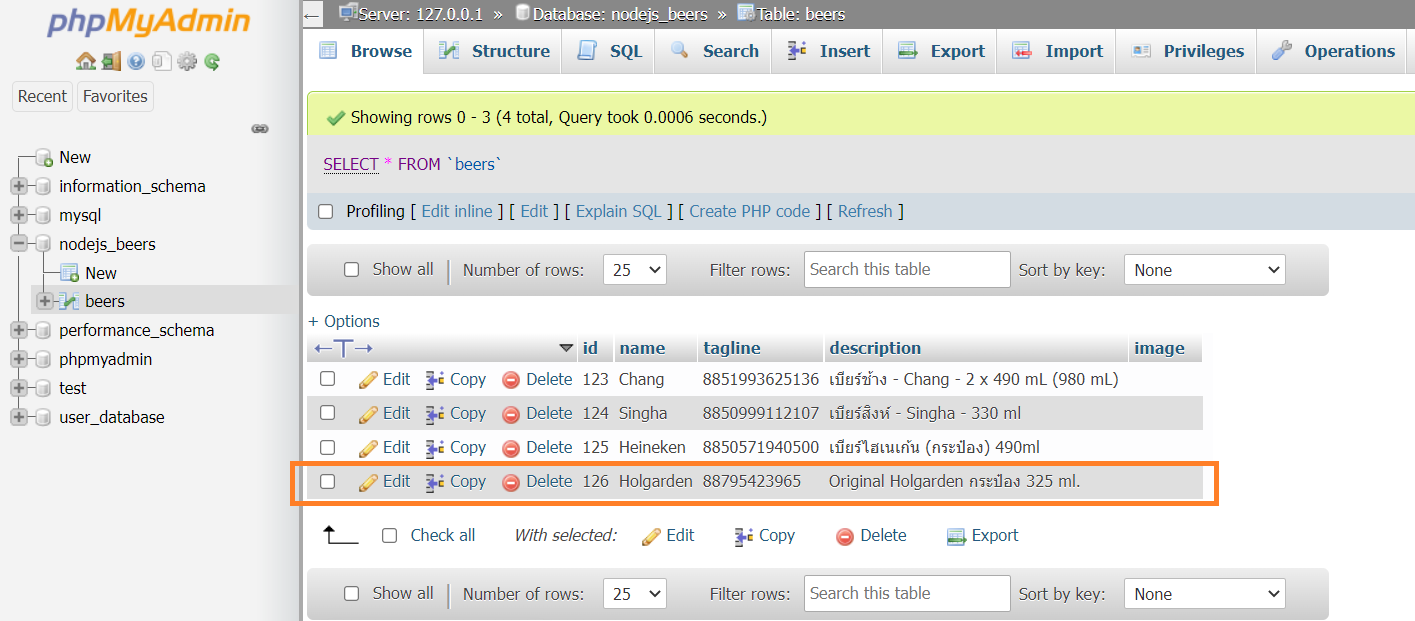
4. Database จะได้รายการข้อมูลเพิ่มเติมบันทึกเข้ามาแล้ว
5. เขียนโปรแกรมคำสั่ง POST ทำการ INSERT ข้อมูลลง Database
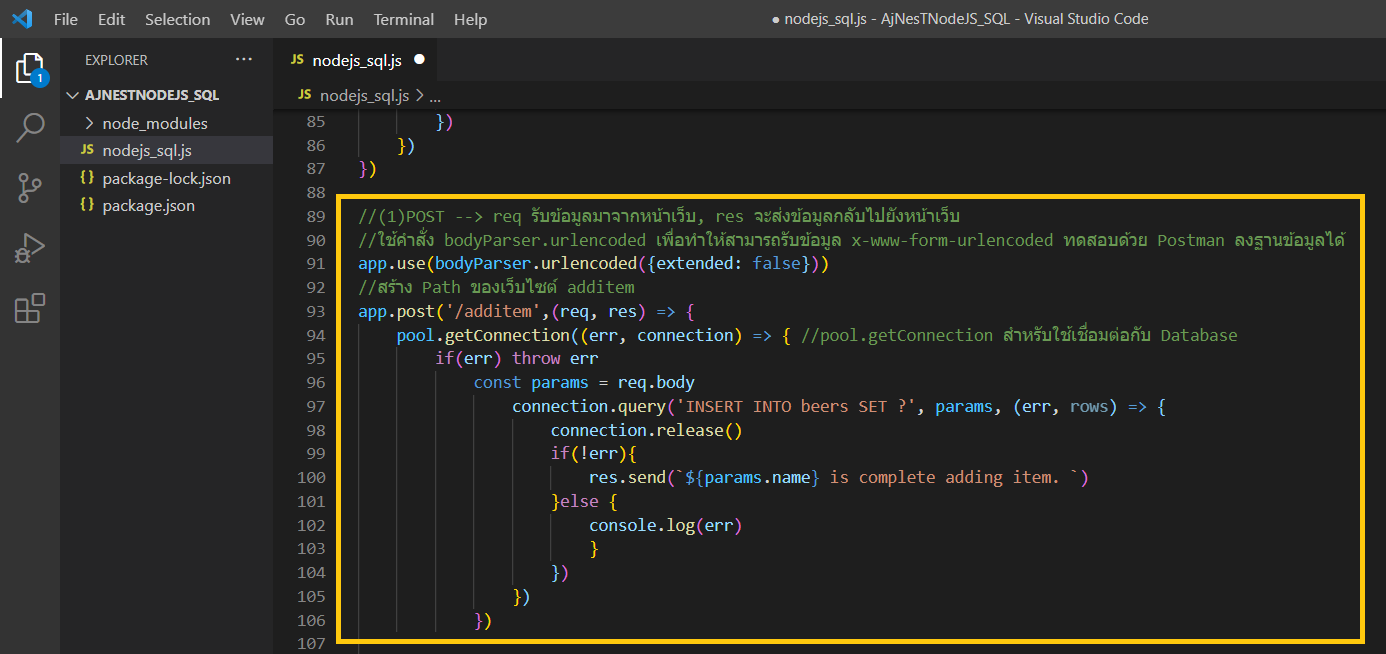
5.1 เขียนโปรแกรมใช้งาน POST และ INSERT ข้อมูล
//(1)POST --> req รับข้อมูลมาจากหน้าเว็บ, res จะส่งข้อมูลกลับไปยังหน้าเว็บ
//ใช้คำสั่ง bodyParser.urlencoded เพื่อทำให้สามารถรับข้อมูล x-www-form-urlencoded ทดสอบด้วย Postman ลงฐานข้อมูลได้
app.use(bodyParser.urlencoded({extended: false}))
//สร้าง Path ของเว็บไซต์ additem
app.post('/additem',(req, res) => {
    pool.getConnection((err, connection) => { //pool.getConnection สำหรับใช้เชื่อมต่อกับ Database
        if(err) throw err
            const params = req.body
                connection.query('INSERT INTO beers SET ?', params, (err, rows) => {
                    connection.release()
                    if(!err){
                        res.send(`${params.name} is complete adding item. `)
                    }else {
                        console.log(err)
                        }
                    })
                })
            })
5.2 ทำการรัน Server ไปที่ Terminal พิมพ์คำสั่ง npm start
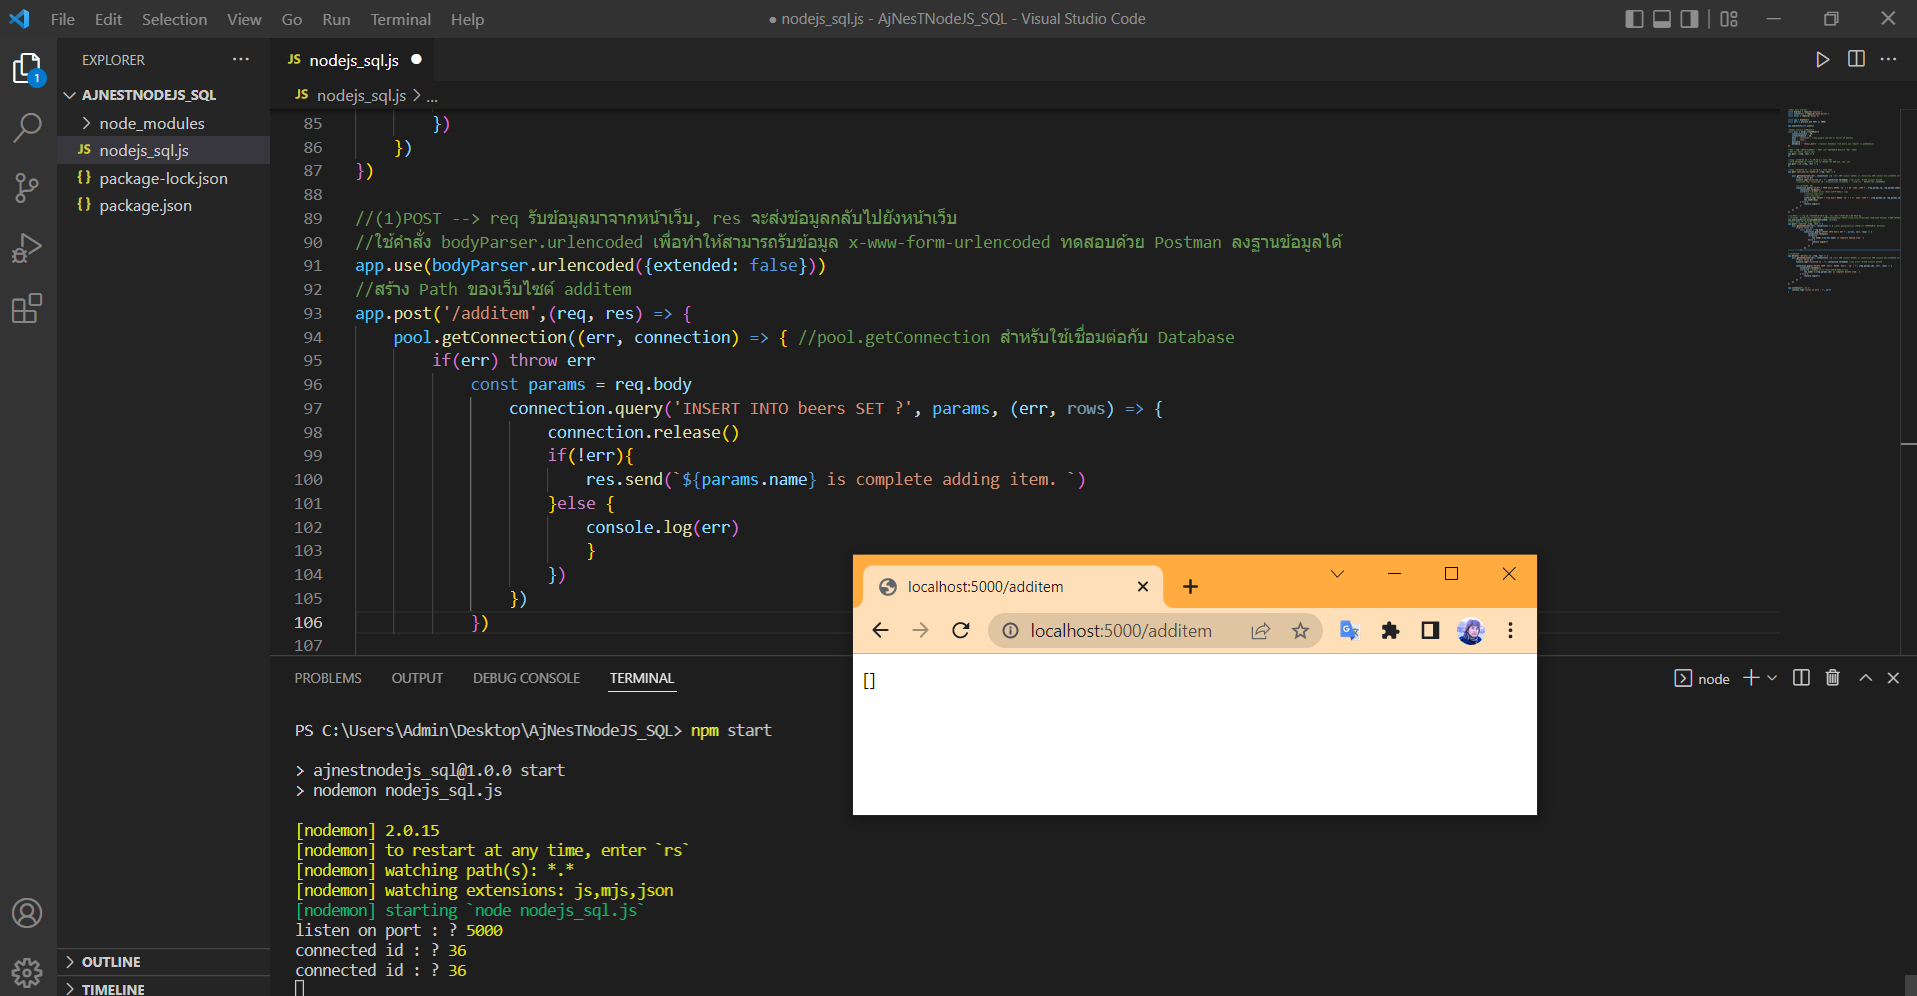
5.3 เปิด Web Browser พิมพ์ http://localhost:5000/additem
จะได้ผลคือไม่ได้แสดงข้อมูลอะไรออกมา เพราะ Web Browser ทำได้แค่ GET อย่างเดียว
เว็บไซต์จะทำ POST ได้ต้องมีปุ่ม Action มารับ ที่ต้องอยู่ใน Folder views (EJS) ที่เราต้องสร้างเว็บฝั่ง Front-End ขึ้นมาถึงจะใส่ข้อมูลลงฐานข้อมูลได้
5.4 ใช้โปรแกรม Postman ในการทดสอบ Action การใส่ข้อมูลลง Database ได้
1) กด + เปิดหน้าใหม่ เลือก POST: http://localhost:5000/additem
2) เลือก Body –> x-www-form-urlencoded
3) สร้างและใส่ข้อมูล ดังรูป
id: 127
name: Leo Beer
tagline: 88693428489
description: Leo Beer กระป๋อง 490 ml
image:
4) เสร็จแล้วทำการกด Send –> จะแสดงข้อความ Leo Beer is complete adding item.

5.5 เปิด MySQL phpMyAdmin จะพบว่าข้อมูลที่ INSERT ได้เพิ่มเข้ามาใน Database แล้ว

6. เขียนโปรแกรมคำสั่ง DELETE ทำการ ลบ ข้อมูลออกจาก Database
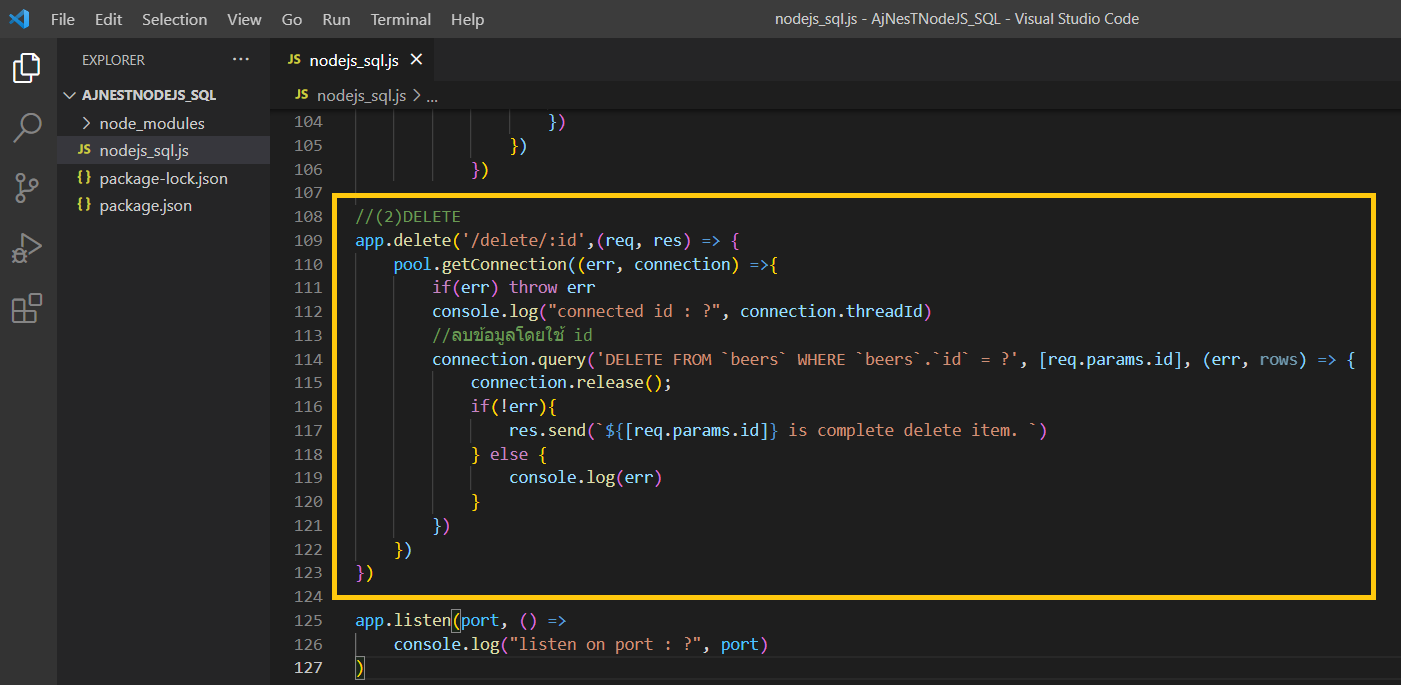
6.1 เขียนโปรแกรมใช้งาน DELETE ทำการลบข้อมูล
//(2)DELETE
app.delete('/delete/:id',(req, res) => {
    pool.getConnection((err, connection) =>{
        if(err) throw err
        console.log("connected id : ?", connection.threadId)
        //ลบข้อมูลโดยใช้ id
        connection.query('DELETE FROM `beers` WHERE `beers`.`id` = ?', [req.params.id], (err, rows) => {
            connection.release();
            if(!err){
                res.send(`${[req.params.id]} is complete delete item. `)
            } else {
                console.log(err)
            }
        })
    })
})
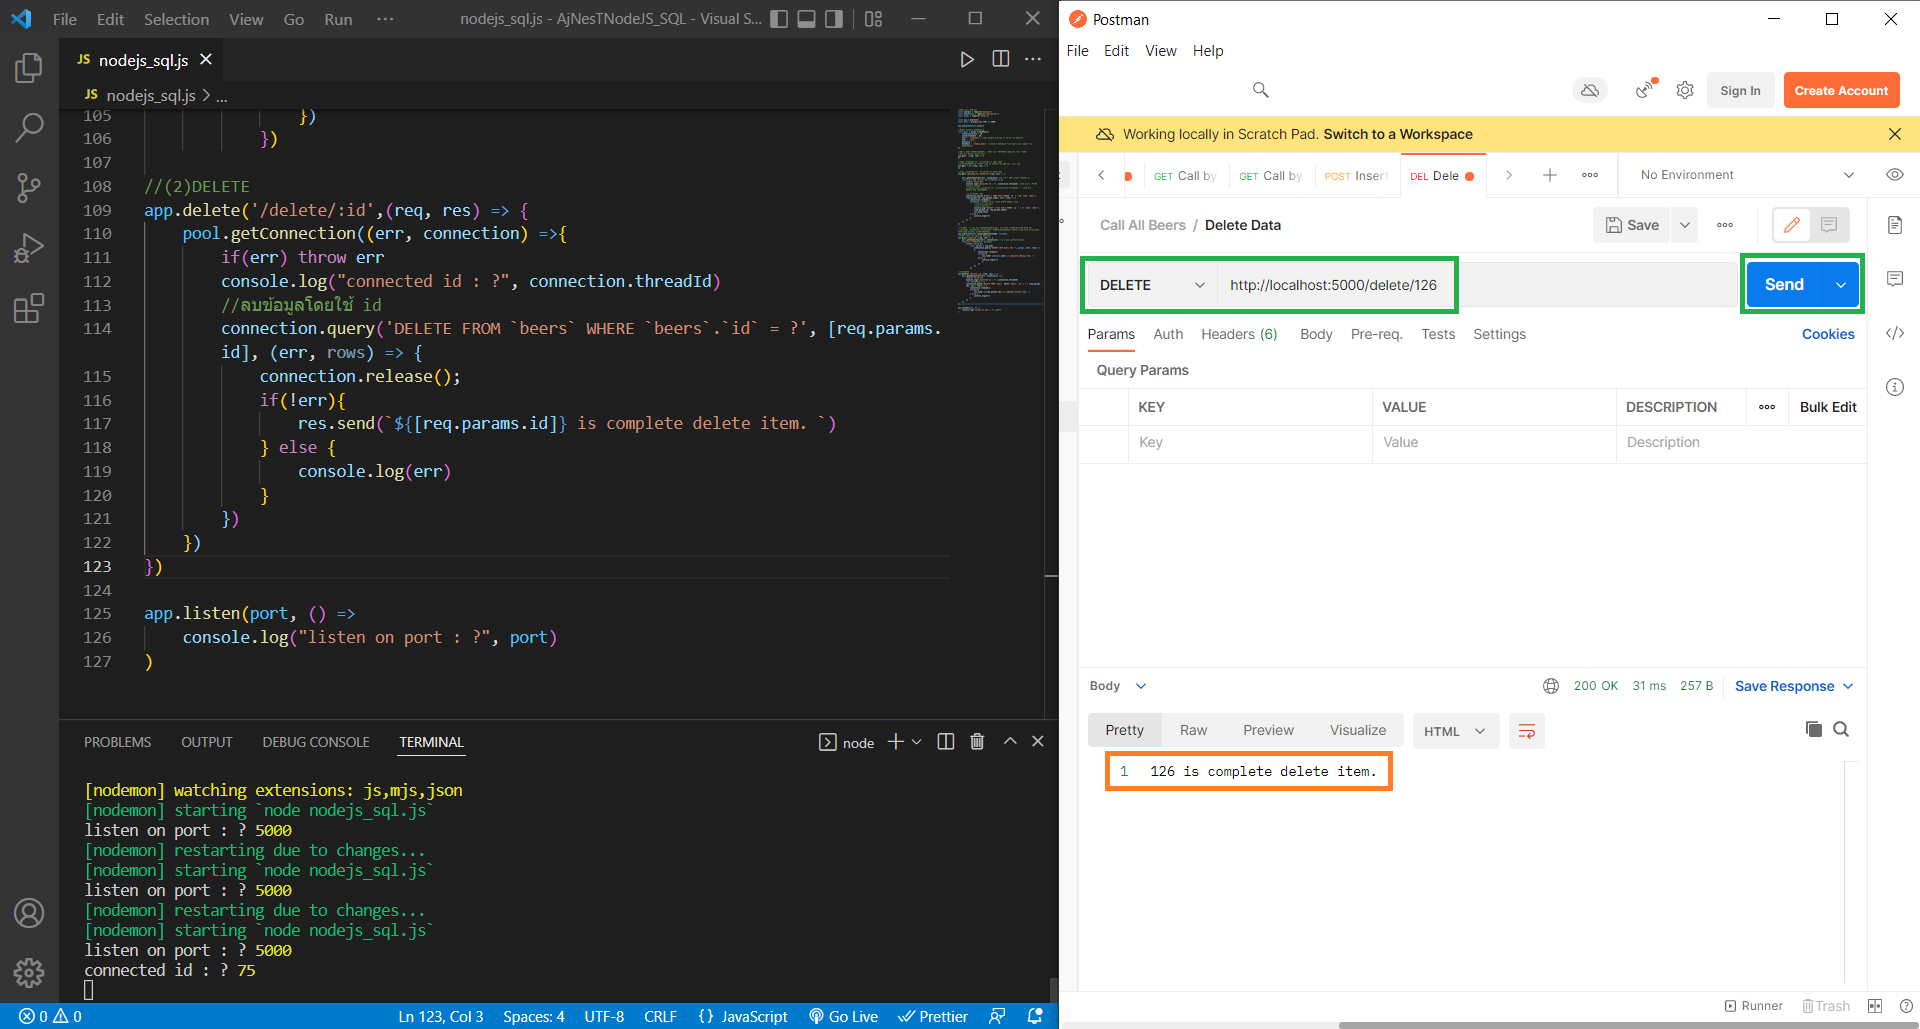
6.2 รัน Server พิมพ์ npm start –> เปิดโปรแกรม Postman
1) กด + เปิดหน้าใหม่ เลือก DELETE: http://localhost:5000/delete/126
2) กด Send
3) แสดงข้อความ 126 is complete delete item.
6.3 เปิด MySQL phpMyAdmin จะพบว่าข้อมูล id: 126 ได้ถูก DELETE ออกจาก Database แล้ว
7. เขียนโปรแกรมคำสั่ง PUT ทำการ UPDATE ข้อมูลใน Database
7.1 ทดลอง Update โดยใช้ UI ของ phpMyAdmin เลือกข้อมูลที่ต้องการ กด Edit

7.2 ทำการแก้ไขข้อมูล เสร็จแล้วกด Go
7.3 แสดงผลการ UPDATE จะมี SQL Code สามารถนำไปใช้ในการเขียนโปรแกรมฝั่ง Back-End NodeJS Express ได้

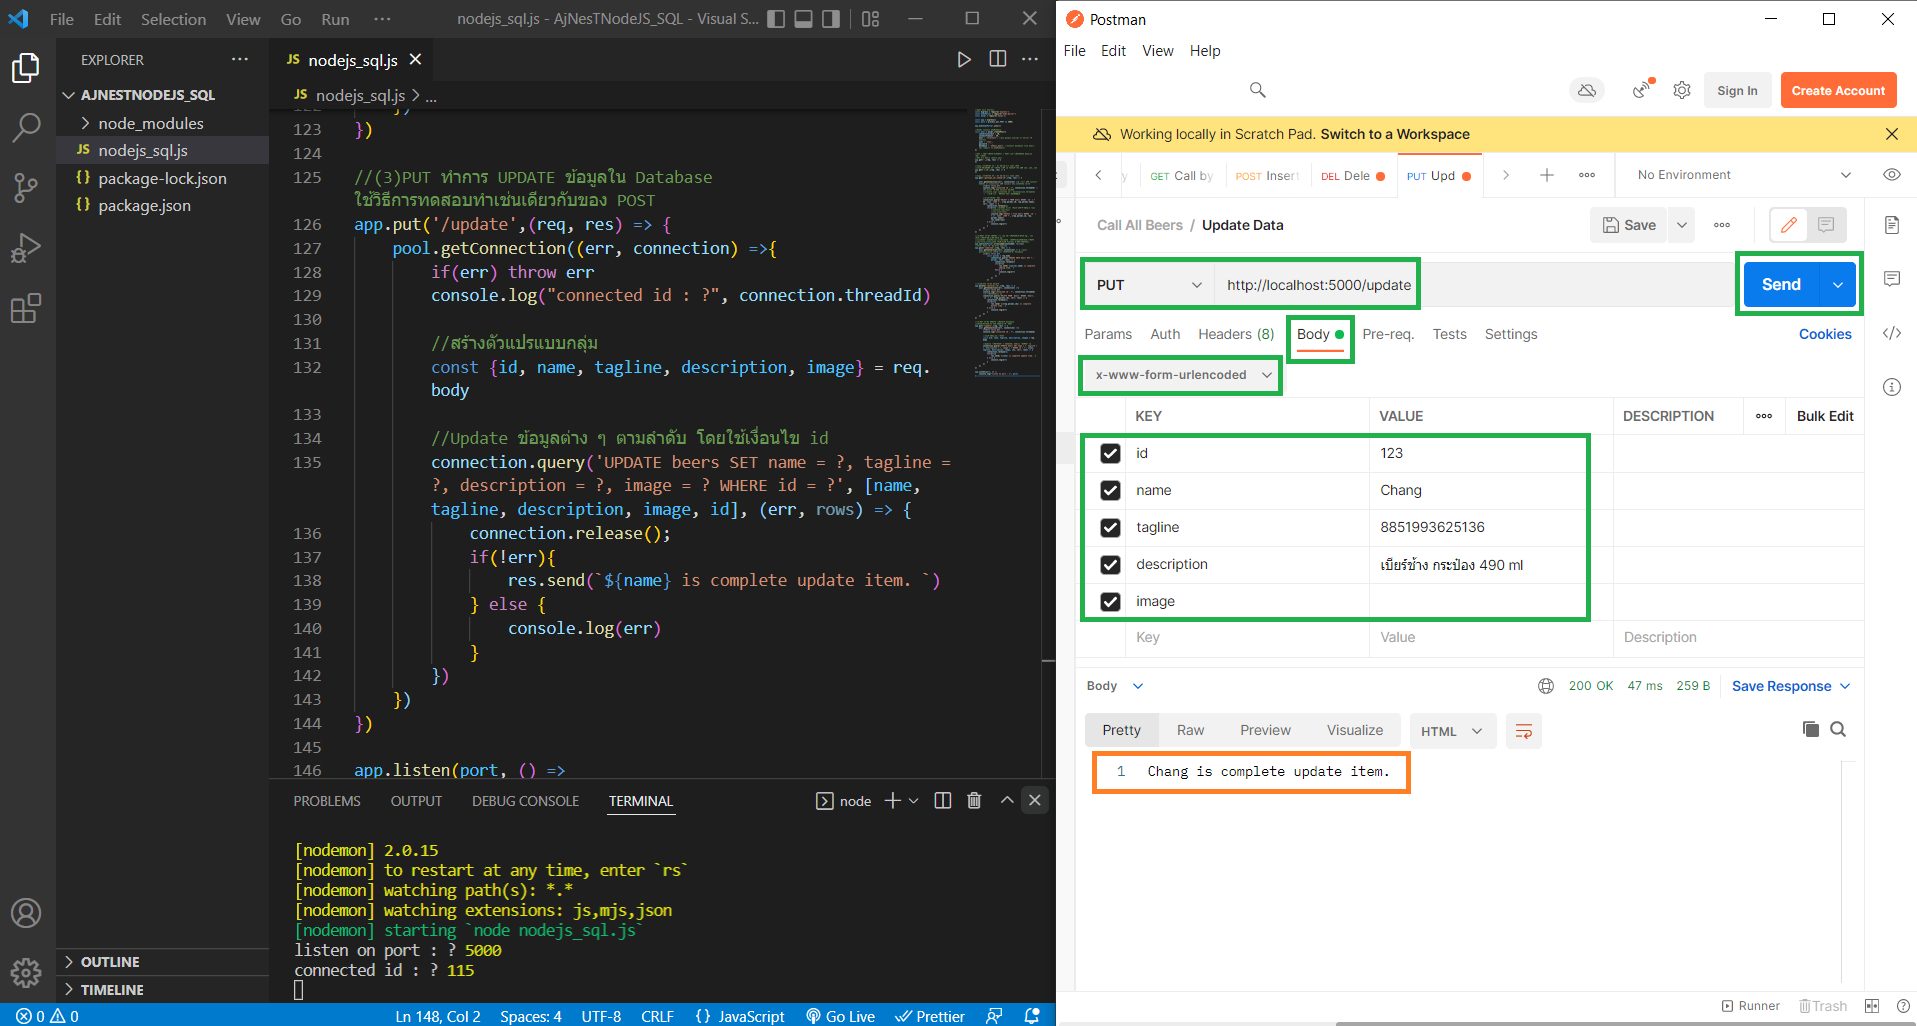
7.4 เขียนโปรแกรม PUT ทำการ UPDATE ข้อมูล
//(3)PUT ทำการ UPDATE ข้อมูลใน Database ใช้วิธีการทดสอบทำเช่นเดียวกับของ POST
app.put('/update',(req, res) => {
    pool.getConnection((err, connection) =>{
        if(err) throw err
        console.log("connected id : ?", connection.threadId)

        //สร้างตัวแปรแบบกลุ่ม
        const {id, name, tagline, description, image} = req.body

        //Update ข้อมูลต่าง ๆ ตามลำดับ โดยใช้เงื่อนไข id
        connection.query('UPDATE beers SET name = ?, tagline = ?, description = ?, image = ? WHERE id = ?', [name, tagline, description, image, id], (err, rows) => {
            connection.release();
            if(!err){
                res.send(`${name} is complete update item. `)
            } else {
                console.log(err)
            }
        })
    })
})

7.5 ใช้ Postman ทดสอบการทำงาน
) กด + เปิดหน้าใหม่ เลือก PUT: http://localhost:5000/update
2) เลือก Body –> x-www-form-urlencoded
3) ใส่ข้อมูลที่ต้องการ Update ดังรูป
id: 123
name: Chang
tagline: 8851993625136
description: เบียร์ช้าง กระป๋อง 490 ml
image:
4) เสร็จแล้วทำการกด Send –> จะแสดงข้อความ Chang is complete update item.
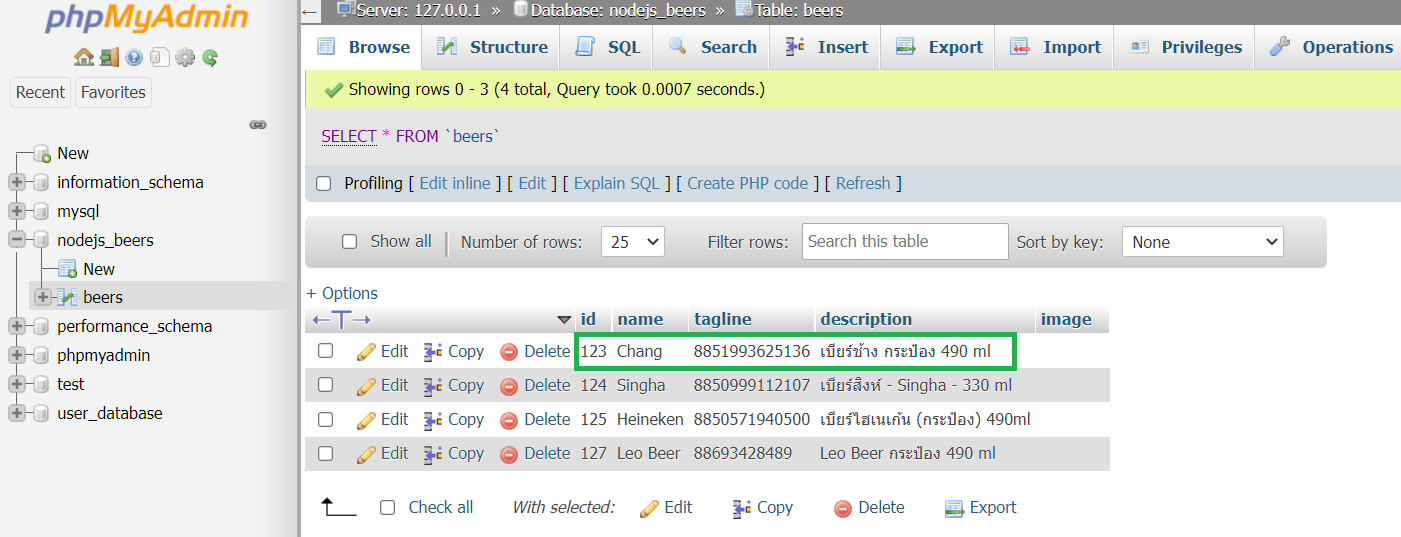
7.6 เปิด phpMyadmin แสดงข้อมูลที่ Update แล้ว
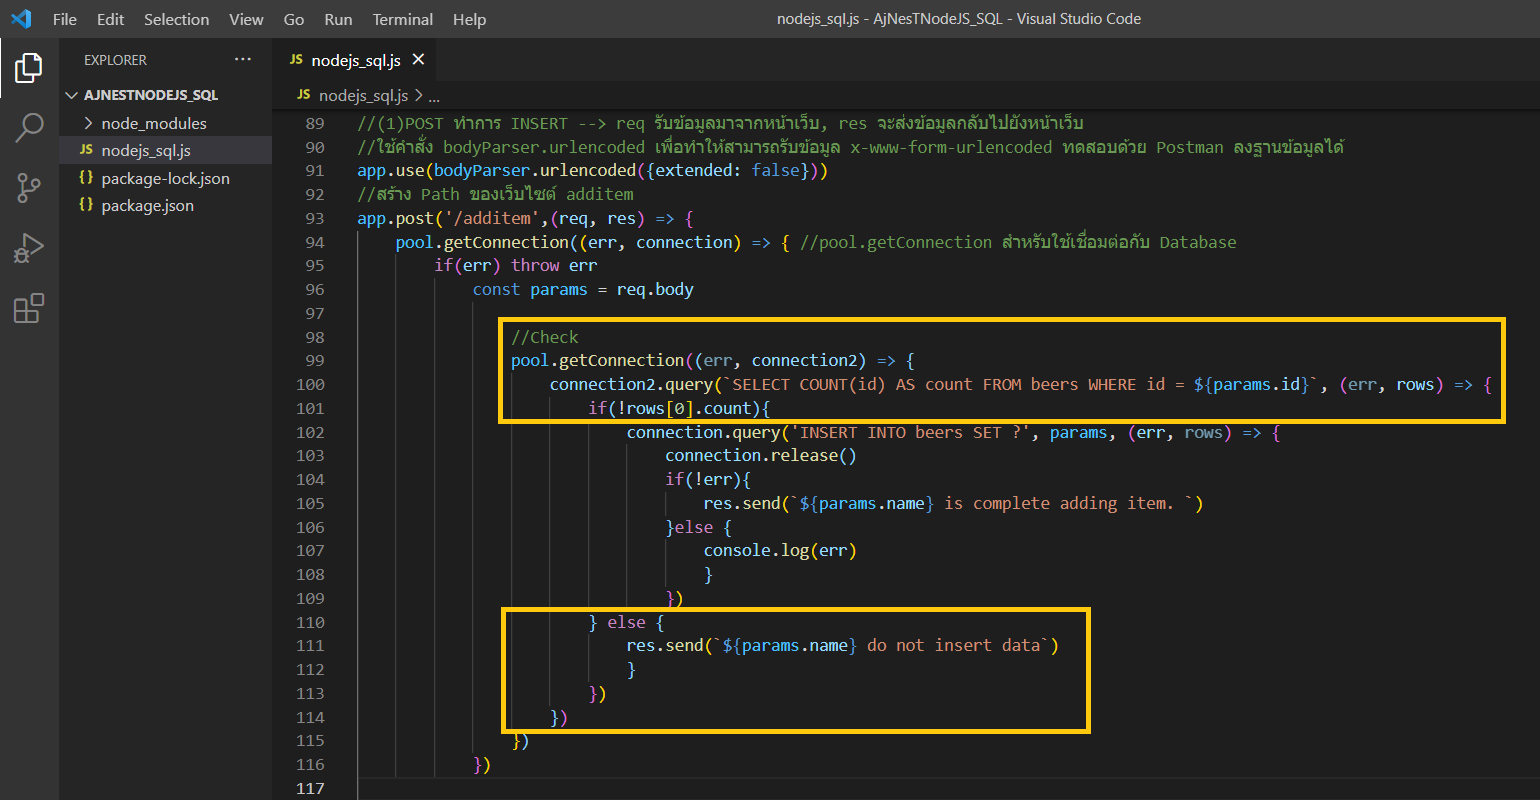
8. เขียนโปรแกรมดักหรือ Check Error ให้มีข้อความแจ้งบอกผู้ใช้ของการใส่ข้อมูล INSERT ของคำสั่ง POST เพื่อให้การใช้งานมีประสิทธิภาพดีขึ้น
ปัญหาเดิมคือ ถ้าใส่ id ที่มีข้อมูลอยู่แล้ว เมื่อทดสอบจะขึ้น Error
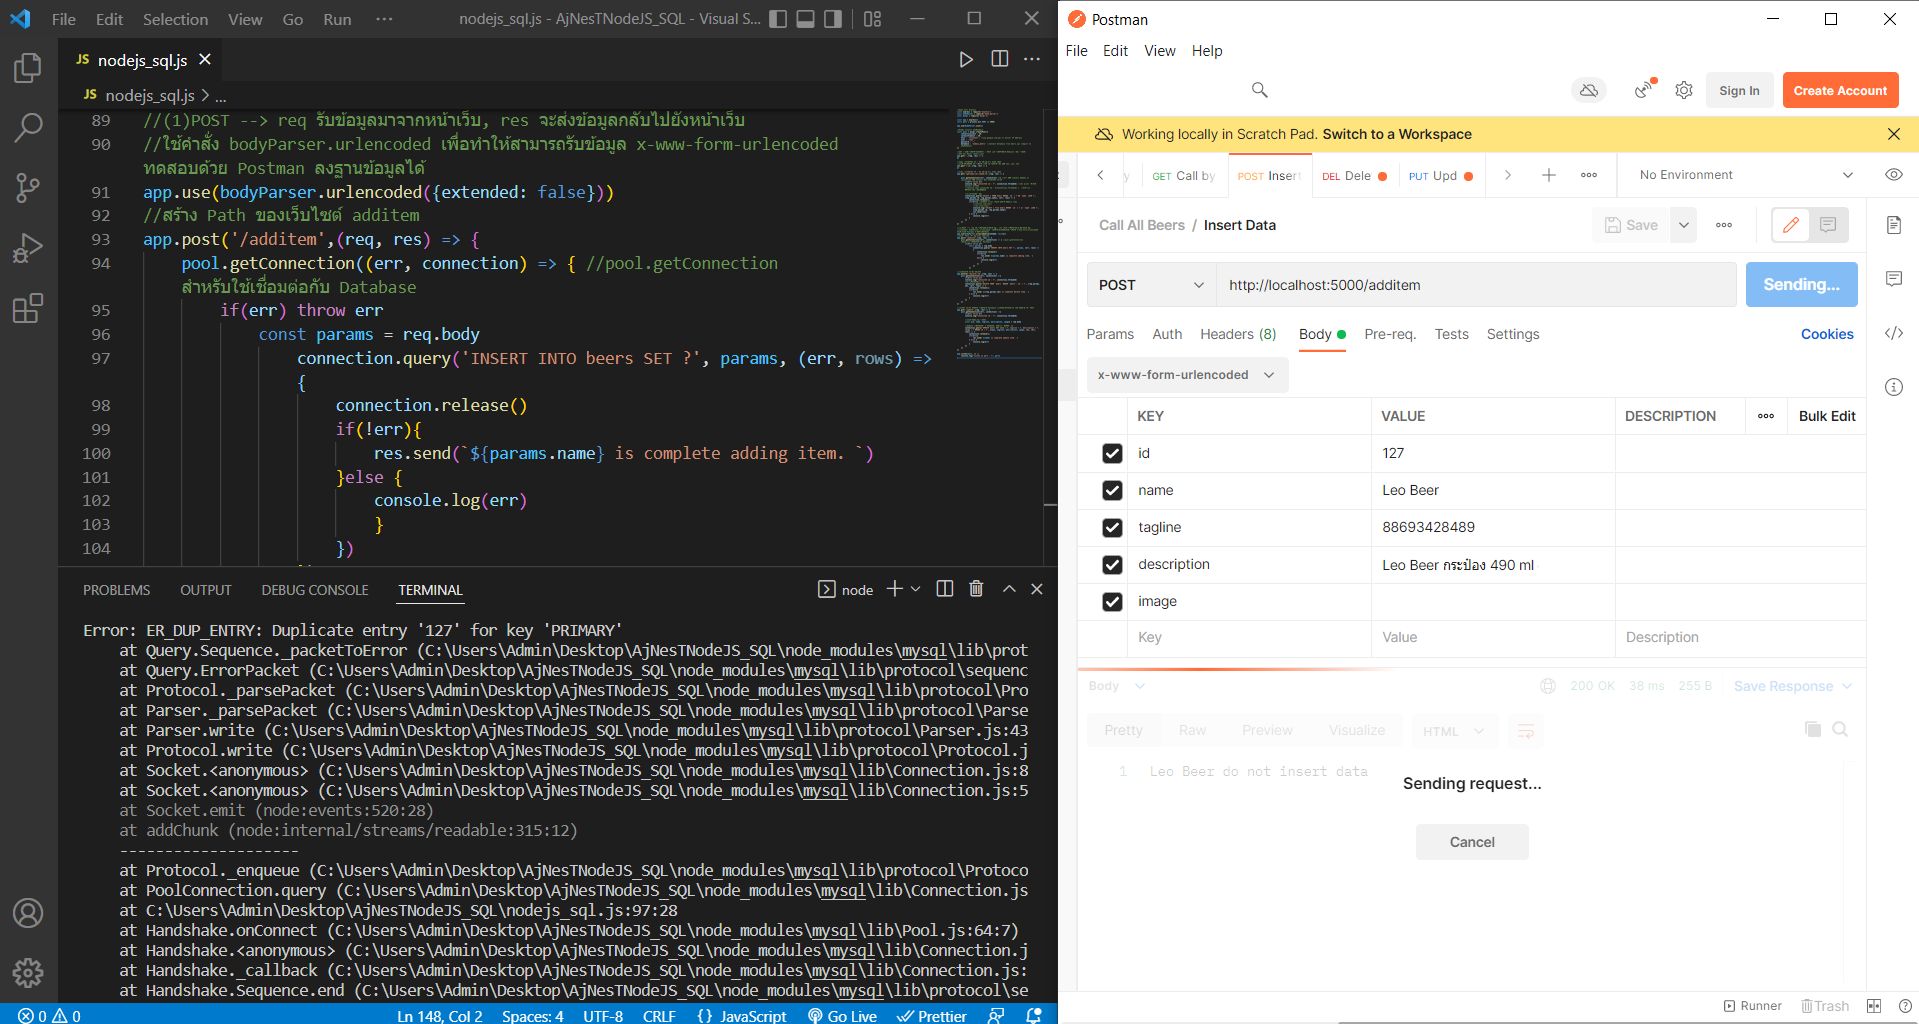
Solution เขียนโปรแกรม POST เพิ่มการดักหรือ Check Error ให้มีข้อความแจ้งบอกผู้ใช้ เพื่อให้การใช้งานมีประสิทธิภาพที่ดีขึ้น
//(1)POST ทำการ INSERT --> req รับข้อมูลมาจากหน้าเว็บ, res จะส่งข้อมูลกลับไปยังหน้าเว็บ
//ใช้คำสั่ง bodyParser.urlencoded เพื่อทำให้สามารถรับข้อมูล x-www-form-urlencoded ทดสอบด้วย Postman ลงฐานข้อมูลได้
app.use(bodyParser.urlencoded({extended: false}))
//สร้าง Path ของเว็บไซต์ additem
app.post('/additem',(req, res) => {
    pool.getConnection((err, connection) => { //pool.getConnection สำหรับใช้เชื่อมต่อกับ Database
        if(err) throw err
            const params = req.body

                //Check
                pool.getConnection((err, connection2) => {
                    connection2.query(`SELECT COUNT(id) AS count FROM beers WHERE id = ${params.id}`, (err, rows) => {
                        if(!rows[0].count){
                            connection.query('INSERT INTO beers SET ?', params, (err, rows) => {
                                connection.release()
                                if(!err){
                                    res.send(`${params.name} is complete adding item. `)
                                }else {
                                    console.log(err)
                                    }
                                })
                        } else {
                            res.send(`${params.name} do not insert data`)
                            }
                        })
                    })
                })
            })
แสดงผลการทดสอบสามารถเช็คและแจ้งผู้ใช้ได้

ไฟล์ Final ของ nodejs_sql.js
https://github.com/ajnesttheseries/nodjssql_postdeleteput
//Open Call Express
const express = require('express')
const bodyParser = require('body-parser')
const mysql = require('mysql');

const app = express()
const port = process.env.PORT || 5000;

app.use(bodyParser.json())

//MySQL Connect phpMyAdmin
const pool = mysql.createPool({
    connectionLimit : 10,
    connectTimeout : 20,
    host : 'localhost', //www.google.com/sql or Server IP Address
    user : 'root',
    password : '',
    database : 'nodejs_beers' //Connect Database from beers.sql (Import to phpMyAdmin)
})

//GET (เรียกข้อมูลขึ้นมาดู) | POST (ส่งข้อมูลหน้า Website กลับเข้ามา)
//GET All Beers (beers.sql)
app.get('',(req, res) => {

    pool.getConnection((err, connection) =>{ //err คือ connect ไม่ได้ or connection คือ connect ได้บรรทัดที่ 13-19
        if(err) throw err
        console.log("connected id : ?", connection.threadId) //ให้ print บอกว่า Connect ได้ไหม
        //console.log(`connected id : ${connection.threadId}`)  //ต้องใช้ ` อยู่ตรงที่เปลี่ยนภาษา

        connection.query('SELECT * FROM beers', (err, rows) => {
            connection.release();
            if(!err){ //ถ้าไม่ error จะแสดงค่าของตัวแปร rows
                //console.log(rows)
                //res.json(rows)
                res.send(rows)
            } else {
                console.log(err)
            }
        })
    })
})

//Copy บรรทัดที่ 23 - 41 มาปรับแก้ Code ใหม่
//สร้างหน้าย่อย ดึงข้อมูลเฉพาะ id ที่ต้องการ คือ 123, 124, 125
app.get('/:id',(req, res) => {

    pool.getConnection((err, connection) =>{ //err คือ connect ไม่ได้ or connection คือ connect ได้บรรทัดที่ 13-19
        if(err) throw err
        console.log("connected id : ?", connection.threadId) //ให้ print บอกว่า Connect ได้ไหม
        //console.log(`connected id : ${connection.threadId}`)  //ต้องใช้ ` อยู่ตรงที่เปลี่ยนภาษา

        connection.query('SELECT * FROM beers WHERE `id` = ?', req.params.id, (err, rows) => {
            connection.release();
            if(!err){ //ถ้าไม่ error จะแสดงค่าของตัวแปร rows
                //console.log(rows)
                //res.json(rows)
                res.send(rows)
            } else {
                console.log(err)
            }
        })
    })
})

//Copy บรรทัดที่ 45 - 63 มาปรับแก้ Code ใหม่
//Add New GET เปลี่ยน path และใส่ตัวแปรไป 2 ตัวคือ name, id
app.get('/getname_id/:name&:id',(req, res) => {

    pool.getConnection((err, connection) =>{ //err คือ connect ไม่ได้ or connection คือ connect ได้บรรทัดที่ 13-19
        if(err) throw err
        console.log("connected id : ?", connection.threadId) //ให้ print บอกว่า Connect ได้ไหม
        //console.log(`connected id : ${connection.threadId}`)  //ต้องใช้ ` อยู่ตรงที่เปลี่ยนภาษา

        //แก้ไขคำสั่ง SQL
        connection.query('SELECT * FROM beers WHERE `id` = ? OR `name` LIKE ?', [req.params.id, req.params.name], (err, rows) => {
            connection.release();
            if(!err){ //ถ้าไม่ error จะแสดงค่าของตัวแปร rows
                //console.log(rows)
                //res.json(rows)
                console.log('SELECT * from beers WHERE `id` = ? or `name` LIKE ?', [req.params.id, req.params.name])
                res.send(rows)
            } else {
                console.log(err)
            }
        })
    })
})

//(1)POST ทำการ INSERT --> req รับข้อมูลมาจากหน้าเว็บ, res จะส่งข้อมูลกลับไปยังหน้าเว็บ
//ใช้คำสั่ง bodyParser.urlencoded เพื่อทำให้สามารถรับข้อมูล x-www-form-urlencoded ทดสอบด้วย Postman ลงฐานข้อมูลได้
app.use(bodyParser.urlencoded({extended: false}))
//สร้าง Path ของเว็บไซต์ additem
app.post('/additem',(req, res) => {
    pool.getConnection((err, connection) => { //pool.getConnection สำหรับใช้เชื่อมต่อกับ Database
        if(err) throw err
            const params = req.body

                //Check
                pool.getConnection((err, connection2) => {
                    connection2.query(`SELECT COUNT(id) AS count FROM beers WHERE id = ${params.id}`, (err, rows) => {
                        if(!rows[0].count){
                            connection.query('INSERT INTO beers SET ?', params, (err, rows) => {
                                connection.release()
                                if(!err){
                                    res.send(`${params.name} is complete adding item. `)
                                }else {
                                    console.log(err)
                                    }
                                })
                        } else {
                            res.send(`${params.name} do not insert data`)
                            }
                        })
                    })
                })
            })

//(2)DELETE ทำการ DELETE
app.delete('/delete/:id',(req, res) => {
    pool.getConnection((err, connection) =>{
        if(err) throw err
        console.log("connected id : ?", connection.threadId)
        //ลบข้อมูลโดยใช้ id
        connection.query('DELETE FROM `beers` WHERE `beers`.`id` = ?', [req.params.id], (err, rows) => {
            connection.release();
            if(!err){
                res.send(`${[req.params.id]} is complete delete item. `)
            } else {
                console.log(err)
            }
        })
    })
})

//(3)PUT ทำการ UPDATE ข้อมูลใน Database ใช้วิธีการทดสอบทำเช่นเดียวกับของ POST
app.put('/update',(req, res) => {
    pool.getConnection((err, connection) =>{
        if(err) throw err
        console.log("connected id : ?", connection.threadId)

        //สร้างตัวแปรแบบกลุ่ม
        const {id, name, tagline, description, image} = req.body

        //Update ข้อมูลต่าง ๆ ตามลำดับ โดยใช้เงื่อนไข id
        connection.query('UPDATE beers SET name = ?, tagline = ?, description = ?, image = ? WHERE id = ?', [name, tagline, description, image, id], (err, rows) => {
            connection.release();
            if(!err){
                res.send(`${name} is complete update item. `)
            } else {
                console.log(err)
            }
        })
    })
})

app.listen(port, () =>
    console.log("listen on port : ?", port)
)


