Back-End NodeJS Express & MySQL Part 1
1. เรียนรู้การเขียนโปรแกรม SQL เพื่อบริหารจัดการฐานข้อมูลด้วยโปรแกรม XAMPP
1. ติดตั้งโปรแกรม XAMPP
ศึกษาทาง https://www.glurgeek.com/education/startnodejs/ หัวข้อที่ 2 ติดตั้งโปรแกรม XAMPP สำหรับจำลองเครื่องคอมพิวเตอร์เป็น Server
2. เปิดโปรแกรม XAMPP
ไปที่ C:\xampp กด xampp-control.exe แล้วกด Start Server: Apache และ MySQL

3. เปิด Web Browser ทดสอบ Server
ไปที่ http://localhost/dashboard/

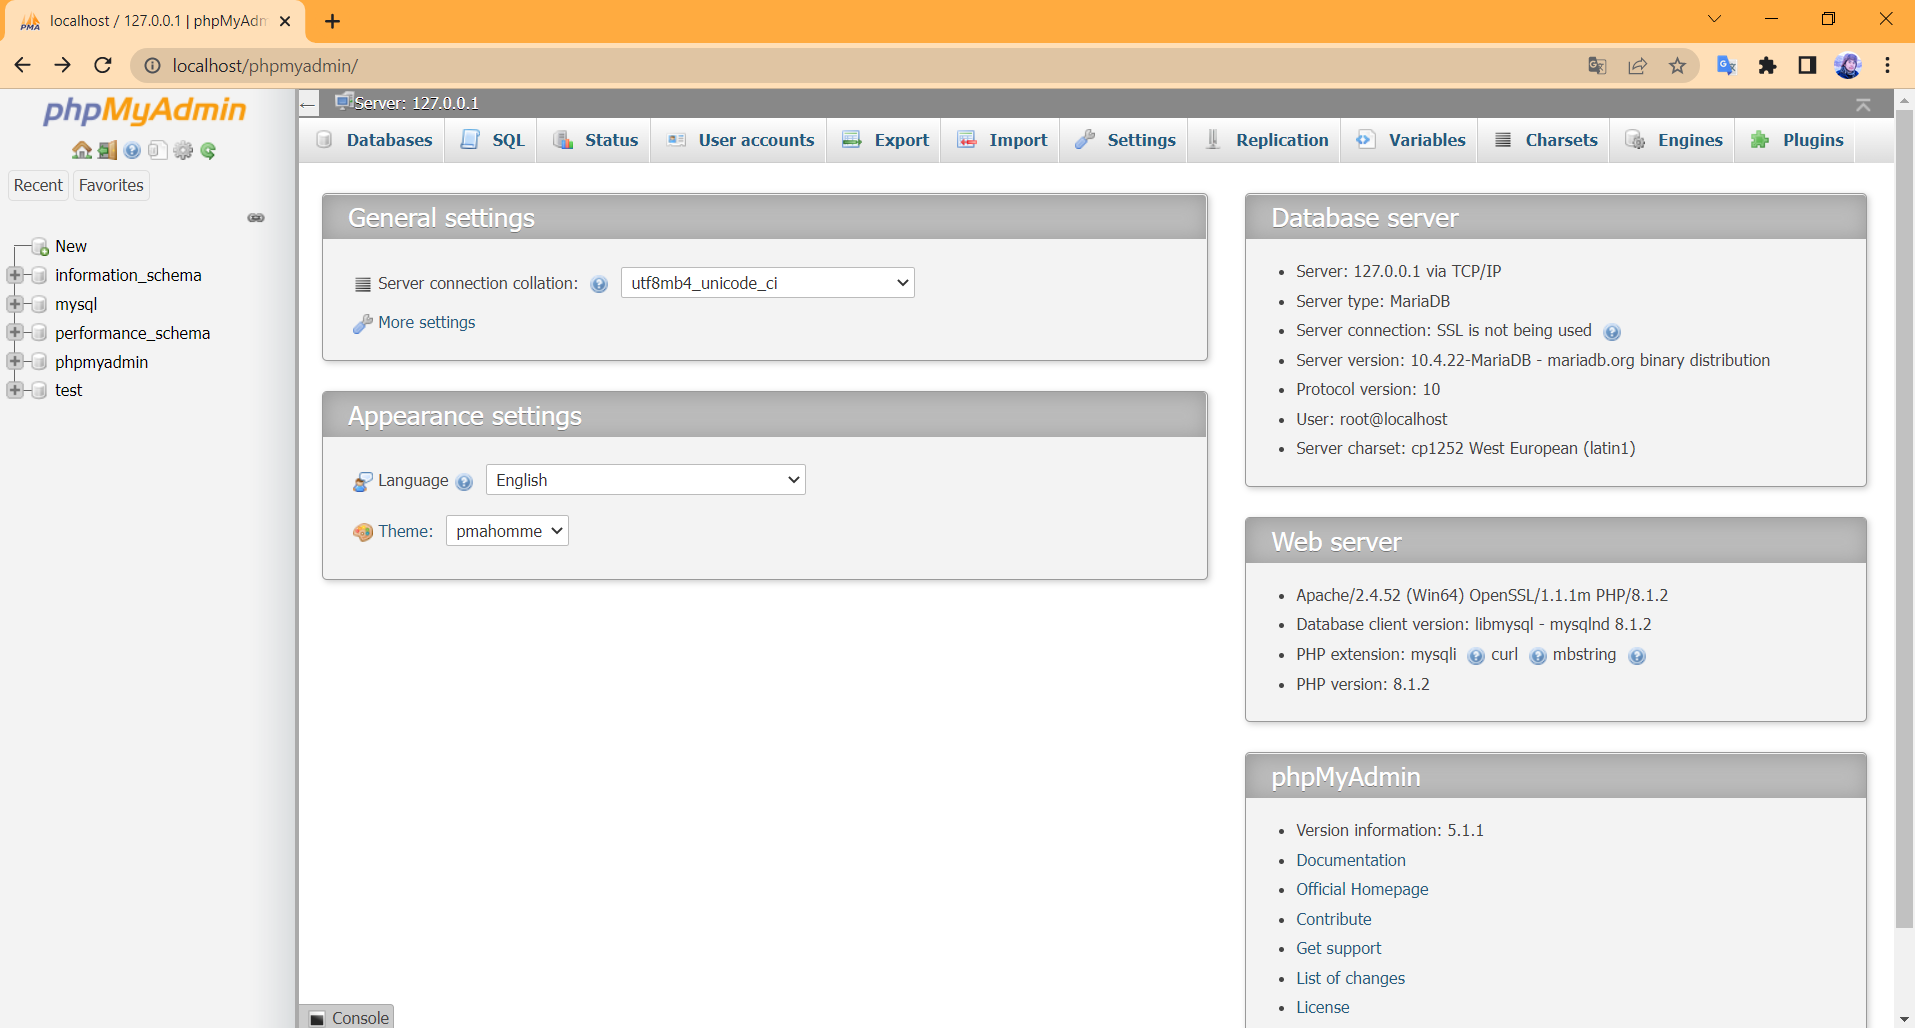
4. ให้กดที่เมนู phpMyAdmin เราจะใช้ User Interface นี้เรียนรู้การเขียนโปรแกรมใช้งาน Database พื้นฐานก่อน
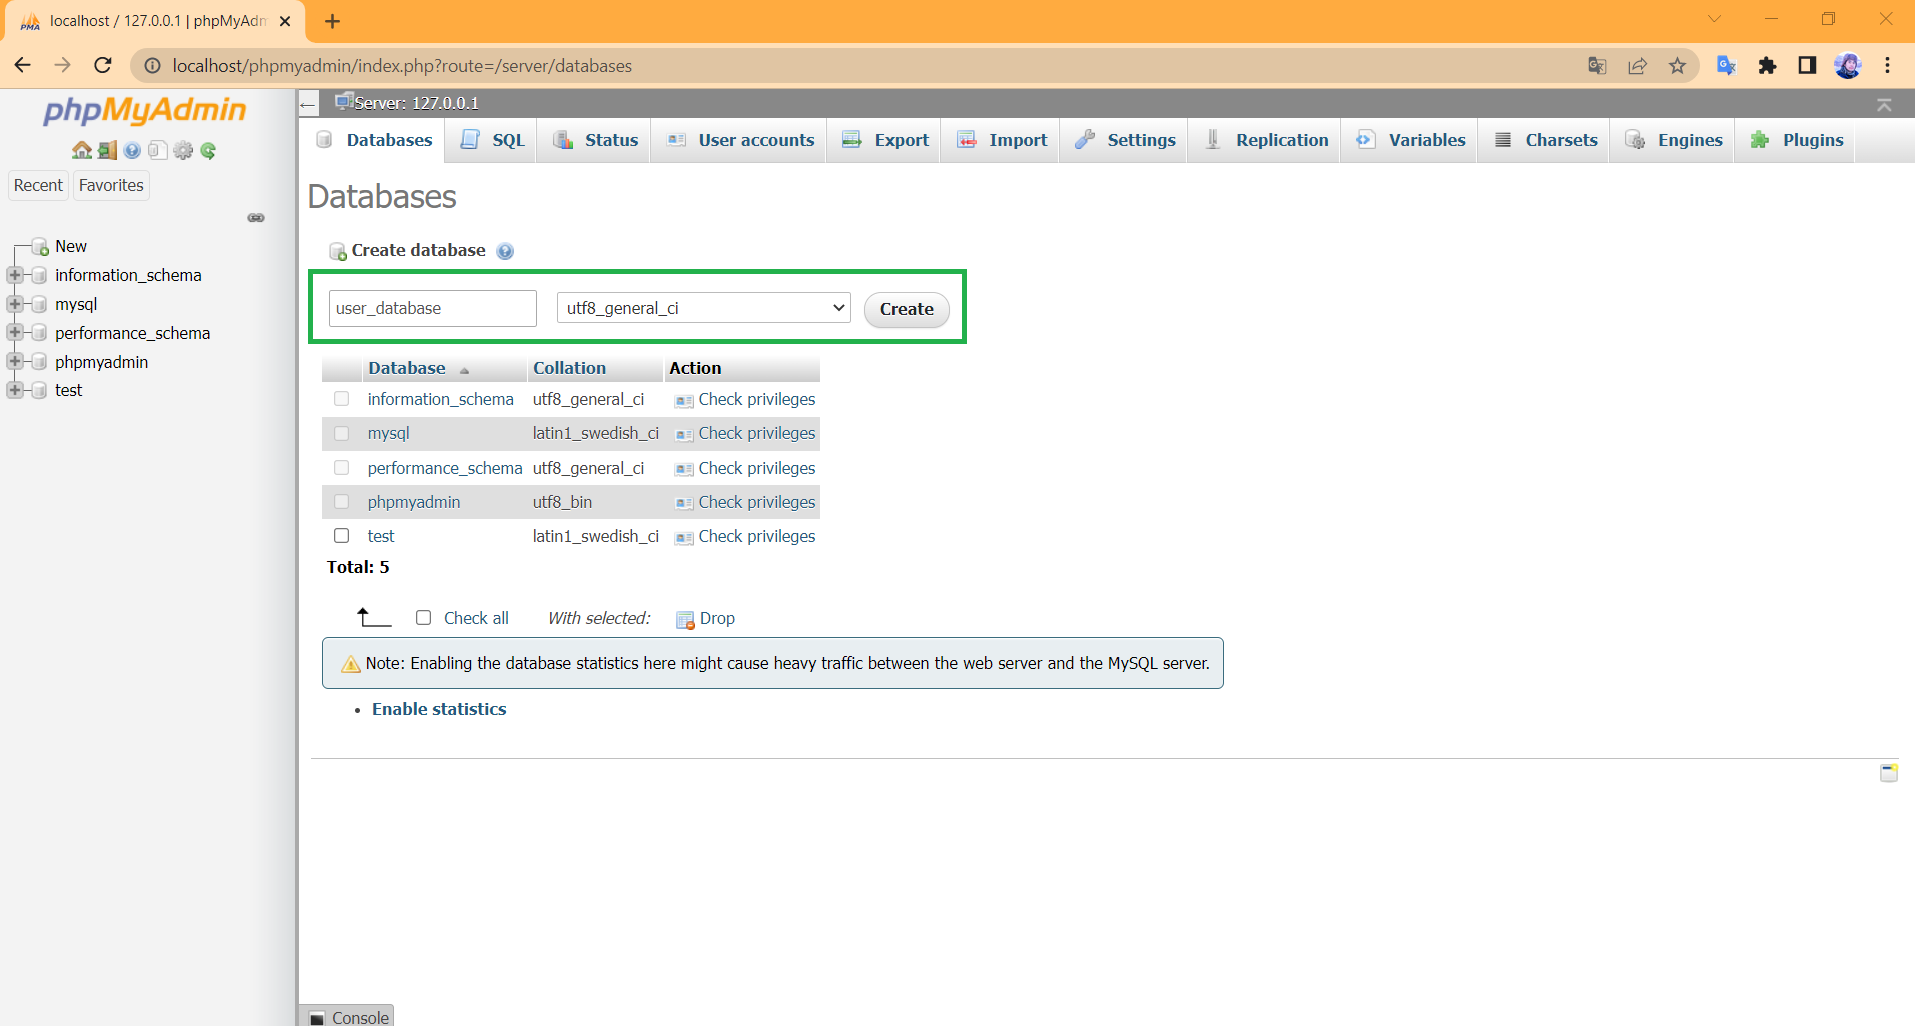
5. เลือกเมนู Database สร้าง Database
พิมพ์ช่องที่ 1: user_database ช่องที่ 2: เลือก utf8_general_ci จากนั้นกด Create
6. จะปรากฏ user_database ให้ทำการสร้างตาราง Create table พิมพ์ชื่อตาราง Name: user Number of columns: 2 แล้วกด Go

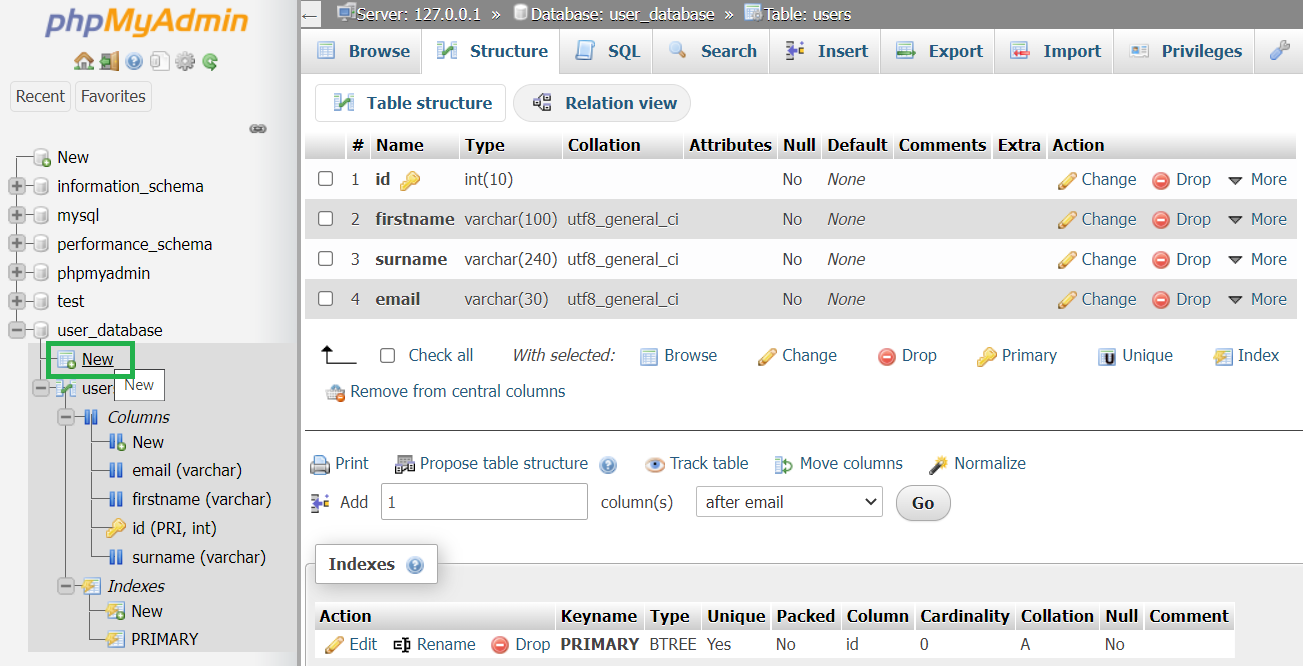
7. สร้างข้อมูลที่ต้องการเก็บ Field ประกอบด้วย id, firstname, surname, email แล้วใส่ค่าต่าง ๆ ดังรูป
Name : ชื่อฟิลด์
Type : ประเภทของข้อมูล
Length/Values : จำนวนค่าสูงสุดของแต่ละฟิลด์
Default : ค่าเริ่มเต้น
Collation : รหัสอักขระ
Attributes : คุณสมบัติ
Null : ว่าง
Index : คุณสมบัติของฟิลด์ (Primary Key)
A.I. (Auto Increment) : รันเลขให้แบบ Auto เช่น 1 2 3 4 ..
Comments : การแสดงรายละเอียดของฟิลด์
เสร็จแล้วให้ทดลองกด Preview SQL
จะแสดงคำสั่ง SQL สำหรับเวลานำไปใช้ในการเขียนโปรแกรมสร้าง Table ใช้ร่วมกับภาษา JavaScript ได้

เสร็จแล้วกด Save บันทึกข้อมูล
8. กด New สร้าง Table เพิ่มเติม
สร้าง Table ชื่อ points ประกอบด้วยฟิลด์ point_id (PRIMARY และติ๊ก A.I.), user_id, toeic, attitude ตั้งค่าต่าง ๆ ดังรูป

เสร็จแล้วกด Save
9. ทดลอง Insert ข้อมูลของตาราง users
เลือกตาราง users –> เลือกเมนู Insert –> ใส่ข้อมูลที่ต้องการ ดังรูป
id: 1630900899
firstname: Ajnest
lastname: Theseries
ทดลองกด Preview SQL จะปรากฏ SQL Code สามารถนำไปใช้เขียนโปรแกรมใส่ในโปรแกรม Visual Studio Code เก็บเอาไว้ใช้งานได้
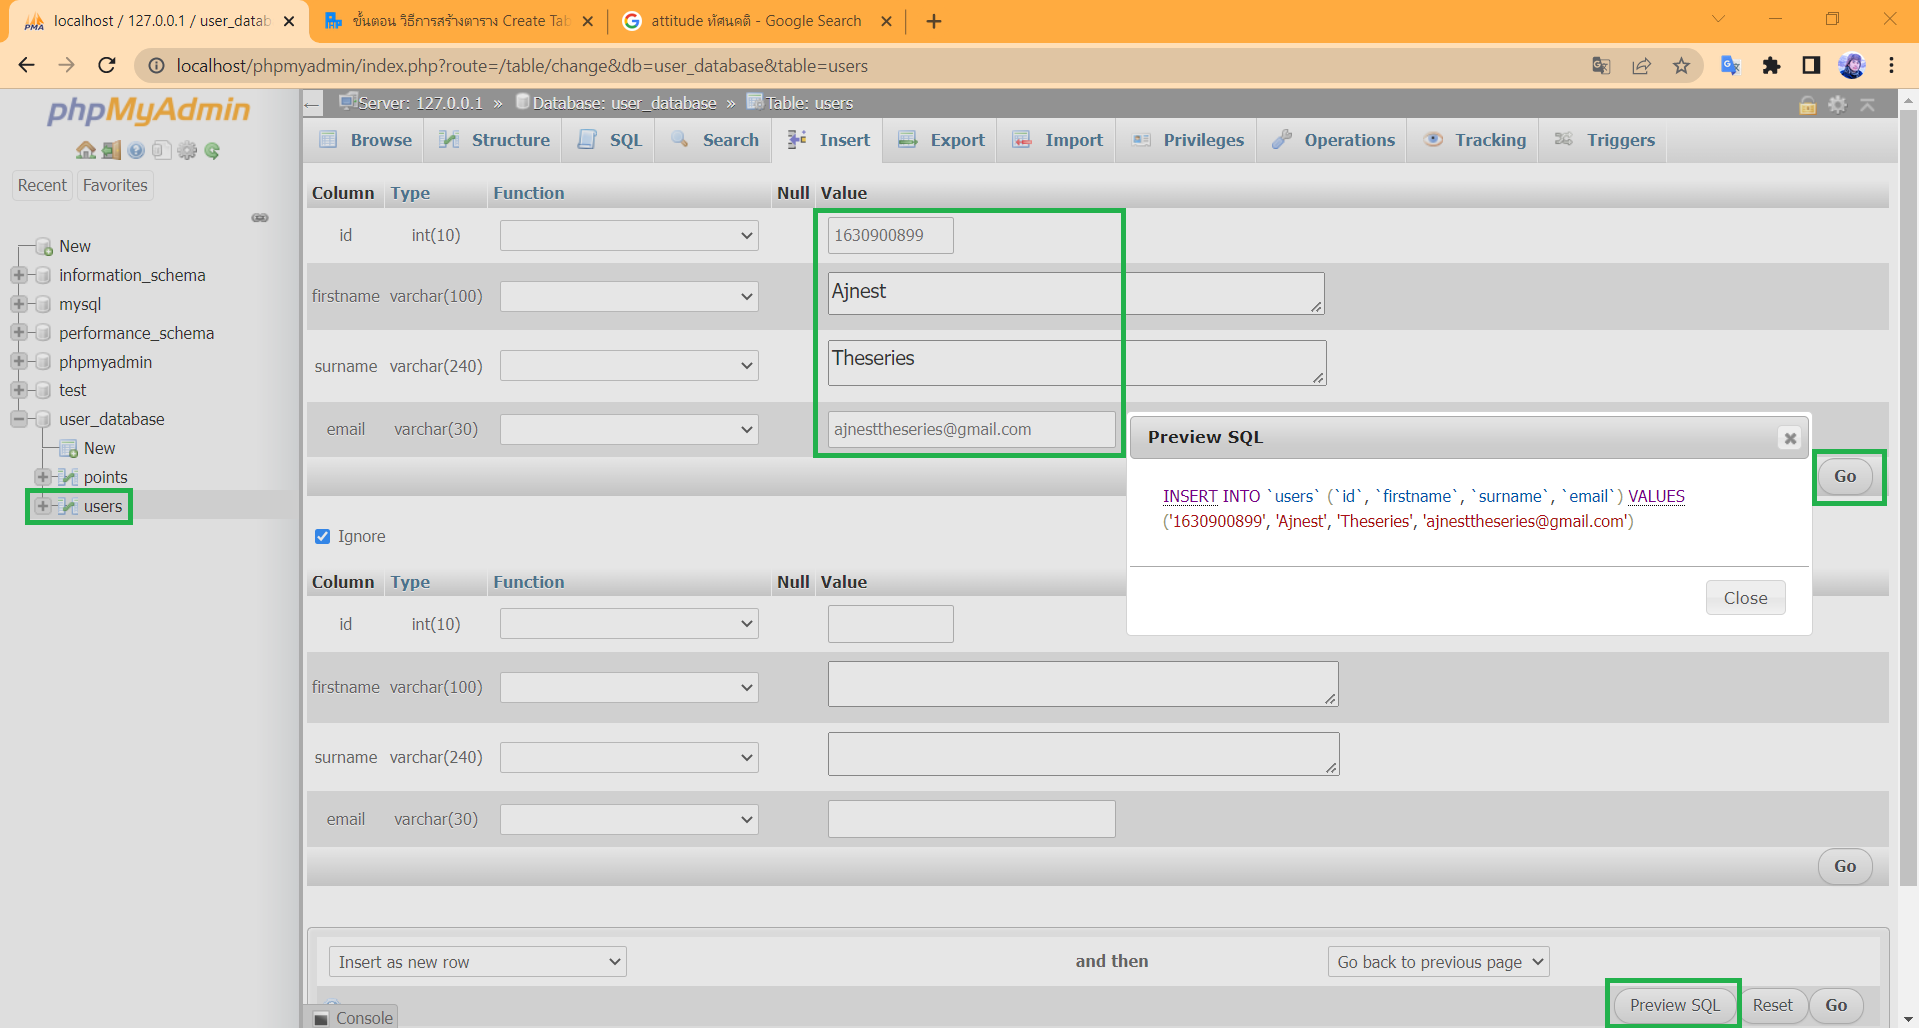
การใช้ Preview SQL ช่วยให้เราสามารถนำ Code ไปใช้งานได้ง่ายขึ้น
จากนั้นให้กด Close แล้วไปกด Go ด้านขวาของข้อมูลที่ใส่เข้าไป
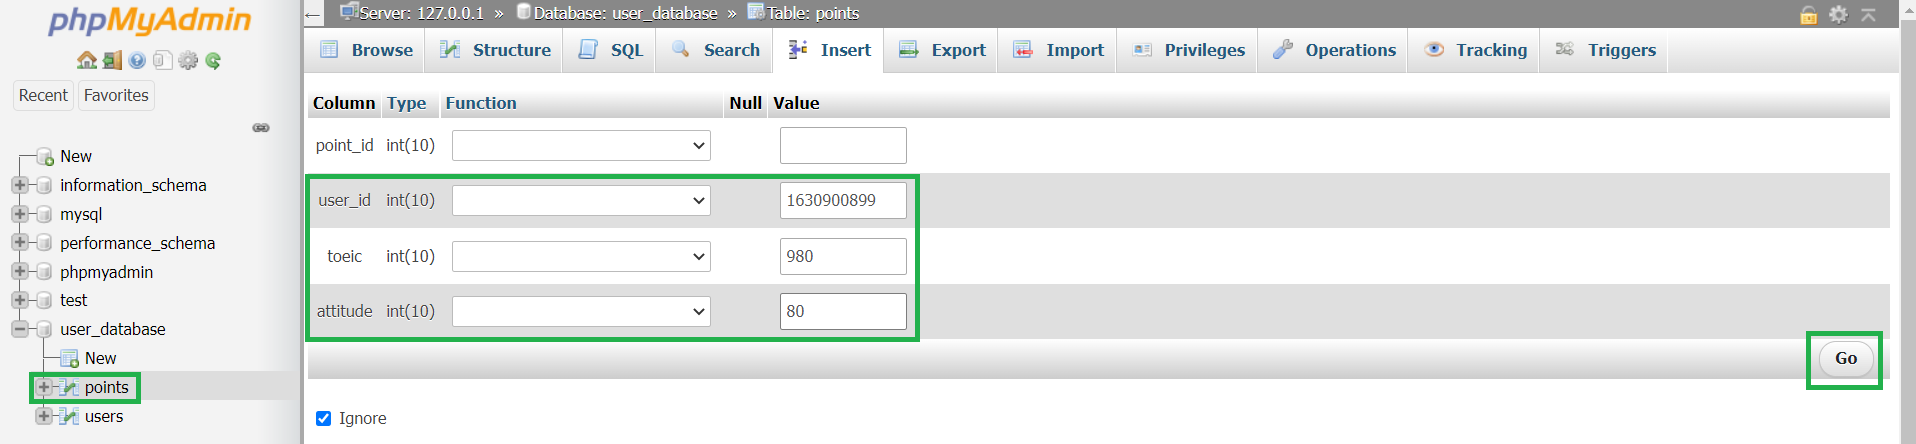
10. ทำการ Insert ข้อมูลของตาราง points
ไปที่ points –> เมนู Insert –> ใส่ข้อมูล user_id: 1630900899 ต้องใส่รหัสให้ตรงกัน และคะแนนต่าง ๆ ดังรูป เพื่อทำการ Sync กับตาราง users –>กด Go
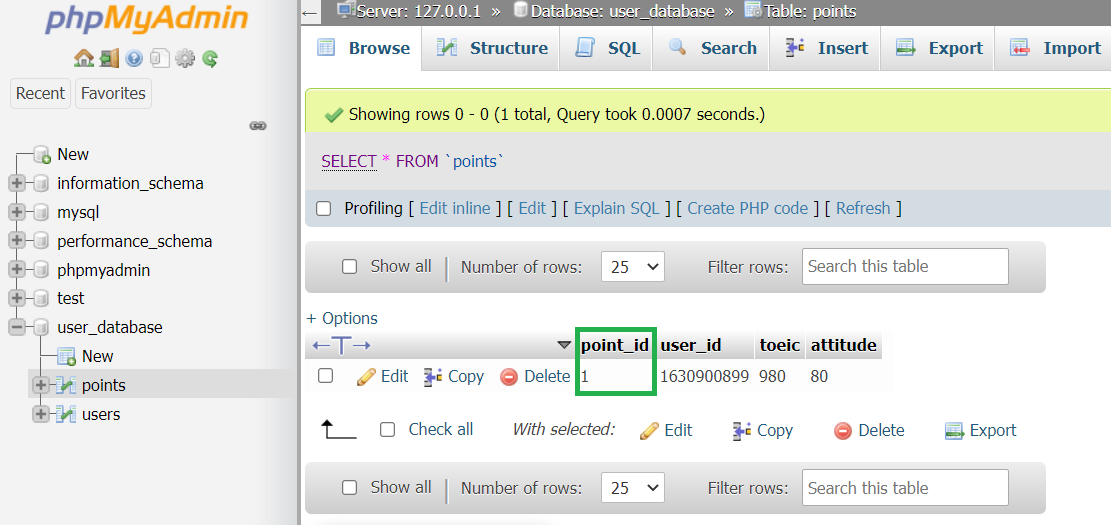
กดตาราง points จะเห็นว่า จะตั้งค่า point_id = 1 มาให้เพราะเราเลือกติ๊ก A.I.
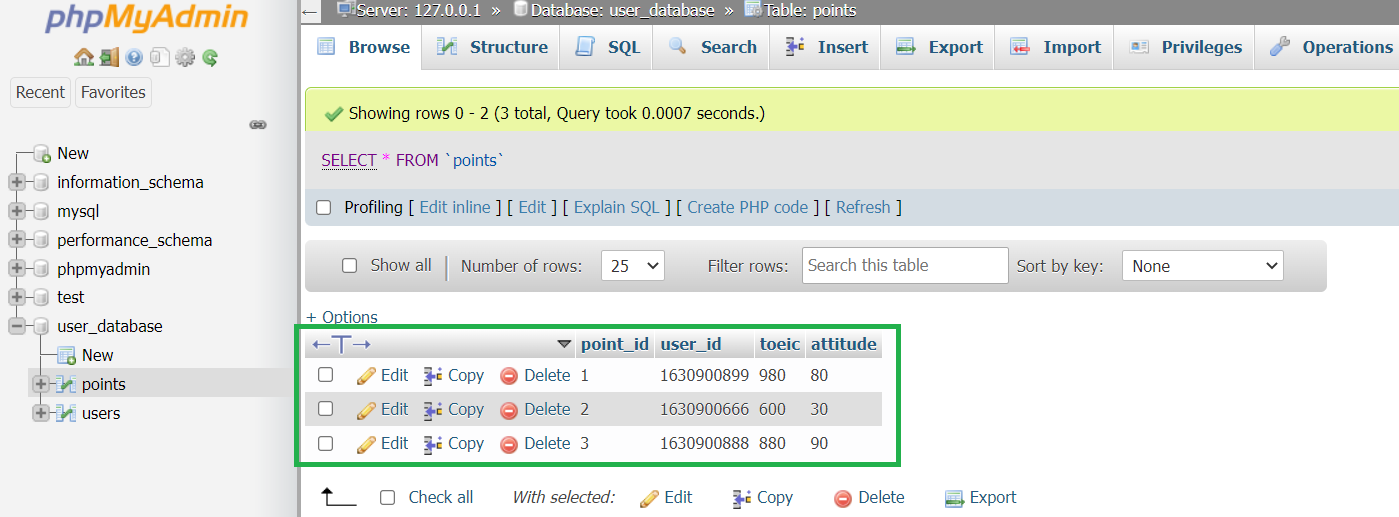
11. เพิ่มข้อมูล Insert users อีก 2 คน ใส่ข้อมูล แล้วกด Go ได้ผลลัพธ์ ดังรูป


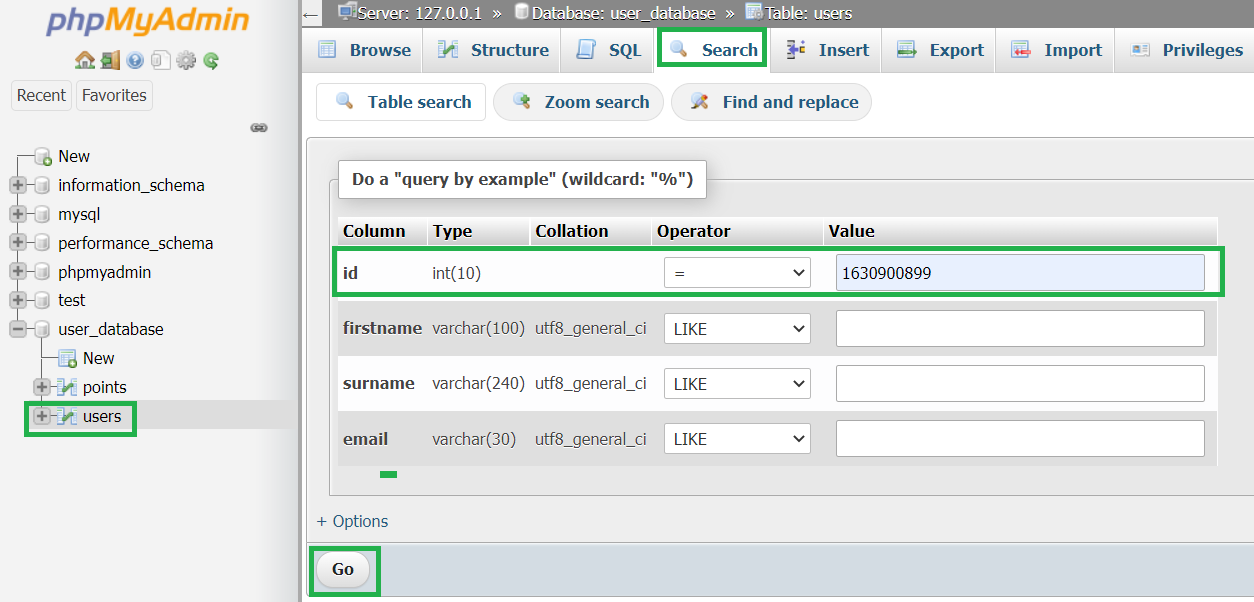
12. ทำการค้นหาข้อมูล users จาก Database
เลือกตาราง users –> Search –> ค้นหาข้อมูล id: 1630900899 –> Go
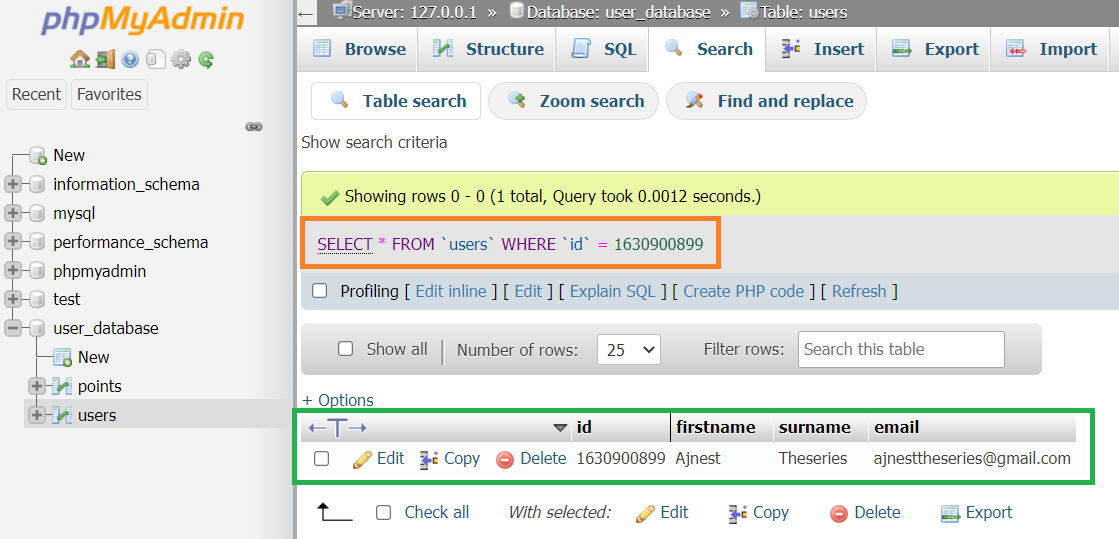
ได้ผลลัพธ์ก็จะแสดงเฉพาะข้อมูลของ user id ที่ต้องการค้นหาออกมาให้เห็น
สามารถนำ SQL Code คำสั่ง SELECT * FROM users WHERE id = 1630900899 ไปใช้เขียนโปรแกรมได้
13. ใส่ข้อมูล points เพิ่มไปอีก 2 คน
เลือกตาราง points –> Insert –> ใส่ข้อมูล user_id: 1630900666 toeic: 600 attitude: 30 และ user_id: 1630900888 toeic: 880 attitude: 90 –> Go

14. เขียนคำสั่ง SQL เพื่อค้นหาข้อมูลของ user แต่ละคนมีคะแนน toiec และ attitude เท่าไรบ้าง จะต้องเขียนโปรแกรมทำการ JOIN Table
เลือกตาราง users –> SQL –> เขียนคำสั่ง SQL –> Go
SELECT users.id, users.firstname, users.surname, points.toeic, points.attitude
FROM users
INNER JOIN points
ON users.id = points.user_id
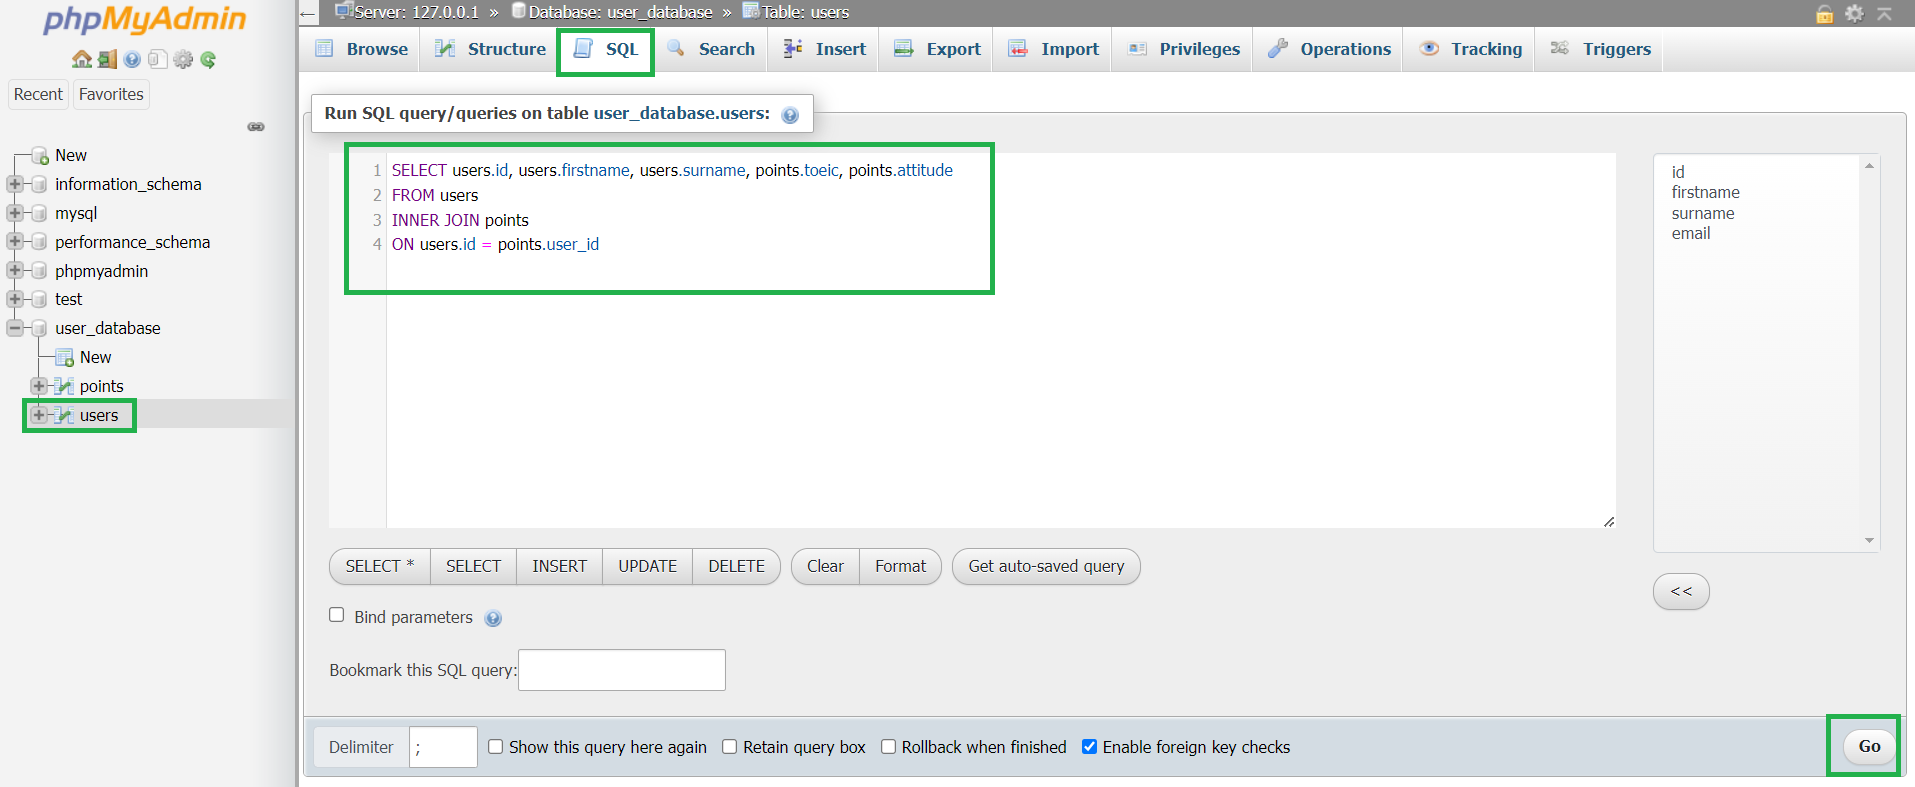
แสดงข้อมูลของ user และ point ของแต่ละคน

15. เขียนคำสั่ง SQL เพื่อค้นหาข้อมูลของ user เฉพาะ users.id = 1630900899
เลือกตาราง users –> SQL –> เขียนคำสั่ง SQL เพิ่ม WHERE users.id = 1630900899 –> Go
SELECT users.id, users.firstname, users.surname, points.toeic, points.attitude
FROM users
INNER JOIN points
ON users.id = points.user_id
WHERE users.id = 1630900899
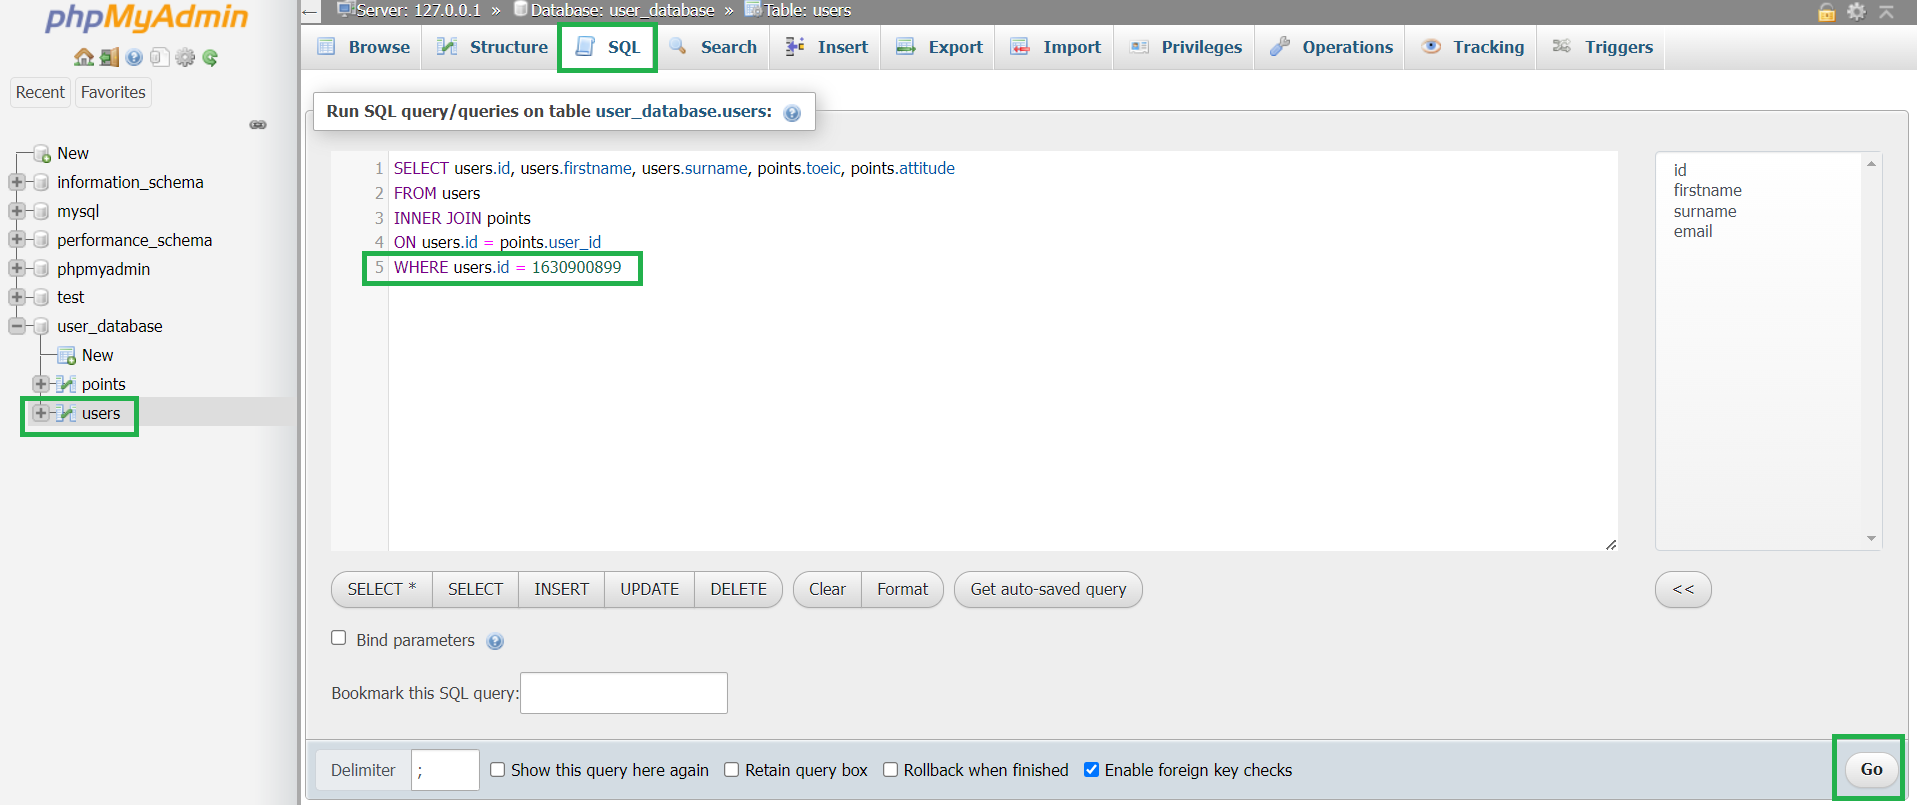
แสดงข้อมูลของ user และ point เฉพาะของ users.id = 1630900899

2. สร้าง Back-End NodeJS เชื่อมต่อฐานข้อมูล SQL
เรียนรู้การใช้งานคำสั่ง GET
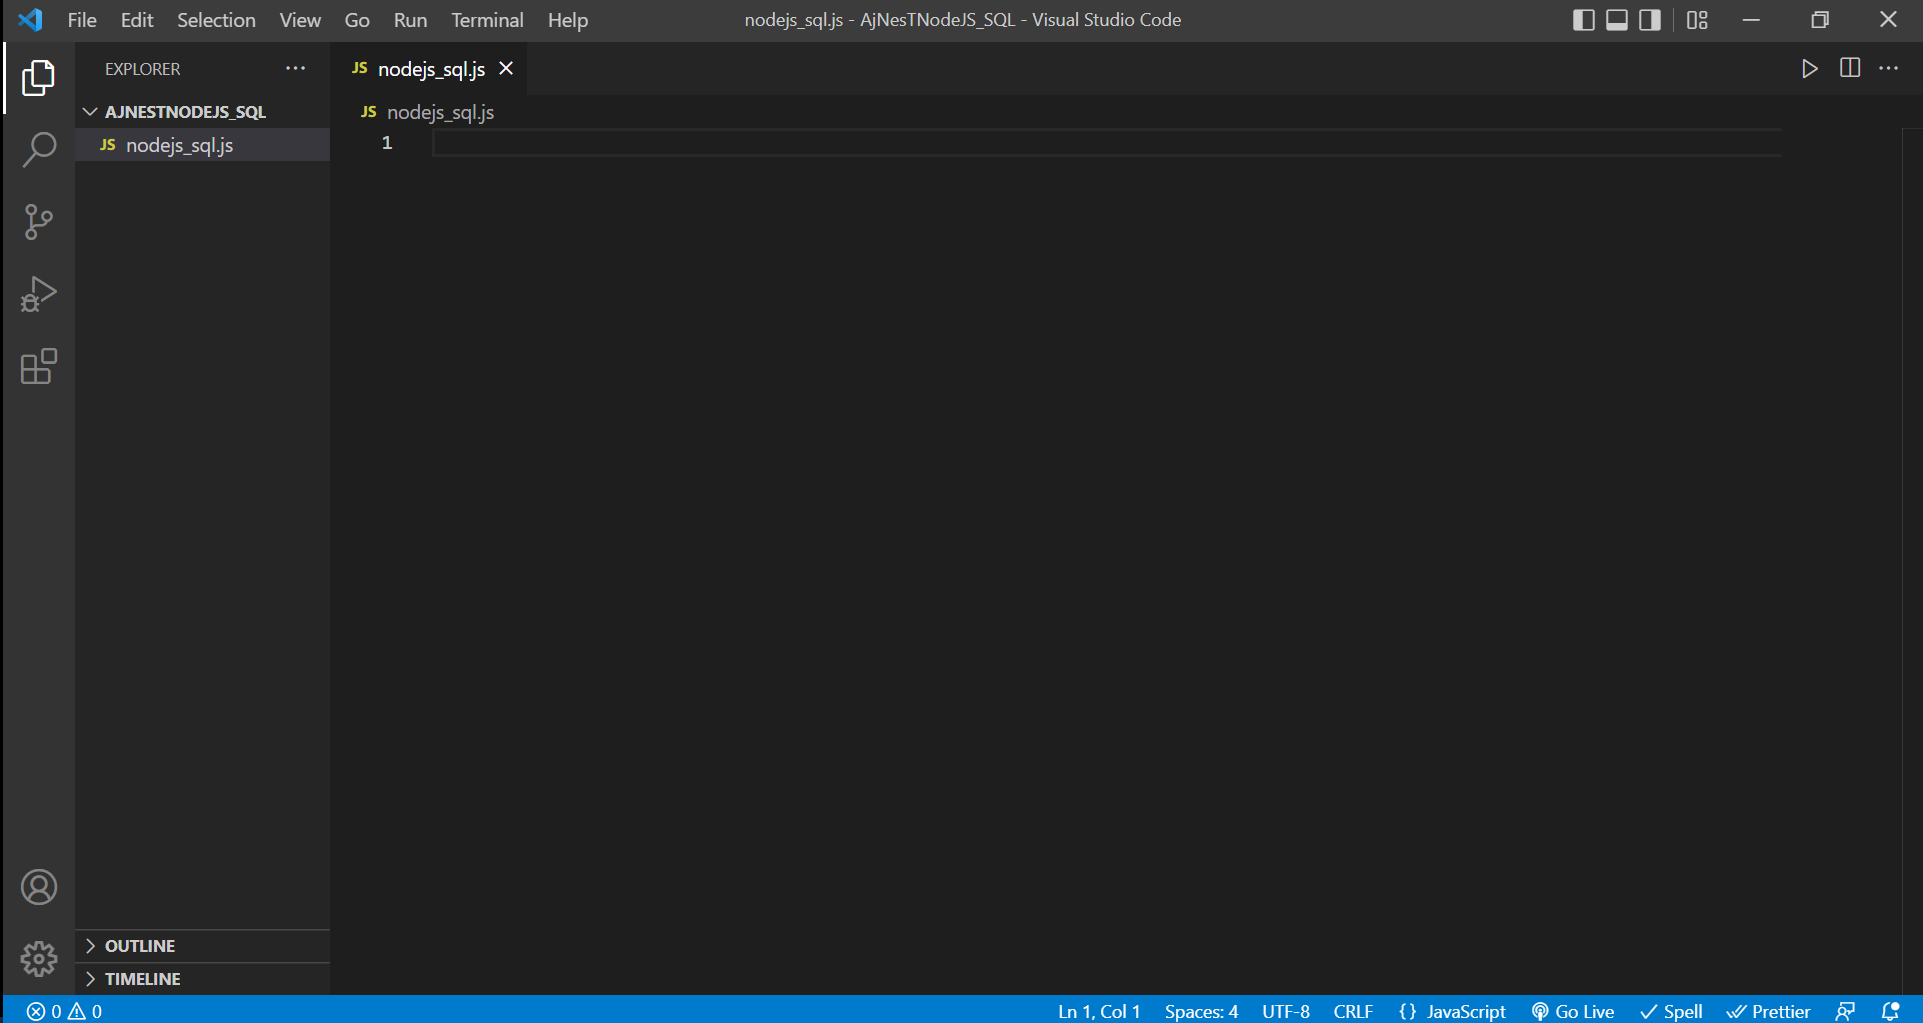
1. เปิดโปรแกรม Visual Studio Code สร้าง Folder แล้วลากเข้าใน VS Code แล้วสร้างไฟล์ชื่อ nodejs_sql.js
2. ทำให้ Project สามารถรัน NodeJS ได้
ไปที่ Terminal –> New Terminal
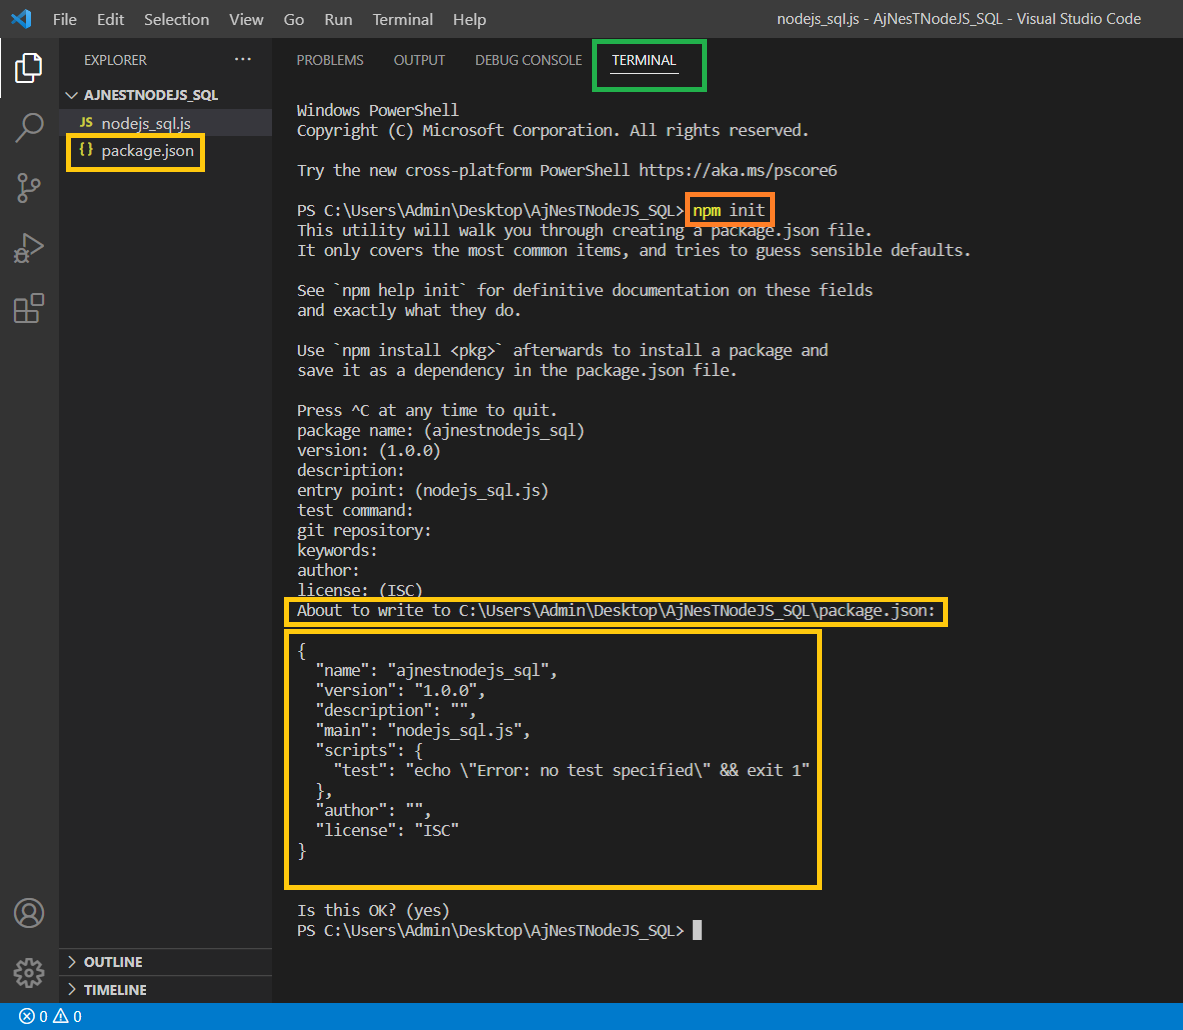
พิมพ์คำสั่ง npm init
หลังจากนั้นกด Enter ไปเรื่อย ๆ จนจบจะสร้างไฟล์ package.json ขึ้นมาให้
3. เปิดไฟล์ package.json เพิ่มบรรทัดที่ 7 เพื่อให้สามารถใช้งานคำสั่ง npm start เวลารัน Server จะได้สะดวกขึ้น
“start”: “nodemon nodejs_sql.js”,
Terminal พิมพ์คำสั่ง npm start จะทำการเรียกใช้งานคำสั่ง nodemon nodejs_sql.js (nodemon ชื่อไฟล์.js) เพื่อเปิด Server
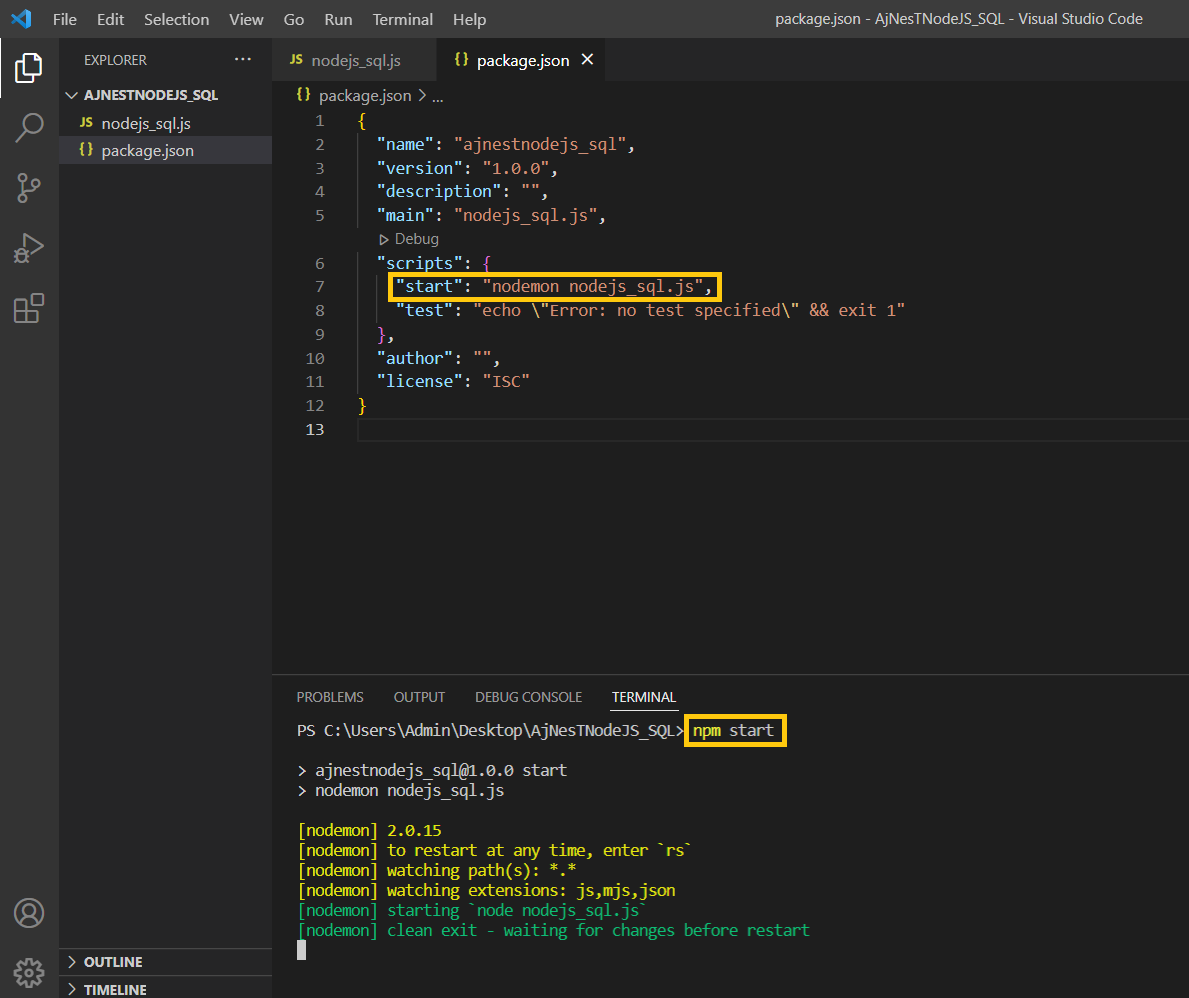
กด Control + C หยุดการรัน
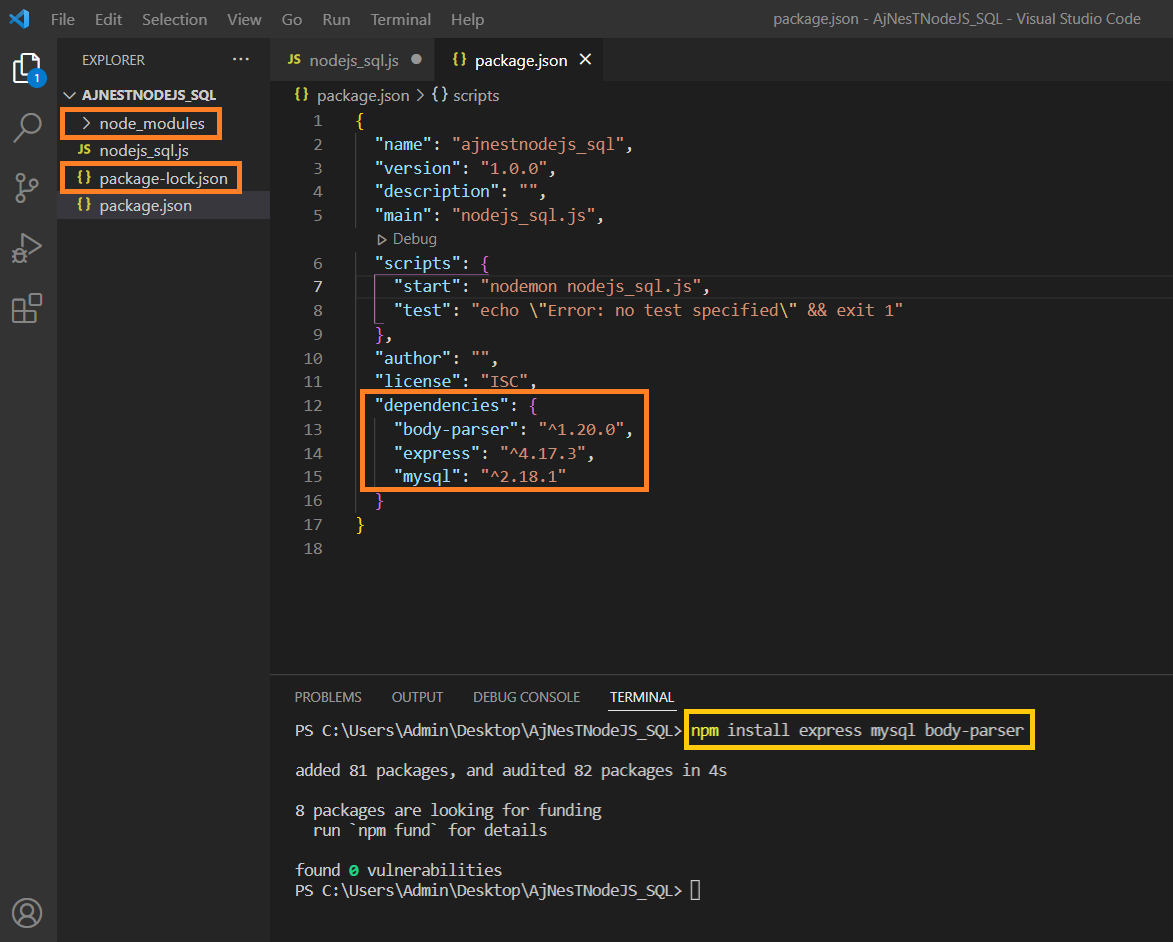
4. ติดตั้ง Express MySQL และ body-parser
ไปที่ Ternimal พิมพ์คำสั่ง npm install express mysql body-parser กด Enter
ทำการติดตั้ง Modules ต่าง ๆ ได้ไฟล์ ดังรูป
5. เขียนโปรแกรมสร้างการใช้งาน Express และการเชื่อม Database ของ MySQL (phpMyAdmin)
//Open Call Express
const express = require('express')
const bodyParser = require('body-parser')
const mysql = require('mysql')
const app = express()
const port = process.env.PORT || 5000;
app.use(bodyParser.json())
//MySQL Connect phpMyAdmin
const pool = mysql.createPool({
connectionLimit : 10,
connectionTimeout : 20,
host : 'localhost', //www.google.com/sql or Server IP Address
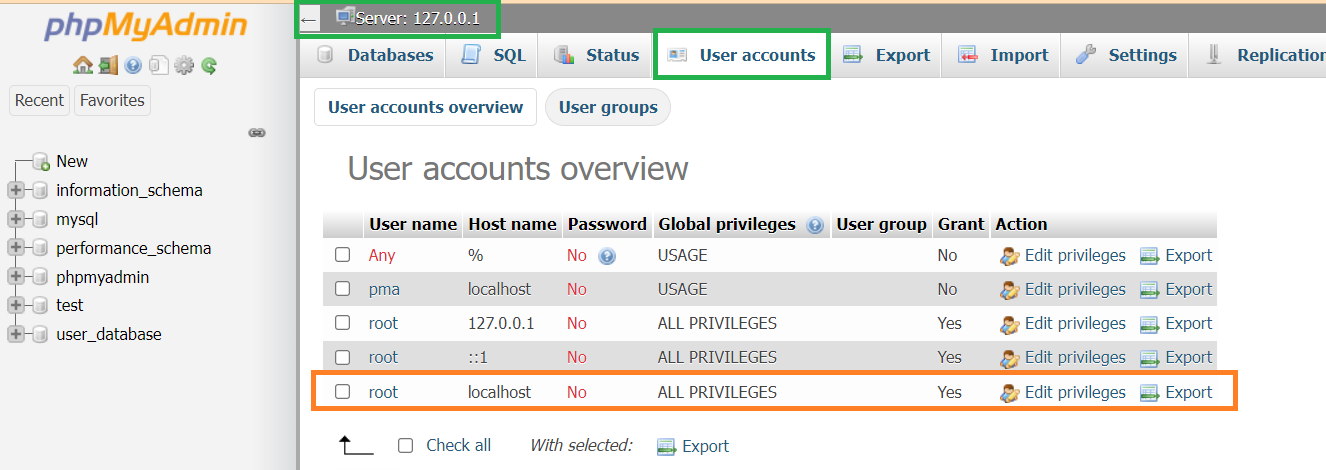
user : 'root',
password : '',
database : 'nodejs_beers' //Connect Database from beers.sql (Import to phpMyAdmin)
})

6. รู้ได้ไงว่าเป็น root และ password ไม่ได้ใส่ เปิดได้ที่ phpMyAdmin –> User accounts
7. ดาวน์โหลดไฟล์ Database ที่ใช้ beers.sql ในการเรียน
https://drive.google.com/file/d/1an9lctBKhGbkg1-fept7D720Epb2ITi3/view?usp=sharing
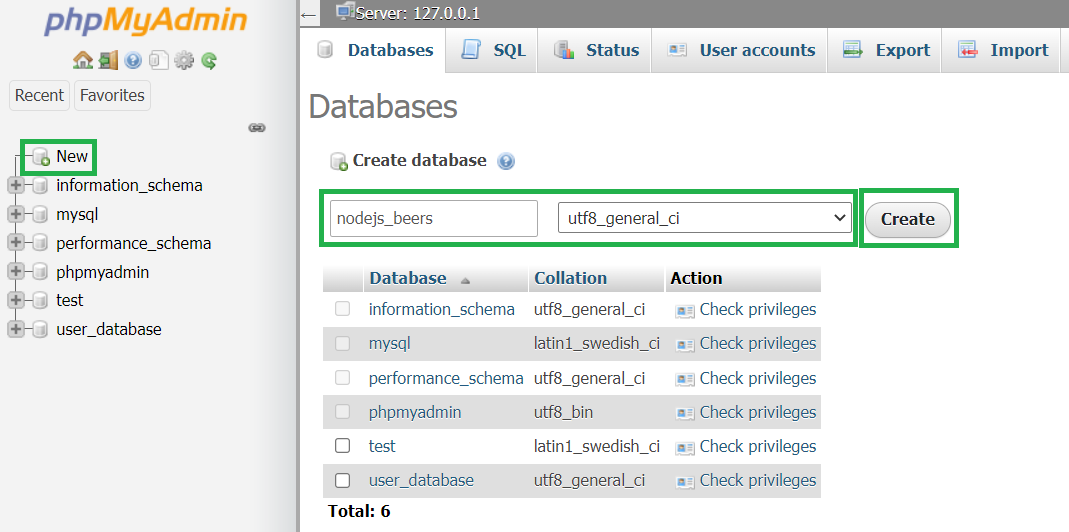
8. ทำการสร้าง Database –> New –> Create database ตั้งชื่อ nodejs_beers และ utf8_general_ci –> Create
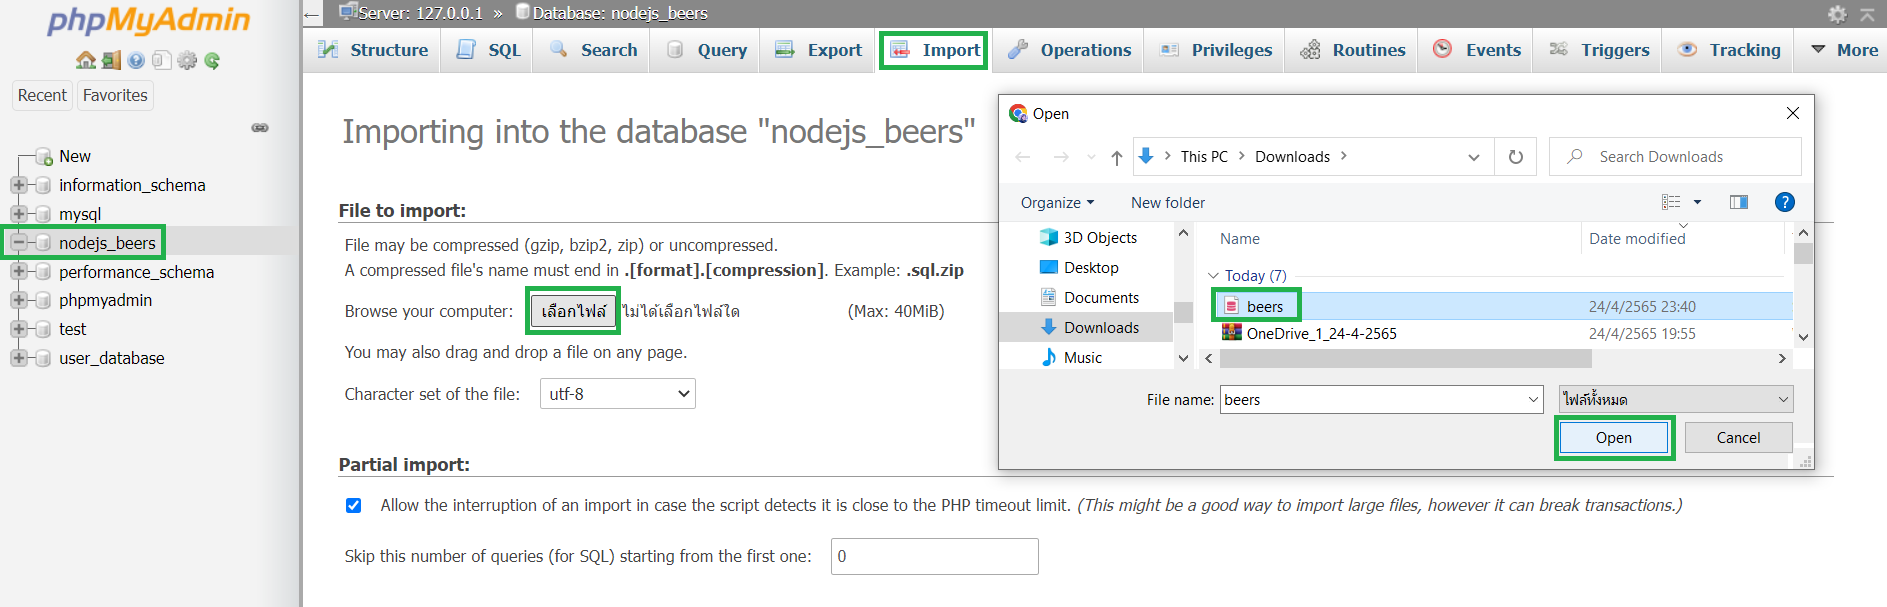
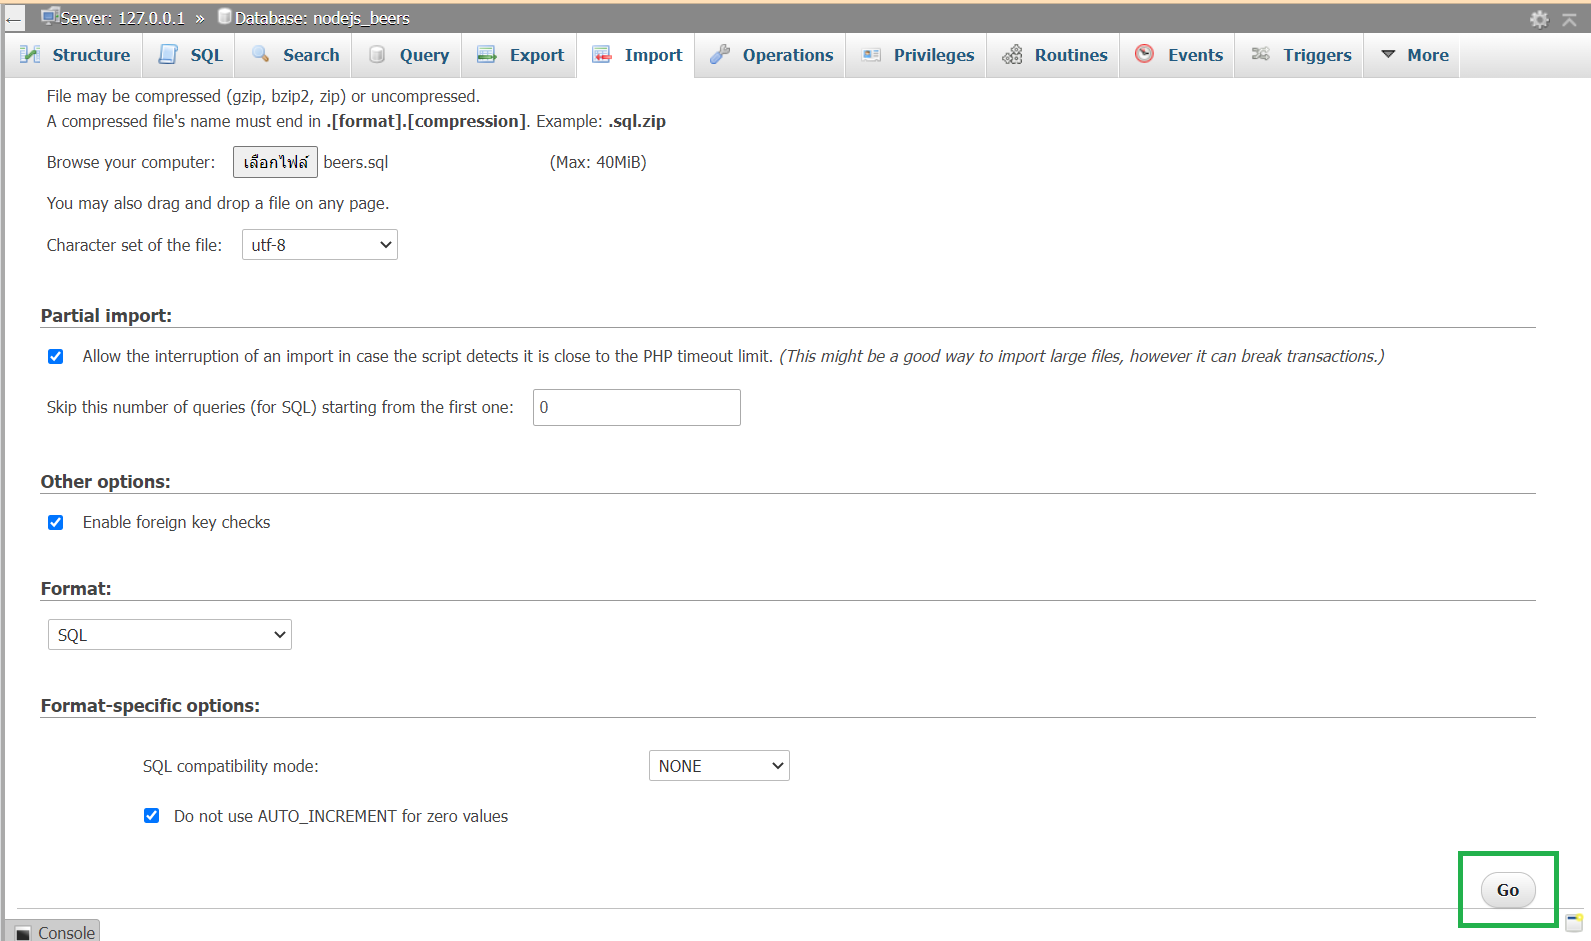
9. ทำการ Import ไฟล์ beers.sql
ไปที่ Import –> เลือกไฟล์ –> beers.sql –> Open –> Go

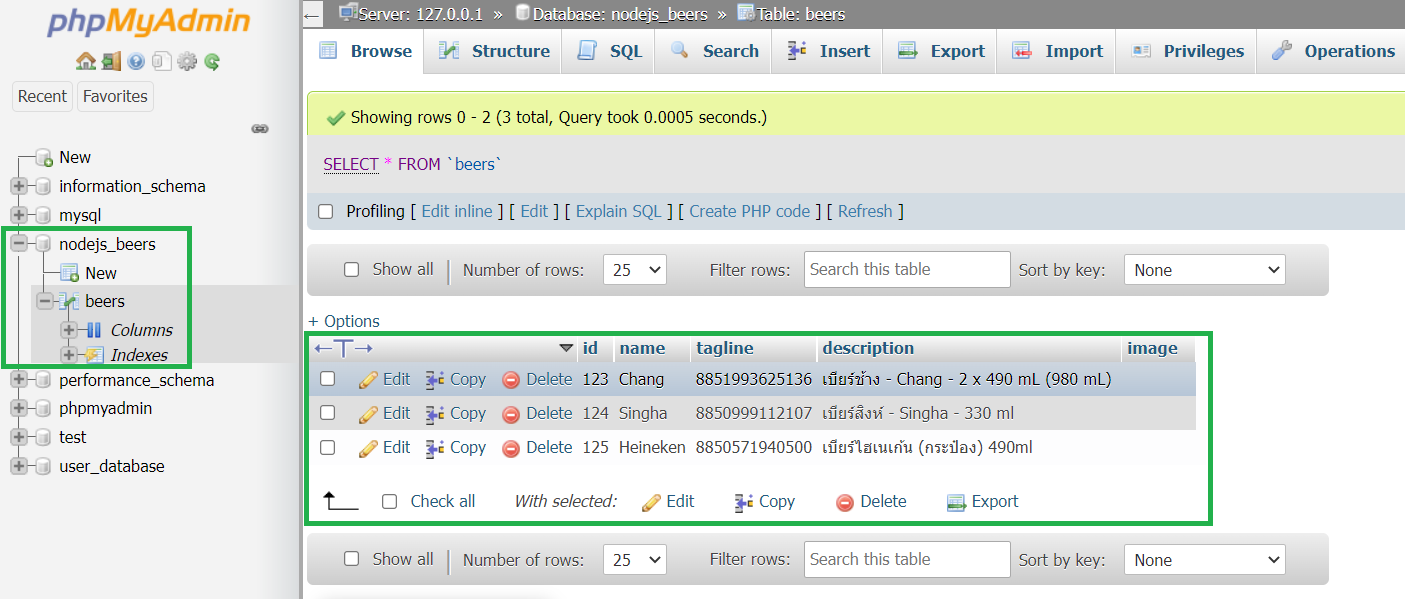
10. ได้ Database ของ beers.sql
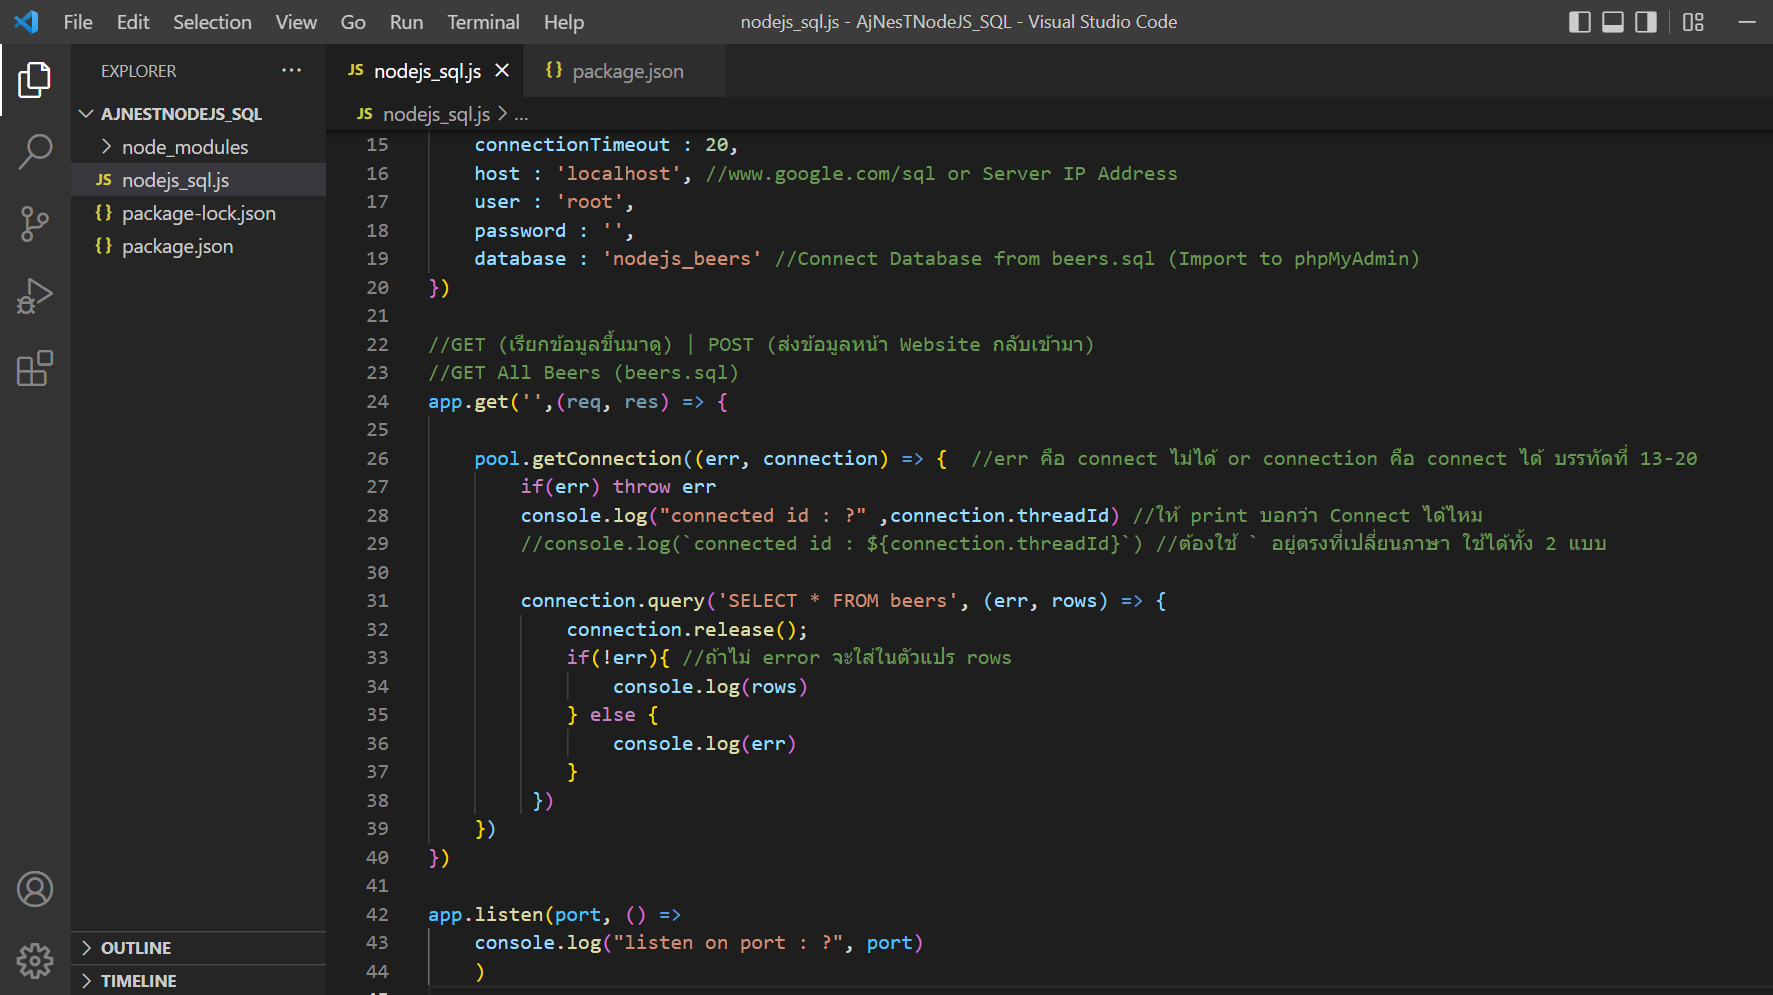
11. เขียนโปรแกรม node.js_sql.js (เขียนเพิ่มบรรทัดที่ 22-44) เชื่อมต่อ Database ใช้ GET เรียกข้อมูลจาก Database ขึ้นมาดู โดยเชื่อมต่อ Database และใช้คำสั่ง SQL
ไฟล์ node.js_sql.js
//Open Call Express
const express = require('express')
const bodyParser = require('body-parser')

const mysql = require('mysql')

const app = express()
const port = process.env.PORT || 5000;

app.use(bodyParser.json())

//MySQL Connect phpMyAdmin
const pool = mysql.createPool({
    connectionLimit : 10,
    connectionTimeout : 20,
    host : 'localhost', //www.google.com/sql or Server IP Address
    user : 'root',
    password : '',
    database : 'nodejs_beers' //Connect Database from beers.sql (Import to phpMyAdmin)
})

//GET (เรียกข้อมูลขึ้นมาดู) | POST (ส่งข้อมูลหน้า Website กลับเข้ามา)
//GET All Beers (beers.sql)
app.get('',(req, res) => {

    pool.getConnection((err, connection) => {  //err คือ connect ไม่ได้ or connection คือ connect ได้ บรรทัดที่ 13-20
        if(err) throw err
        console.log("connected id : ?" ,connection.threadId) //ให้ print บอกว่า Connect ได้ไหม
        //console.log(`connected id : ${connection.threadId}`) //ต้องใช้ ` อยู่ตรงที่เปลี่ยนภาษา ใช้ได้ทั้ง 2 แบบ

        connection.query('SELECT * FROM beers', (err, rows) => {
            connection.release();
            if(!err){ //ถ้าไม่ error จะใส่ในตัวแปร rows
                console.log(rows)
            } else {
                console.log(err)
            }
         })
    })
})

app.listen(port, () =>
    console.log("listen on port : ?", port)
    )
12. Terminal พิมพ์คำสั่ง npm start
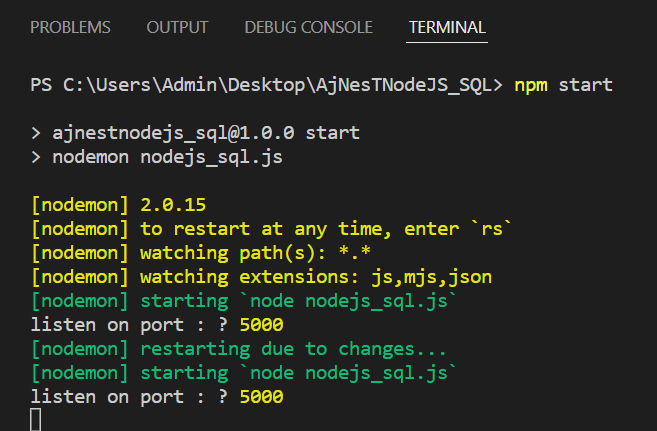
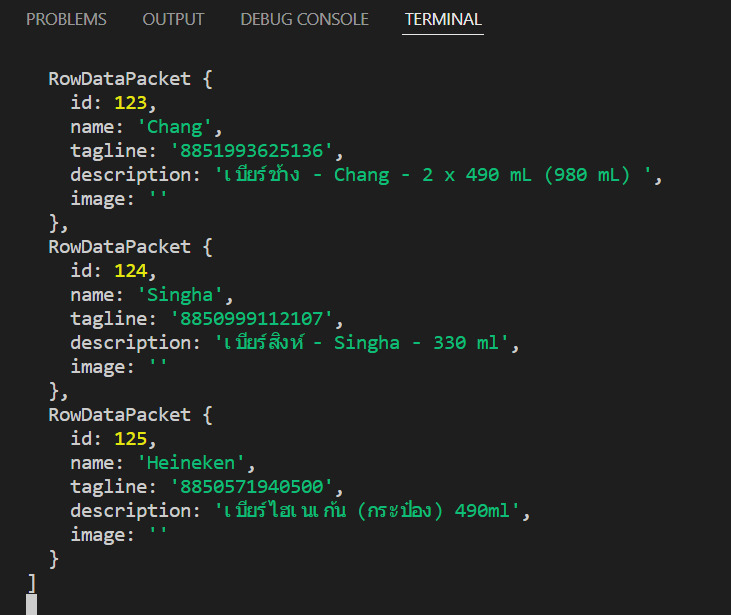
13. เปิด Web Browser รัน http://localhost:5000/ บนเว็บจะหมุนไปเรื่อย ๆ เนื่องจากตั้งค่าให้แสดงข้อมูลผ่าน Console ของ VS Code

หน้า Console เป็นข้อมูลที่อยู่ใน rows ของ Code ที่เขียนใน VS Code จะแสดงข้อมูล beer.sql Database
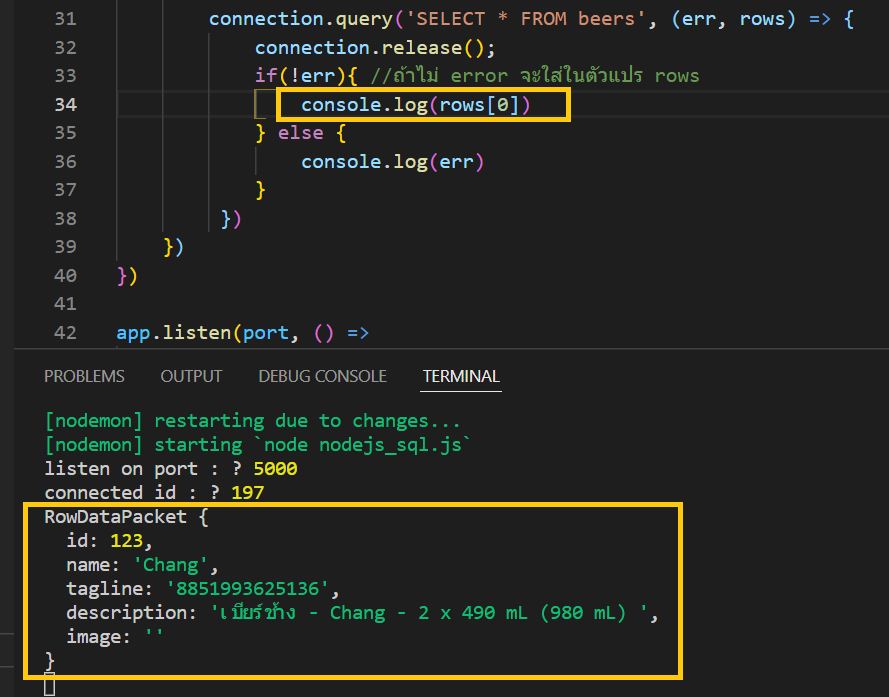
14. แก้ไข Code ให้แสดงรายการที่ต้องการใน Database
แสดงเฉพาะรายการที่ 1 แก้ไขบรรทัดที่ 34 เป็น console.log(raws[0]) ต้องกด Refresch รันเว็บ http://localhost:5000/
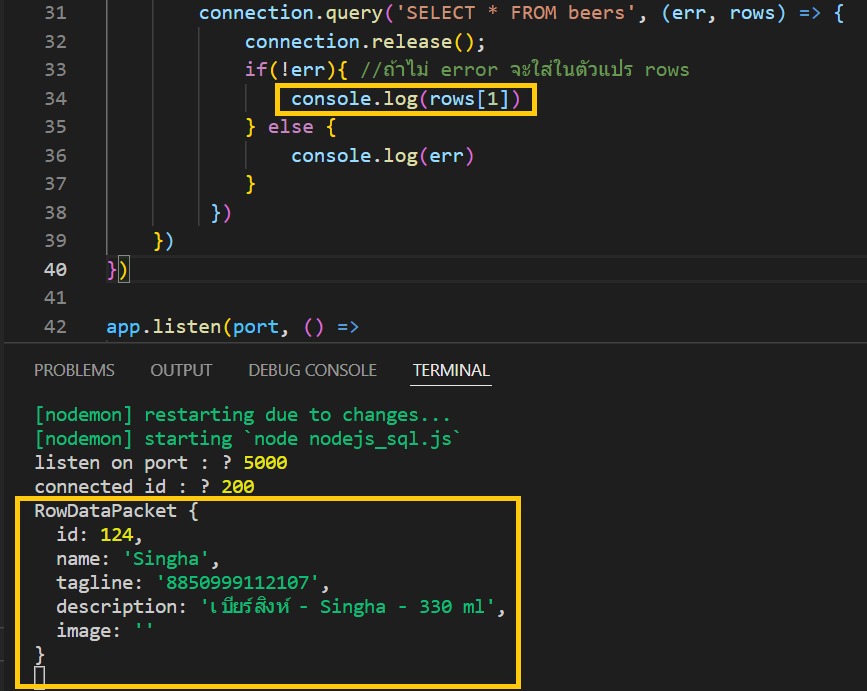
แสดงเฉพาะรายการที่ 2 แก้ไขบรรทัดที่ 34 เป็น console.log(raws[1])
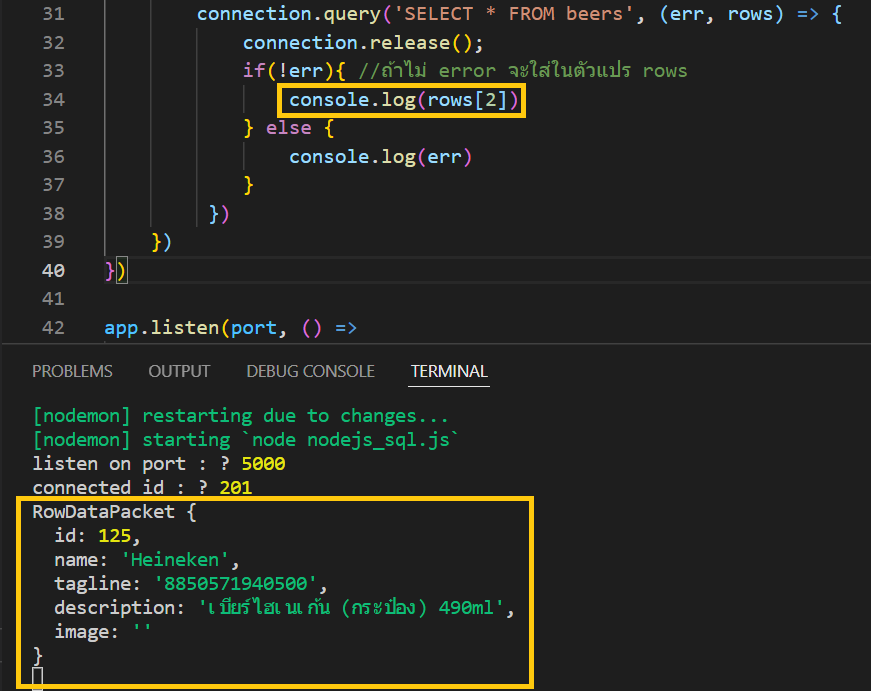
แสดงเฉพาะรายการที่ 3 แก้ไขบรรทัดที่ 34 เป็น console.log(raws[2])
ปิด Web Browser ที่รัน http://localhost:5000/ ถัดไปจะใช้โปรแกรม Postman มาช่วยในการทดสอบแทน
15. ใช้ Postman ในการทดสอบ API สำหรับ Web Developers
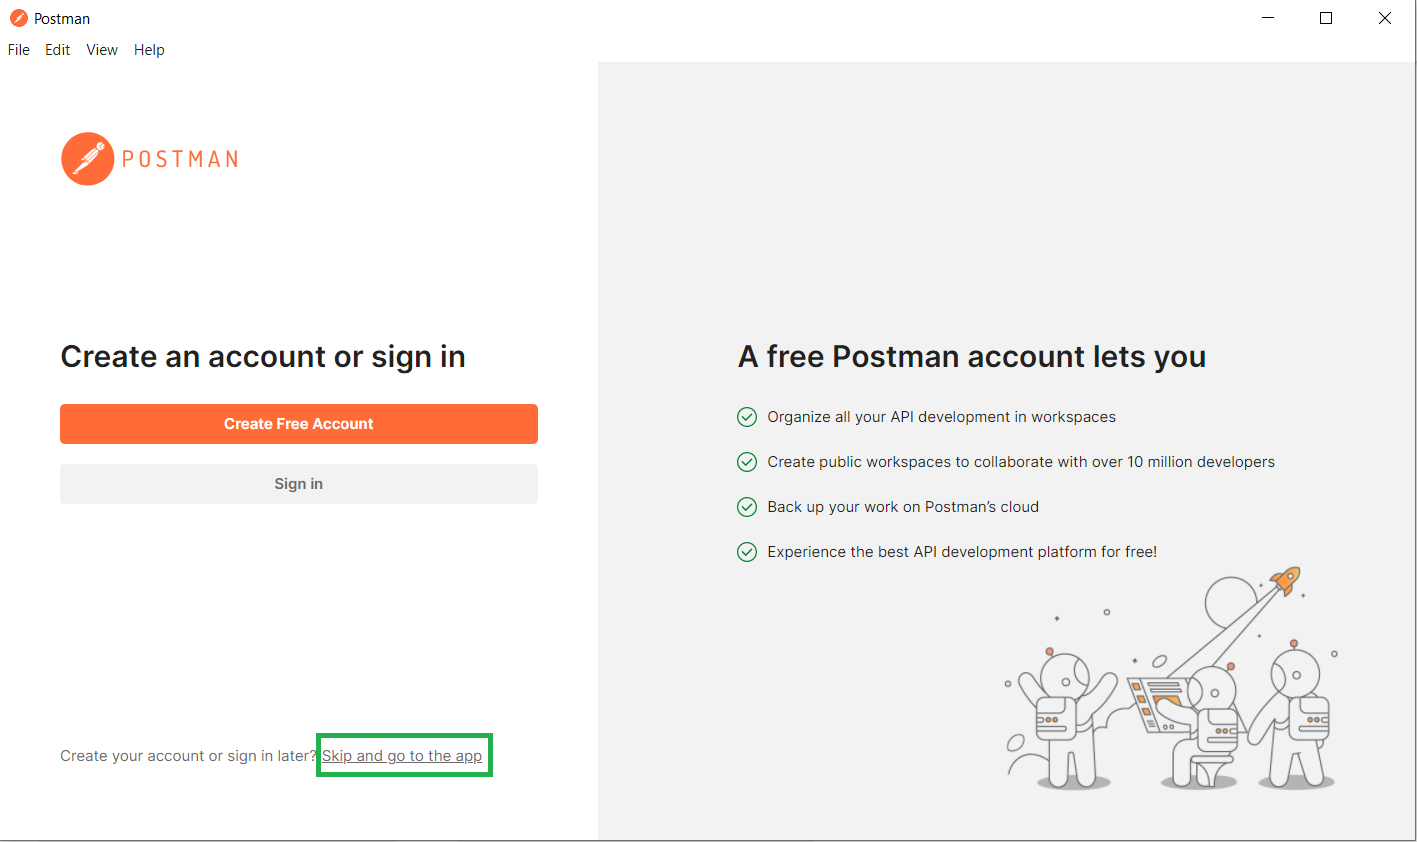
ให้ทำการดาวน์โหลดโปรแกรม https://www.postman.com/downloads/
กด Skip and go to the app
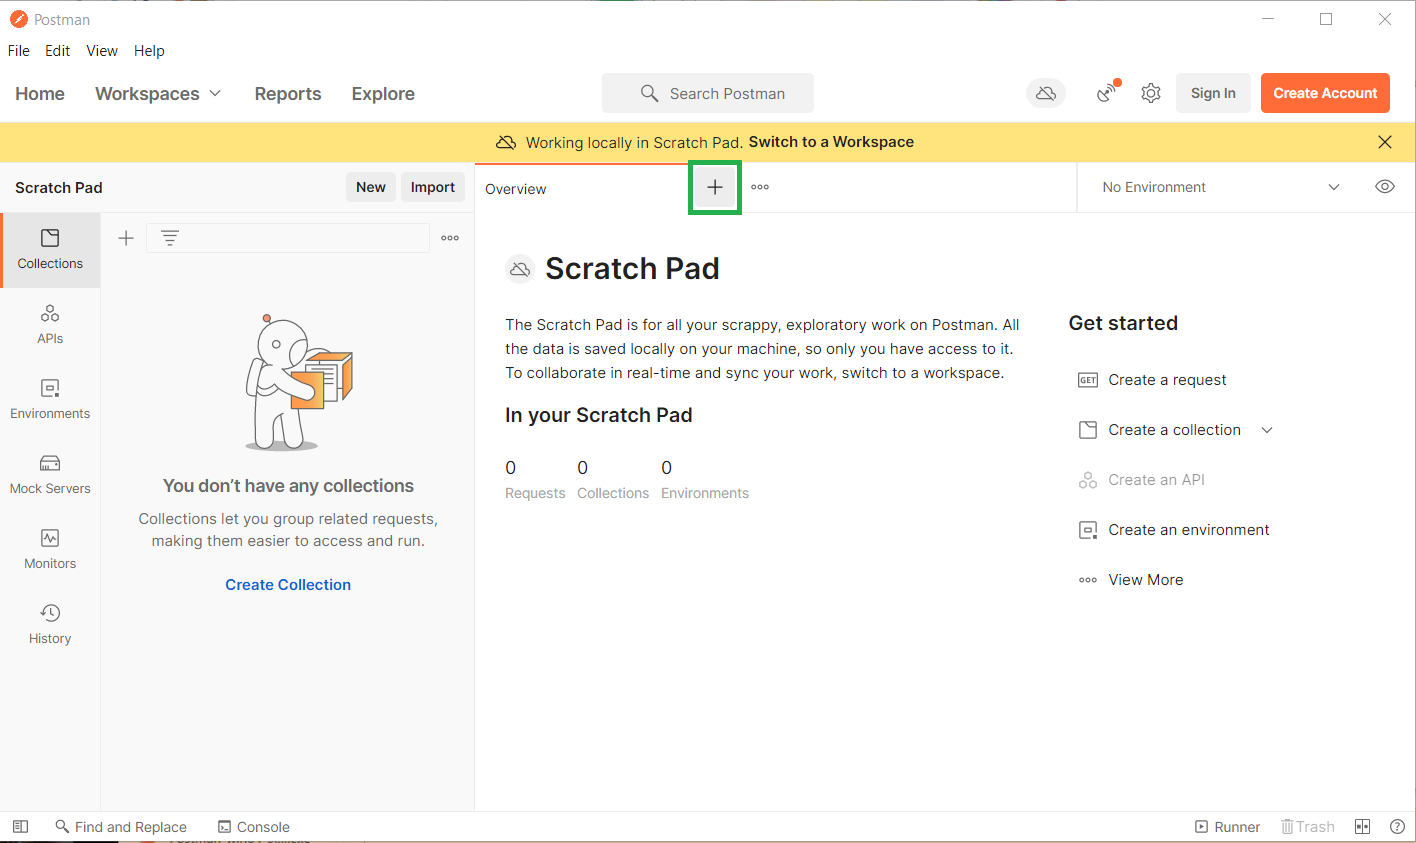
กด +
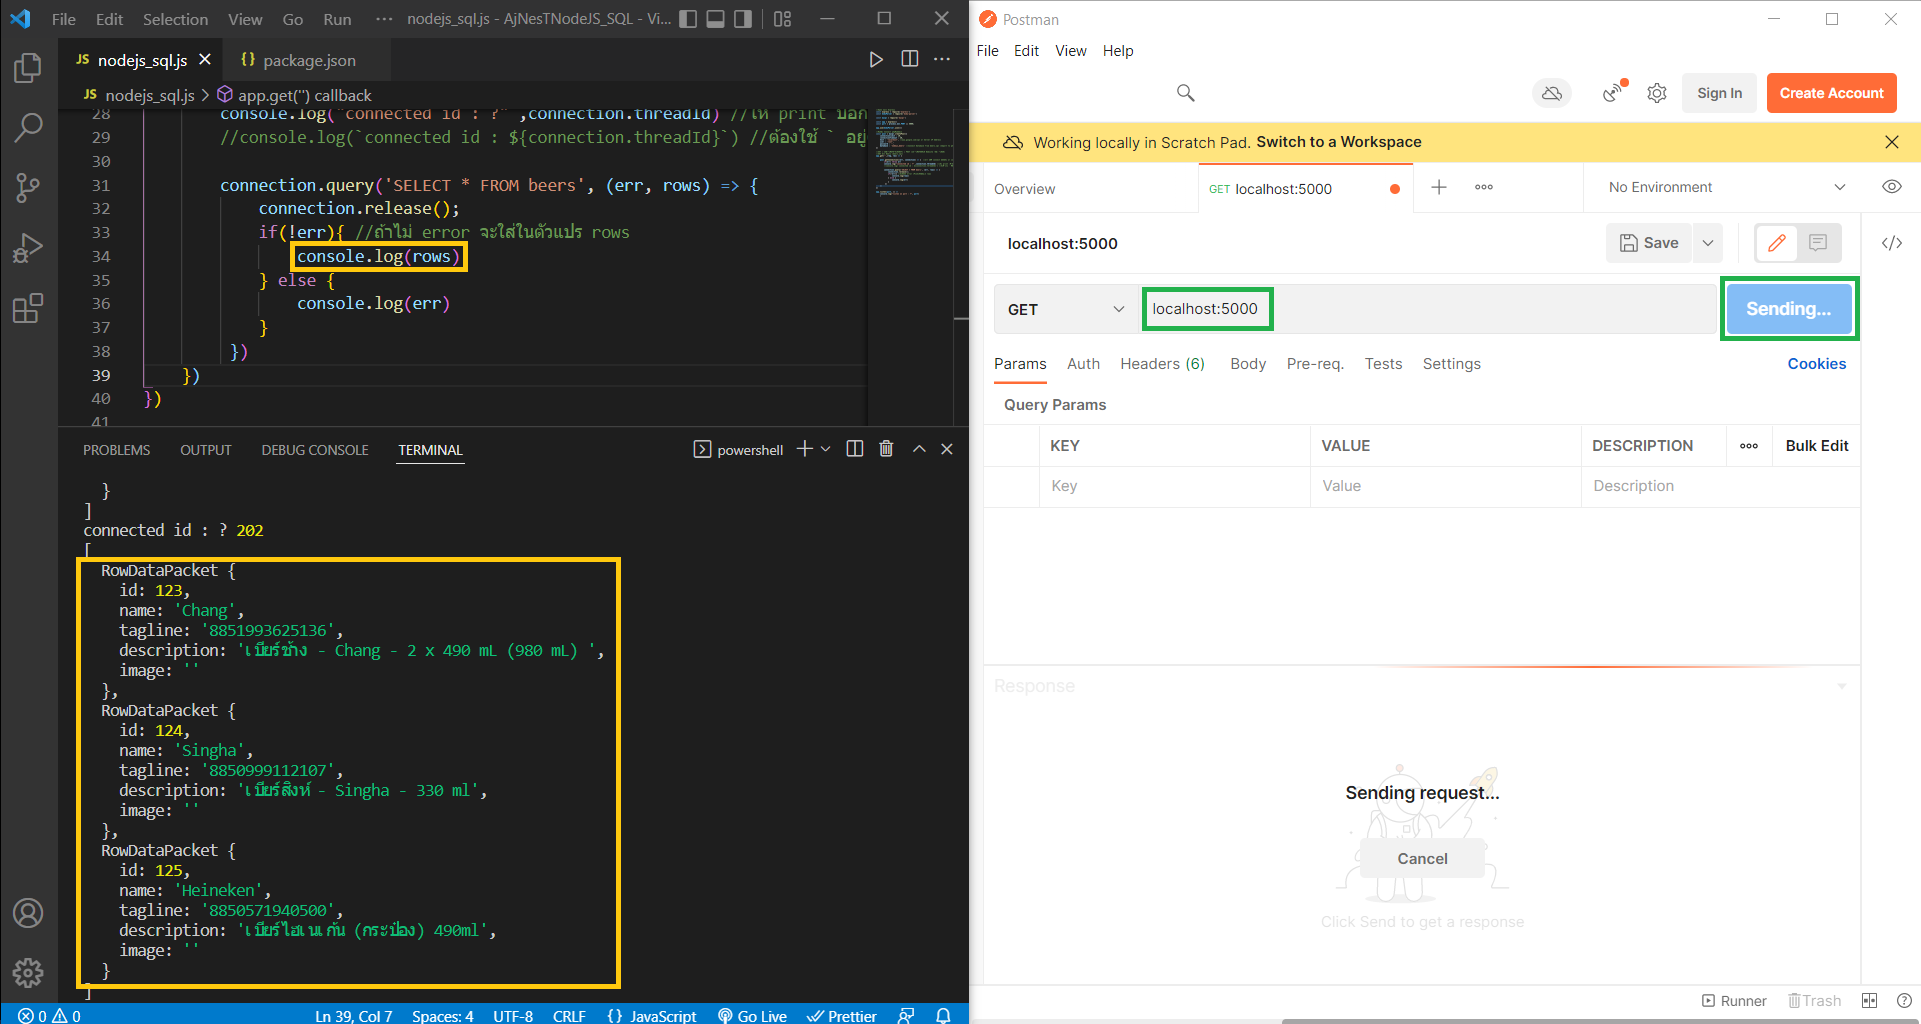
แก้ไข Code บรรทัดที่ 34 เป็น console.log(rows)
โปรแกรม Postman ตรง GET ในช่องพิมพ์ localhost:5000 –> กด Send ผลลัพธ์จะแสดงข้อมูล beers.sql ออกมาหน้า Console ทำได้เหมือนกับการเปิด Web Browser ปกติ ข้อดีสามารถ Save เก็บไปใช้งานได้
16. ทดลองส่งข้อมูลแบบ JSON หรือ Send ไปแสดงบน Postman
ใน VS Code แก้ไข Code จากเดิม console.log(rows) เป็น res.json(rows) หรือ res.send(rows) ส่งไปได้ผลลัพธ์แบบเดียวกัน
ในโปรแกรม Postman ใส่ localhost:5000 แล้วกด Send จะแสดงข้อมูล JSON ที่มาจากฐานข้อมูล beers.sql

17. เขียนโปรแกรมให้แสดงในแต่ละหน้า เฉพาะ id ที่ต้องการ localhost:5000/123 หรือ /124 หรือ /125
Terminal รัน Server คำสั่ง npm start
ข้อมูล Database
//Copy บรรทัดที่ 24 - 42 มาปรับแก้ Code ใหม่
//สร้างหน้าย่อย ดึงข้อมูลเฉพาะ id ที่ต้องการ คือ 123, 124, 125
app.get('/:id',(req, res) => {

    pool.getConnection((err, connection) => {  //err คือ connect ไม่ได้ or connection คือ connect ได้ บรรทัดที่ 13-20
        if(err) throw err
        console.log("connected id : ?" ,connection.threadId) //ให้ print บอกว่า Connect ได้ไหม
        //console.log(`connected id : ${connection.threadId}`) //ต้องใช้ ` อยู่ตรงที่เปลี่ยนภาษา ใช้ได้ทั้ง 2 แบบ

        connection.query('SELECT * FROM beers WHERE `id` = ?', req.params.id, (err, rows) => {
            connection.release();
            if(!err){ //ถ้าไม่ error จะใส่ในตัวแปร rows
                res.send(rows)
            } else {
                console.log(err)
            }
         })
    })
})

18. แสดงผลแต่ละ id บน Postman
พิมพ์ในช่องของ Postmane –> GET พิมพ์ localhost:5000/123 –> Send

พิมพ์ในช่องของ Postmane –> GET พิมพ์ localhost:5000/124 –> Send
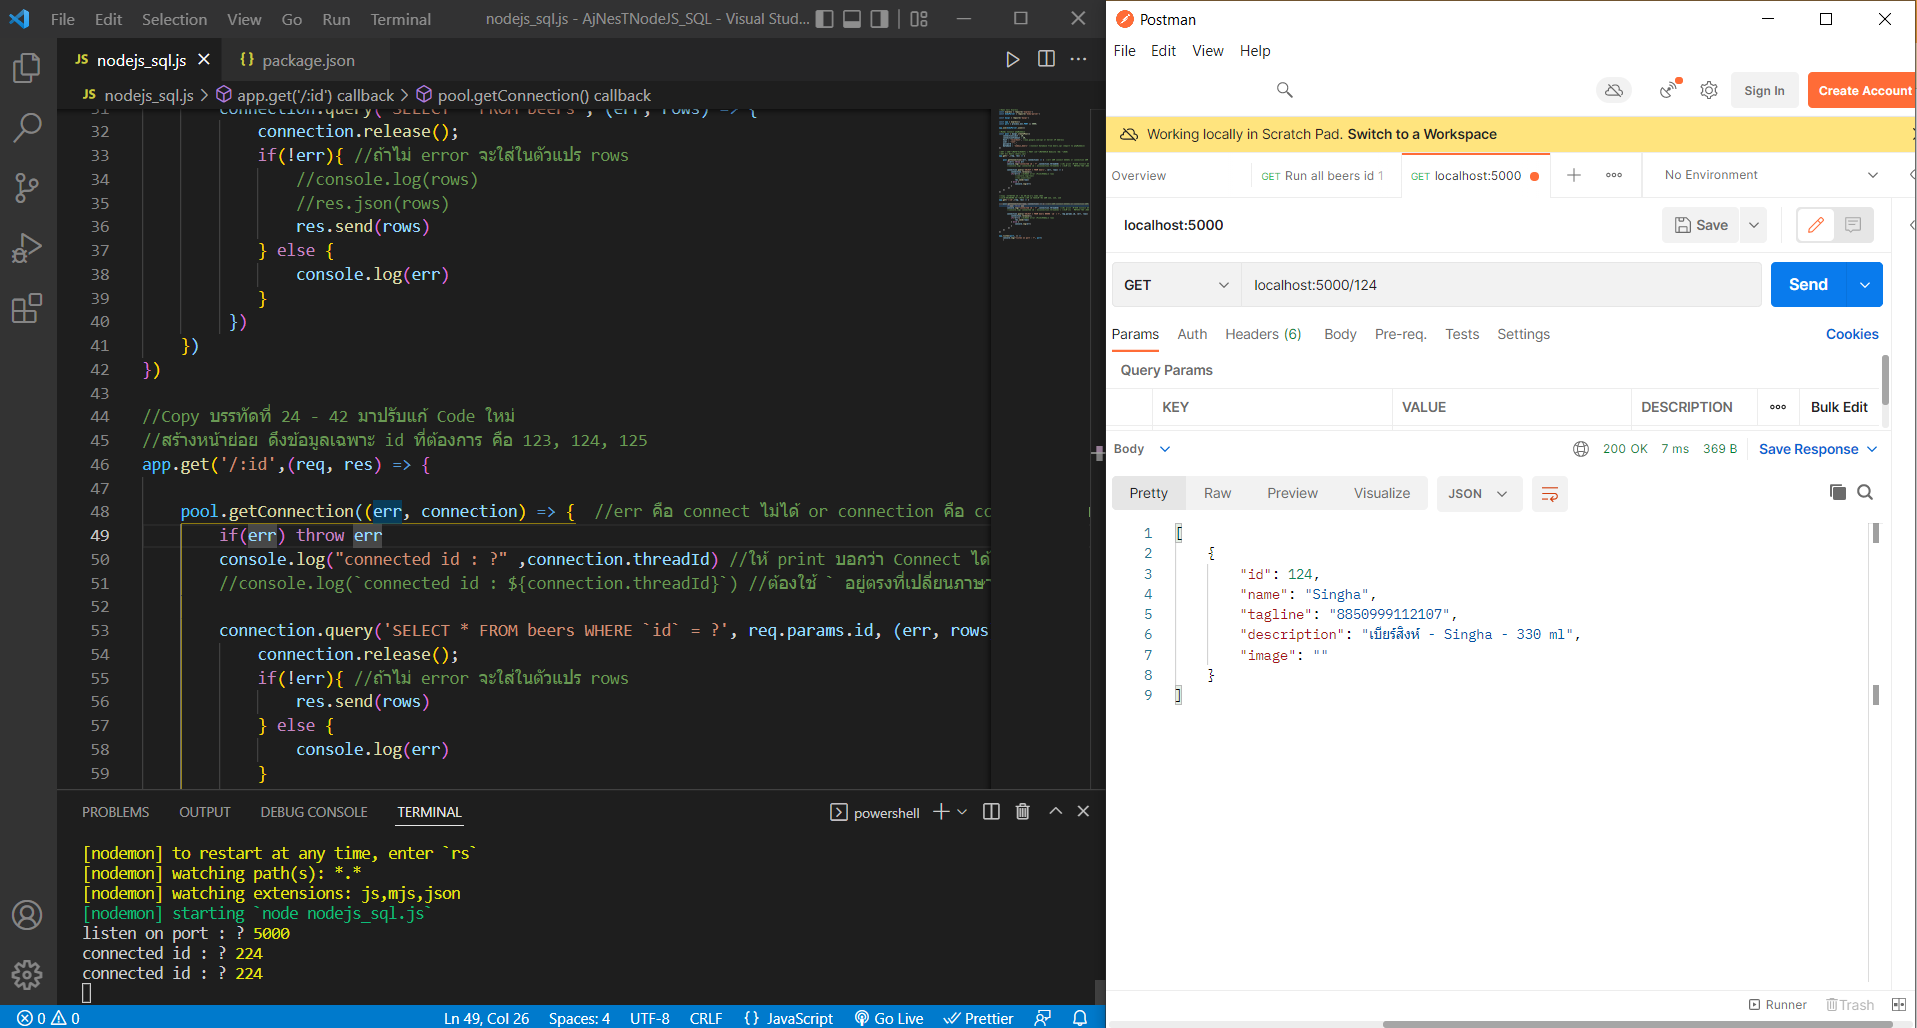
พิมพ์ในช่องของ Postmane –> GET พิมพ์ localhost:5000/125 –> Send

ไฟล์ nodejs_sql.js
Download: https://drive.google.com/file/d/1JLEmcYqbKEFVJeLX0XqE0yOeaeuMw_x_/view?usp=sharing
//Open Call Express
const express = require('express')
const bodyParser = require('body-parser')

const mysql = require('mysql')

const app = express()
const port = process.env.PORT || 5000;

app.use(bodyParser.json())

//MySQL Connect phpMyAdmin
const pool = mysql.createPool({
    connectionLimit : 10,
    connectionTimeout : 20,
    host : 'localhost', //www.google.com/sql or Server IP Address
    user : 'root',
    password : '',
    database : 'nodejs_beers' //Connect Database from beers.sql (Import to phpMyAdmin)
})

//GET (เรียกข้อมูลขึ้นมาดู) | POST (ส่งข้อมูลหน้า Website กลับเข้ามา)
//GET All Beers (beers.sql)
app.get('',(req, res) => {

    pool.getConnection((err, connection) => {  //err คือ connect ไม่ได้ or connection คือ connect ได้ บรรทัดที่ 13-20
        if(err) throw err
        console.log("connected id : ?" ,connection.threadId) //ให้ print บอกว่า Connect ได้ไหม
        //console.log(`connected id : ${connection.threadId}`) //ต้องใช้ ` อยู่ตรงที่เปลี่ยนภาษา ใช้ได้ทั้ง 2 แบบ

        connection.query('SELECT * FROM beers', (err, rows) => {
            connection.release();
            if(!err){ //ถ้าไม่ error จะใส่ในตัวแปร rows
                //console.log(rows)
                //res.json(rows)
                res.send(rows)
            } else {
                console.log(err)
            }
         })
    })
})

//Copy บรรทัดที่ 24 - 42 มาปรับแก้ Code ใหม่
//สร้างหน้าย่อย ดึงข้อมูลเฉพาะ id ที่ต้องการ คือ 123, 124, 125
app.get('/:id',(req, res) => {

    pool.getConnection((err, connection) => {  //err คือ connect ไม่ได้ or connection คือ connect ได้ บรรทัดที่ 13-20
        if(err) throw err
        console.log("connected id : ?" ,connection.threadId) //ให้ print บอกว่า Connect ได้ไหม
        //console.log(`connected id : ${connection.threadId}`) //ต้องใช้ ` อยู่ตรงที่เปลี่ยนภาษา ใช้ได้ทั้ง 2 แบบ

        connection.query('SELECT * FROM beers WHERE `id` = ?', req.params.id, (err, rows) => {
            connection.release();
            if(!err){ //ถ้าไม่ error จะใส่ในตัวแปร rows
                res.send(rows)
            } else {
                console.log(err)
            }
         })
    })
})

app.listen(port, () =>
    console.log("listen on port : ?", port)
    )


