เริ่มต้นใช้งาน React JavaScript Library สำหรับเขียน Web Applications
Lab 1: ติดตั้งและเริ่มต้นเขียนโปรแกรมเว็บด้วย React JavaScript Library
- ติดตั้ง Node.js ทาง https://nodejs.org/en/
- เปิดโปรแกรม Visual Studio Code สร้าง Folder ของ Project ที่ต้องการสร้างเว็บแอปพลิเคชัน
- New Terminal พิมพ์คำสั่ง node
เพื่อตรวจสอบการติดตั้ง Node.js ถ้าขึ้น version แสดงว่าได้ทำการติดตั้งเรียบร้อยแล้ว - หน้า Terminal พิมพ์คำสั่ง npm install -g create-react-app
เพื่อสร้าง Project เริ่มต้นขึ้นมาจากเครื่องมือที่ชื่อ create-react-app ซึ่งเป็นการสร้างไฟล์พื้นฐานต่าง ๆ ที่จำเป็นในการเขียน React

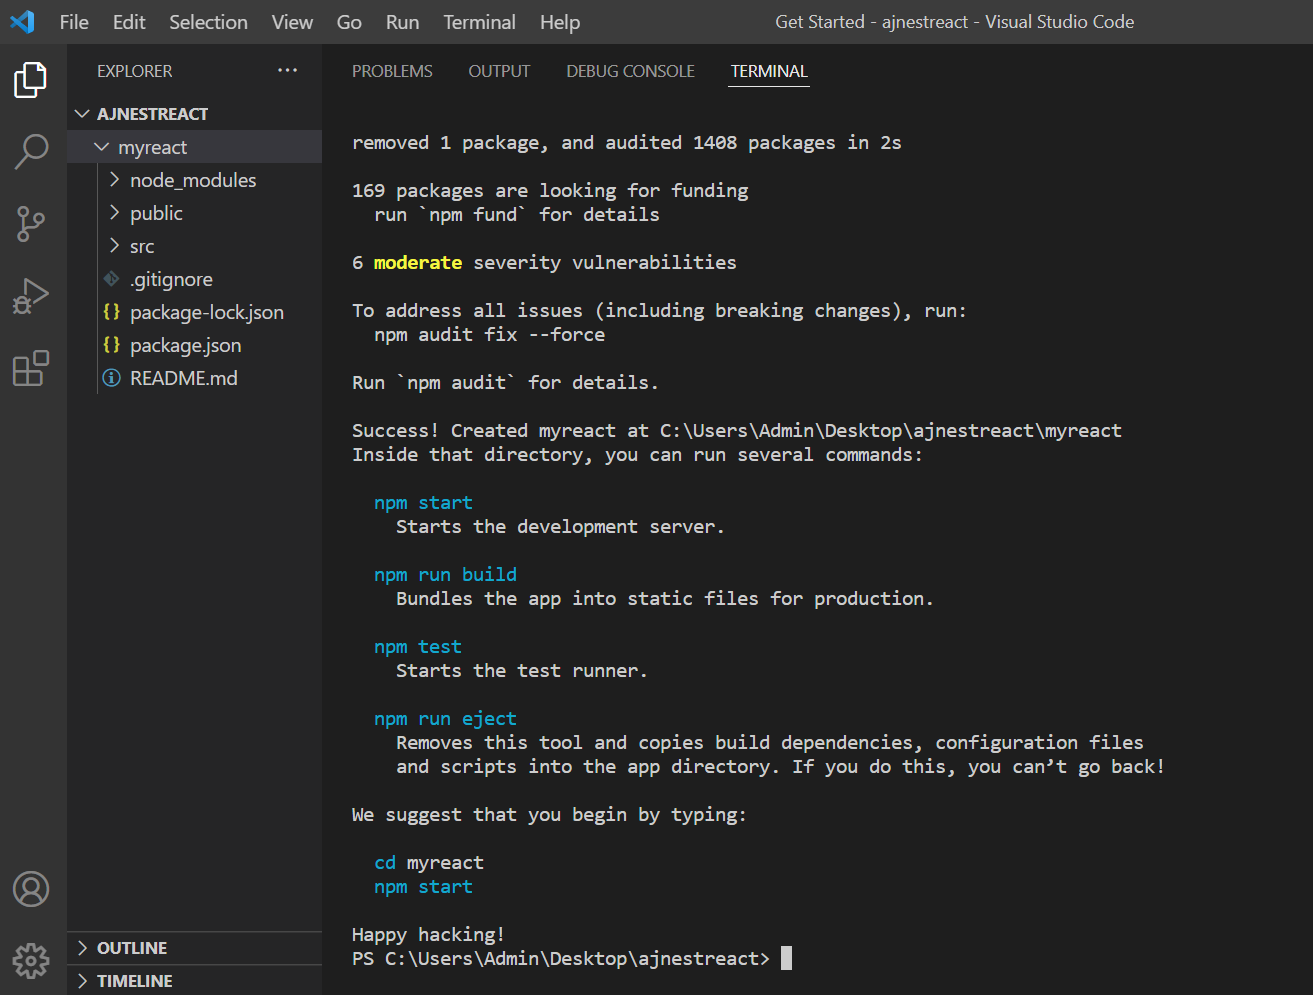
5. สร้าง Project ใหม่ชื่อ myreact ขึ้นมาด้วยคำสั่ง npx create-react-app myreact
6. ผลลัพธ์ได้ไฟล์เครื่องมือต่าง ๆ ของ React ดังรูป
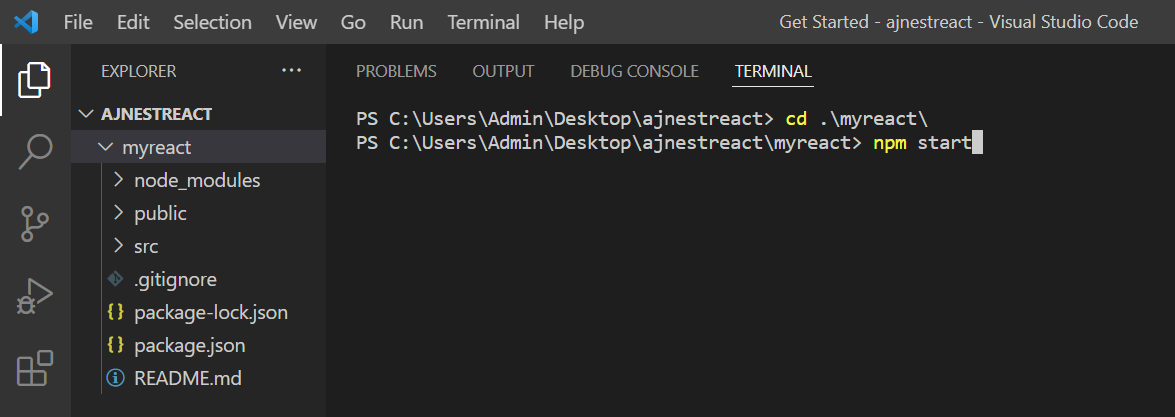
7. Terminal ให้เข้าไปที่ Folder ของ myreact พิมพ์ cd .\myreact\
8. เมื่ออยู่ใน Path ของ myreact แล้ว ทดลองรันด้วยคำสั่ง npm start
เพื่อทำการเปิด Web Server ได้ผลลัพธ์ดังรูป

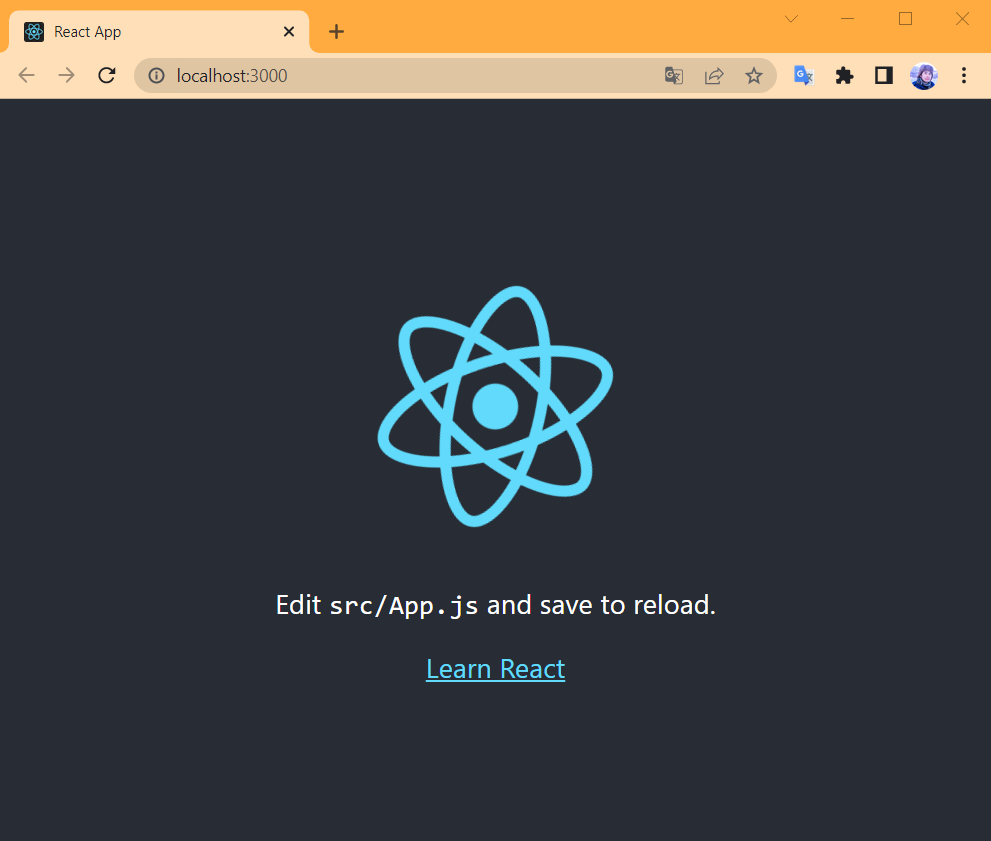
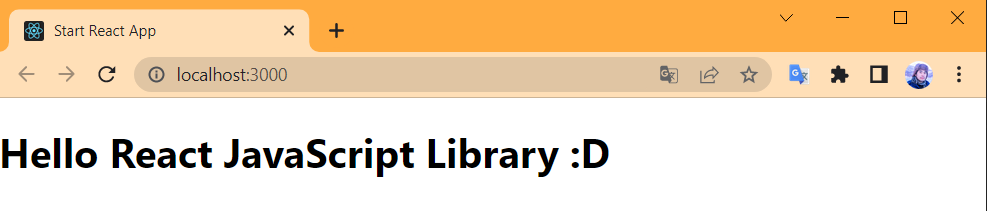
9. Web Browser จะเปิดขึ้นมาที่ http://localhost:3000/ แสดง Logo ของ React ถ้าขึ้นแบบนี้แสดงว่า React พร้อมใช้งานแล้ว
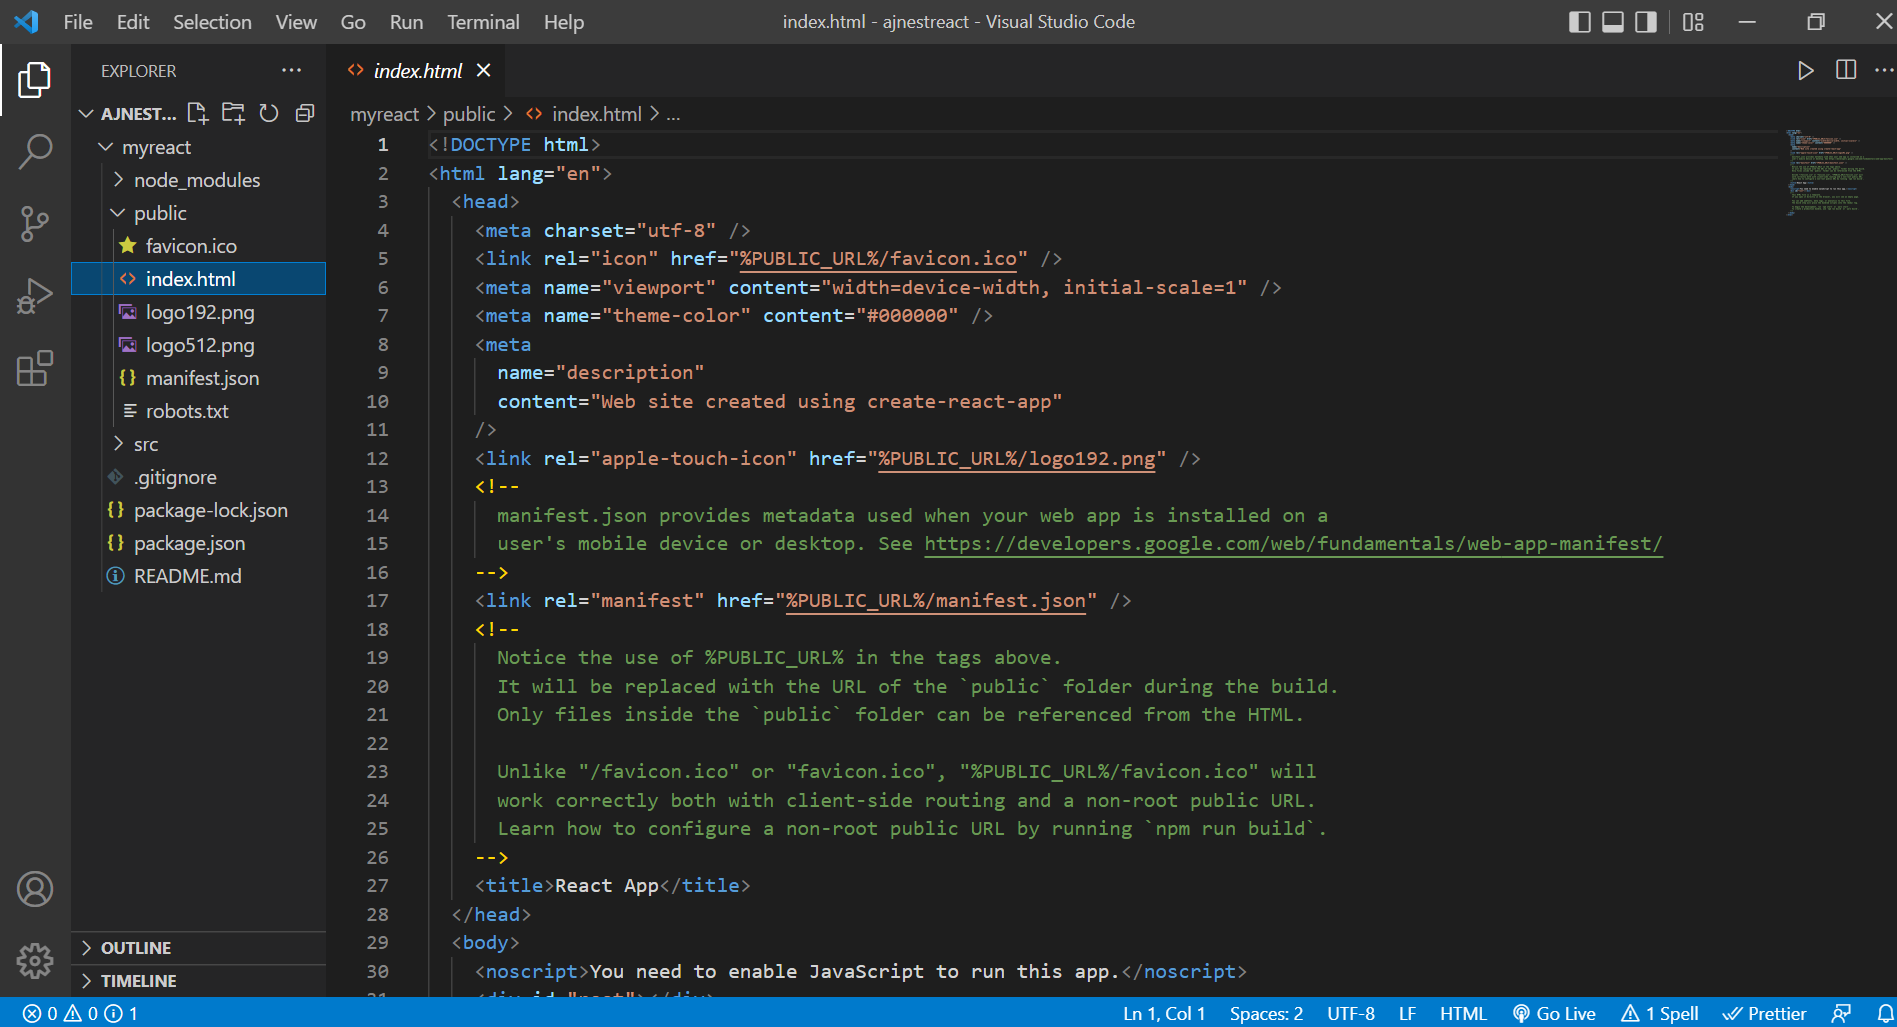
10. สำรวจไฟล์ของ React ที่ต้องรู้
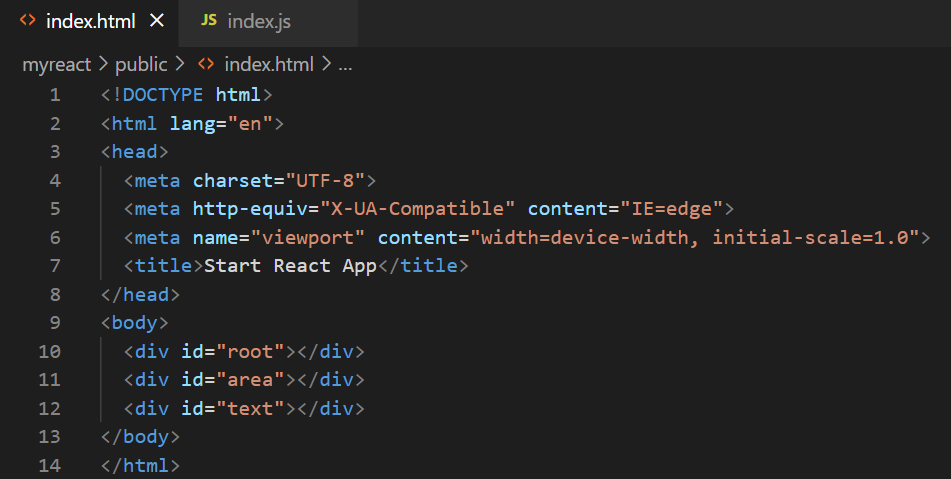
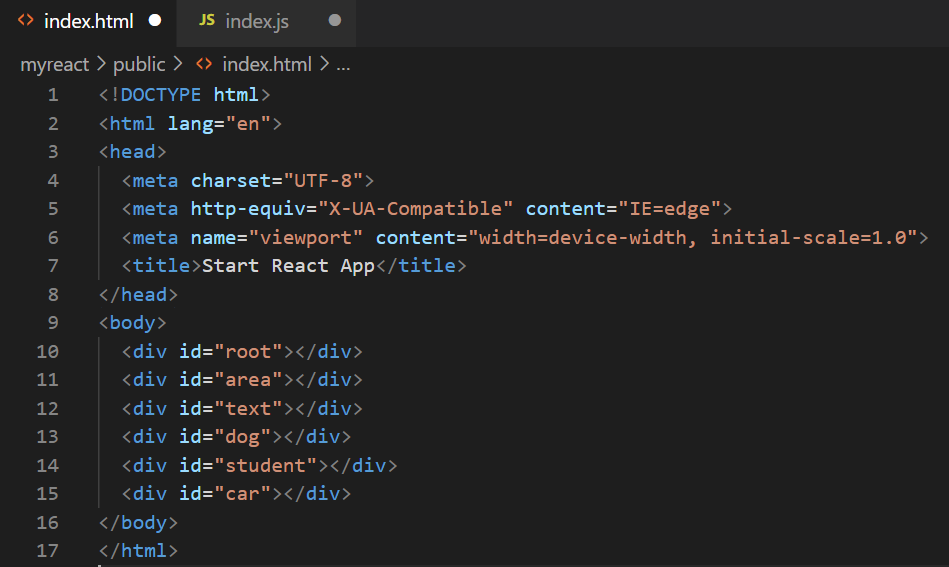
- /public/index.html เป็นไฟล์ HTML ที่ใช้เขียนโปรแกรมเพื่อแสดงผลใน Web Browser
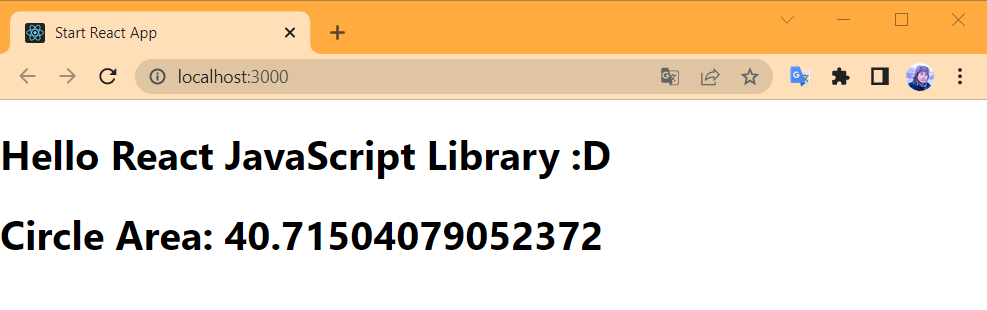
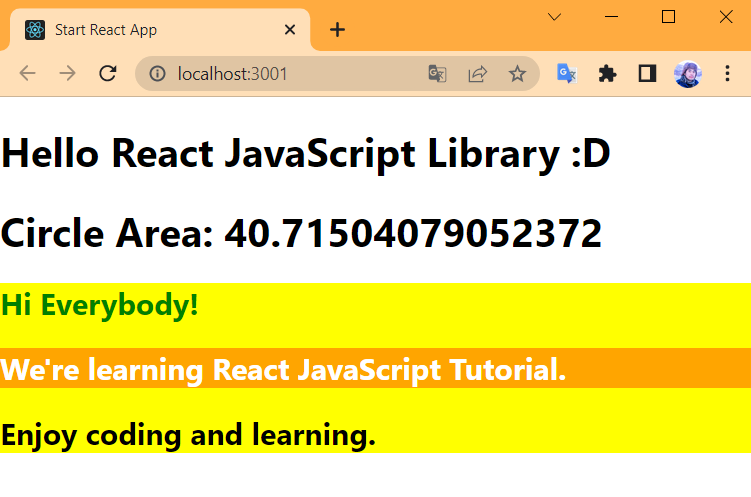
11. เขียนโปรแกรมแสดงข้อความ Hello React JavaScript Library ออกทางหน้าจอ Web Browser
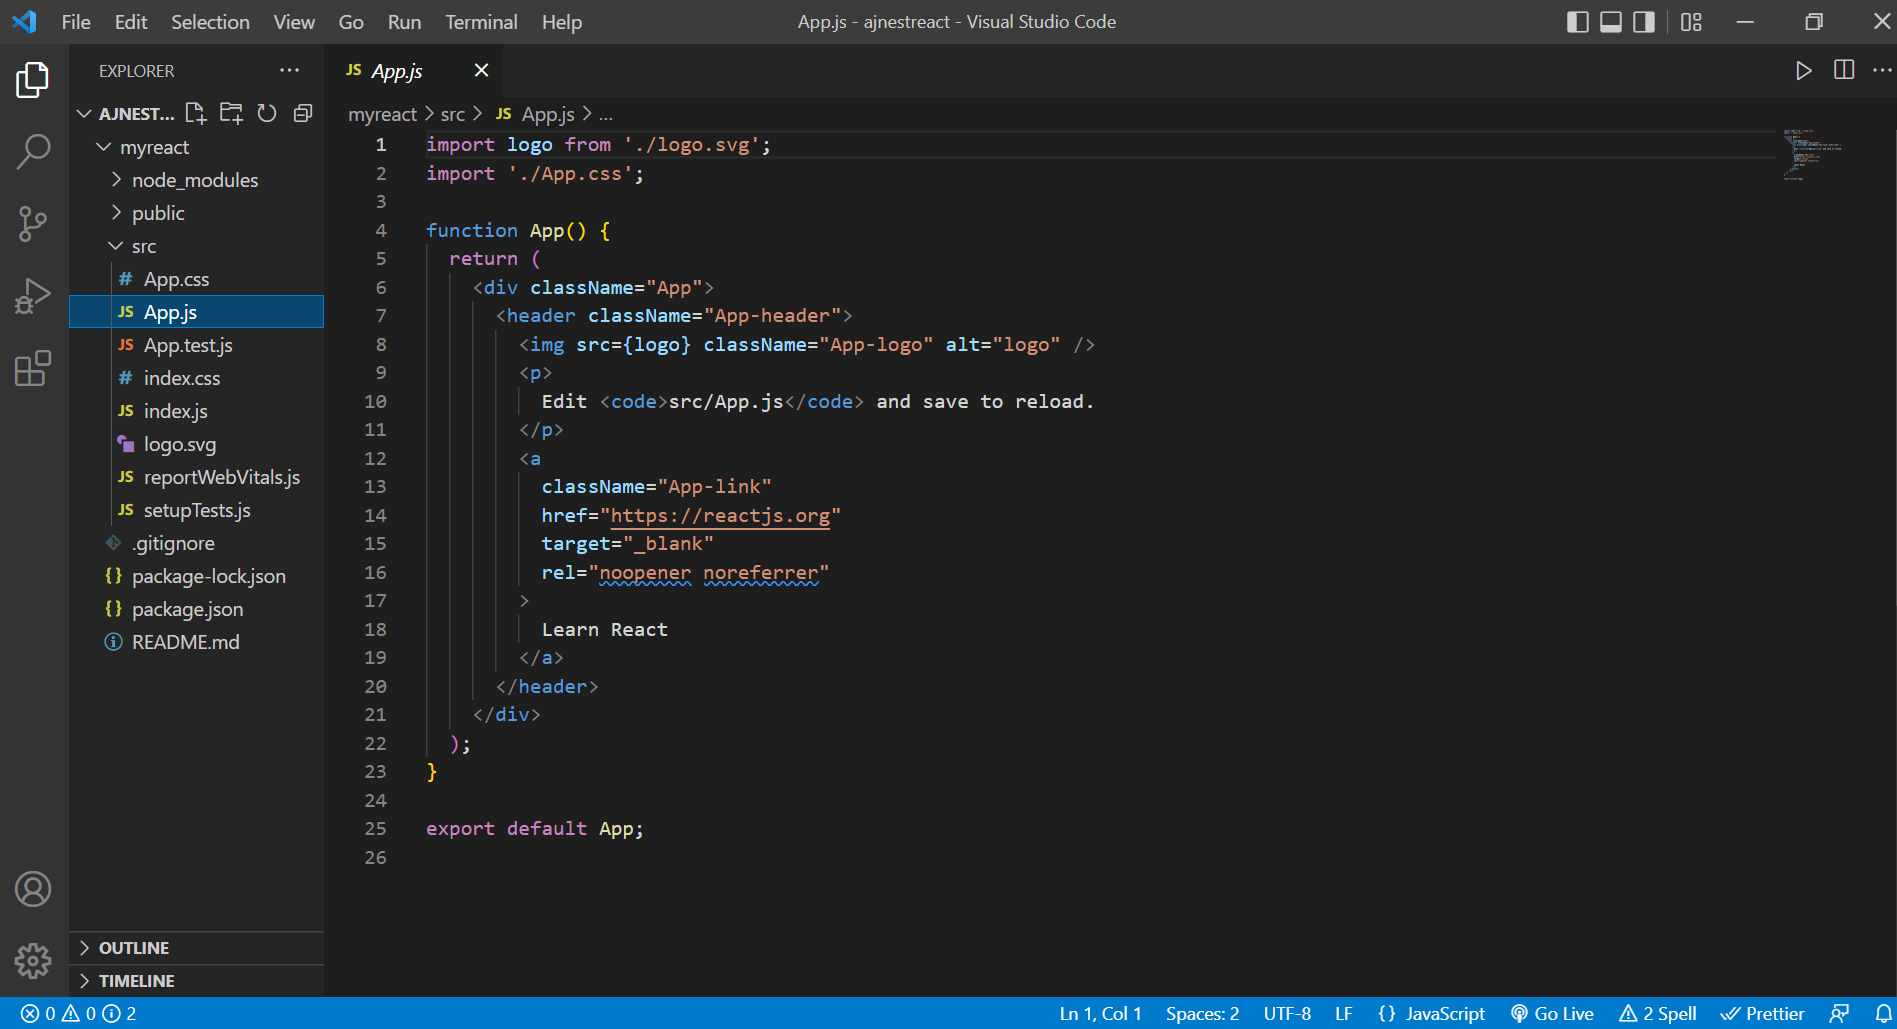
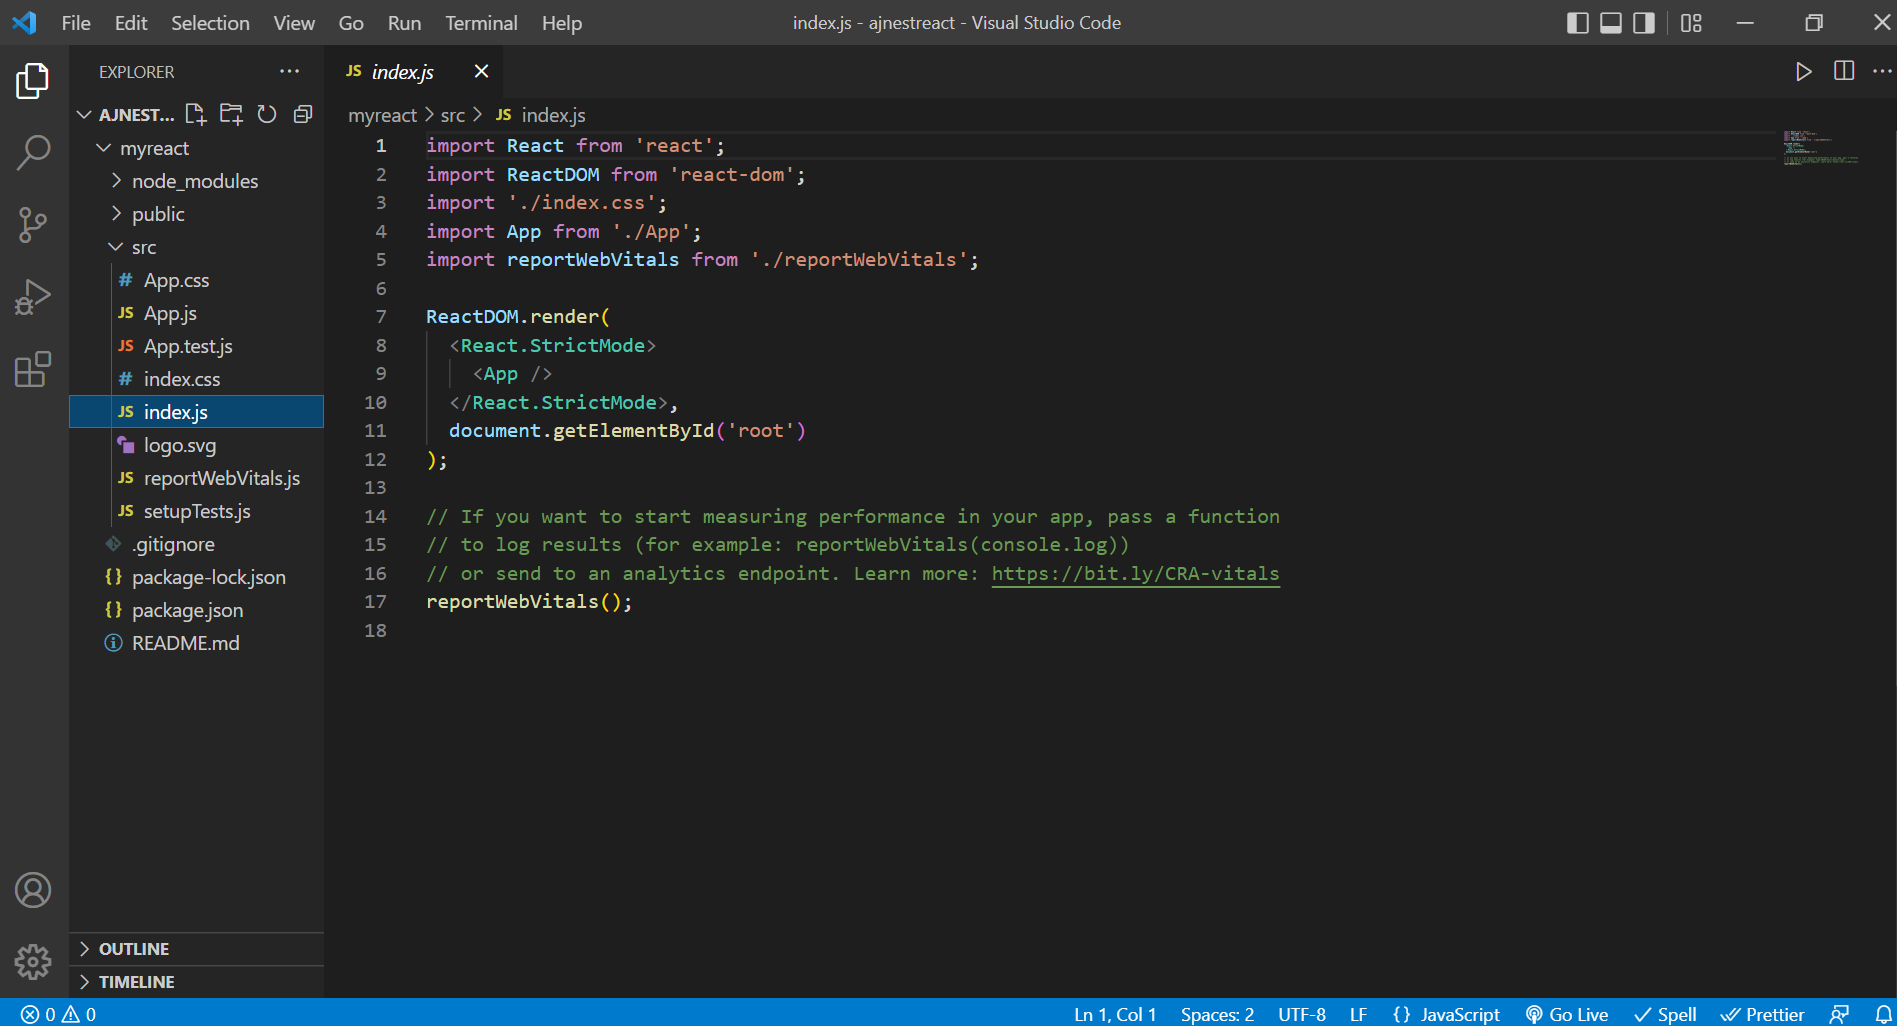
โดยทำการแก้ไขไฟล์ index.html (อยู่ใน public) และ index.js (อยู่ใน src) ดังนี้
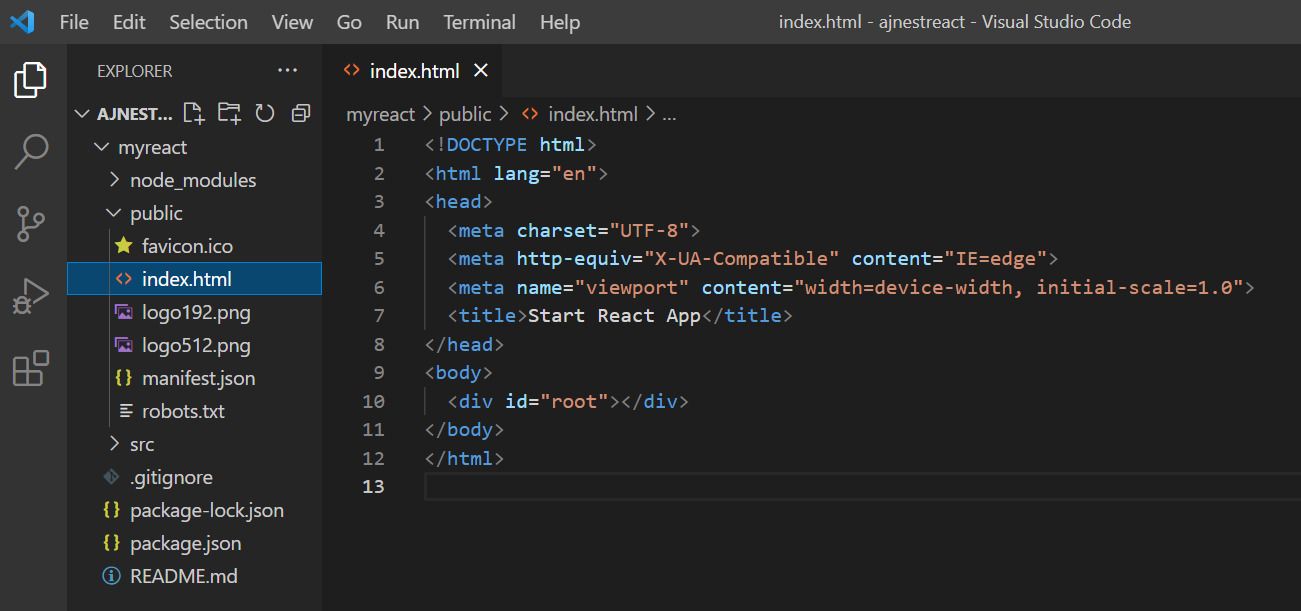
1) ไฟล์ index.html
ทดลองตั้งชื่อ Title ของเว็บเป็น Start React App
บรรดทัดที่ 7 <title>Start React App</title>
2) ไฟล์ index.js
ไฟล์ index.js เป็น JSX (๋JavaScript XML) ซึ่งเป็นจุดเด่นของ React ที่ทำให้เราสามารถเขียนโปรแกรมภาษา JavaScript ร่วมกับ
ภาษา HTML ได้สะดวกและใช้งานง่ายมากขึ้น
เขียนโปรแกรมแสดงข้อความ Hello React JavaScript Library 😀 ออกทางหน้าจอ Web Browser ทาง http://localhost:3000/
บรรทัดที่ 8 const myHelloReact = Hello React JavaScript Library 😀
บรรทัดที่ 9 ReactDOM.render(myHelloReact, document.getElementById(‘root’));
ReactDOM.render() ฟังก์ชันที่ทำการ render HTML ที่เขียนไปแสดงที่ HTML id
//(1) HTML Text --> HTML Tag
const myHelloReact = <h1>Hello React JavaScript Library :D</h1>
ReactDOM.render(myHelloReact, document.getElementById('root'));
Terminal เข้าไปที่ Folder ที่เก็บงานชื่อ myreact พิมพ์ cd .\myreact\
จากนั้นเปิด Server พิมพ์ npm start
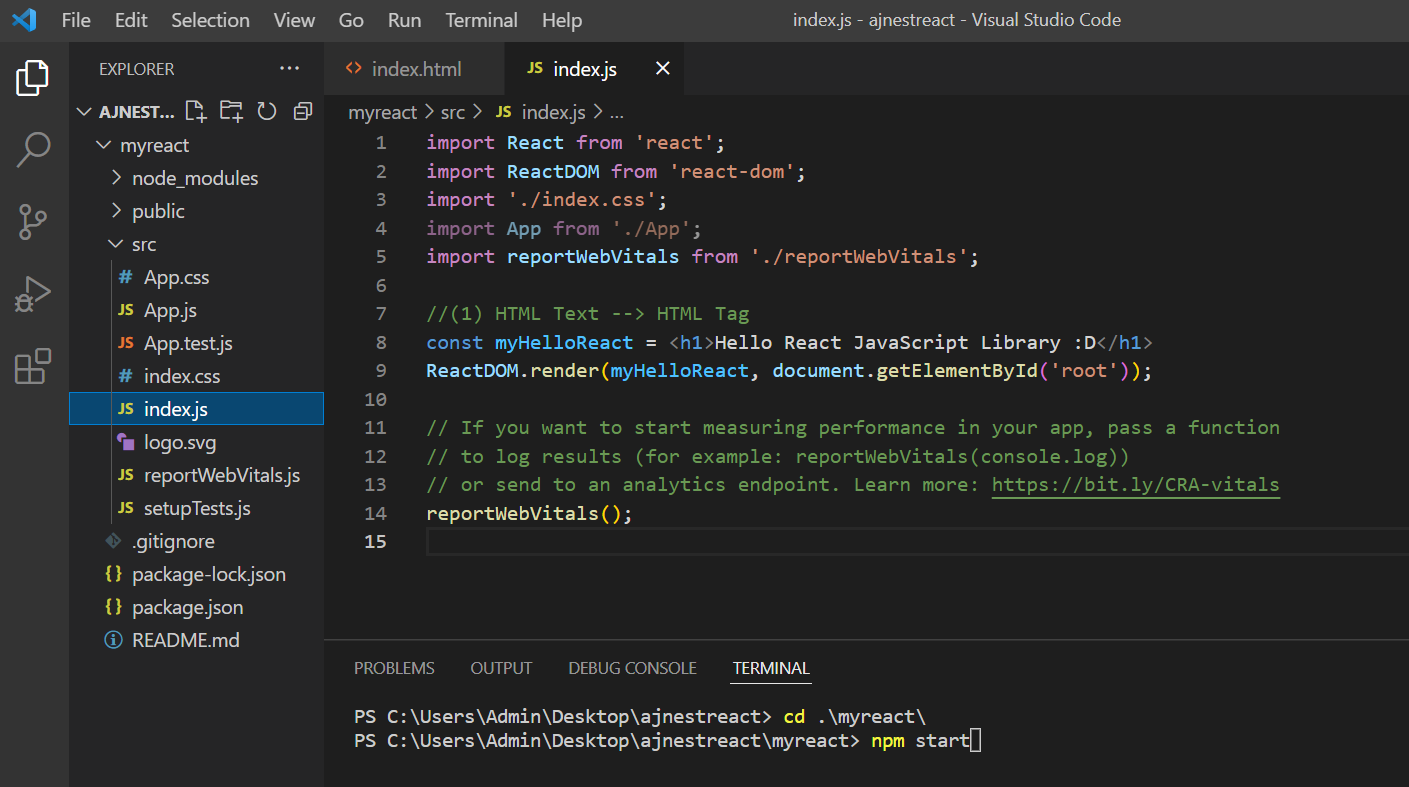
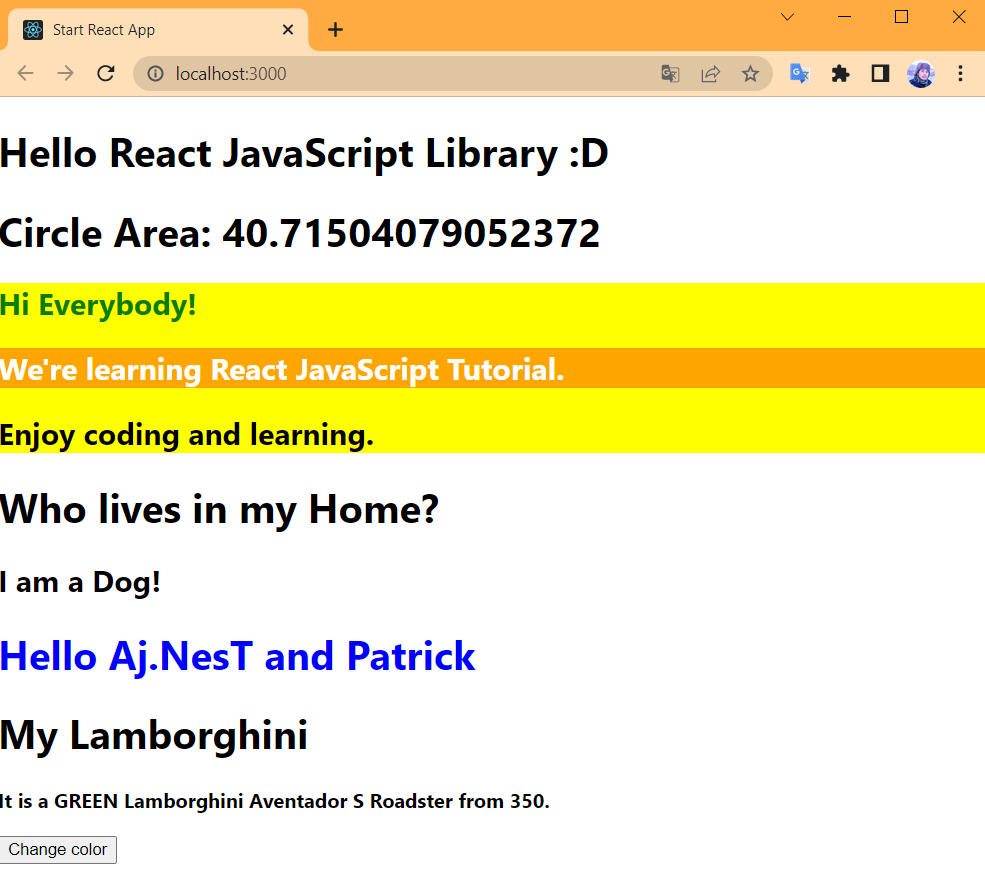
12. แสดงผลลัพธ์ออกทางหน้าจอ Web Browser
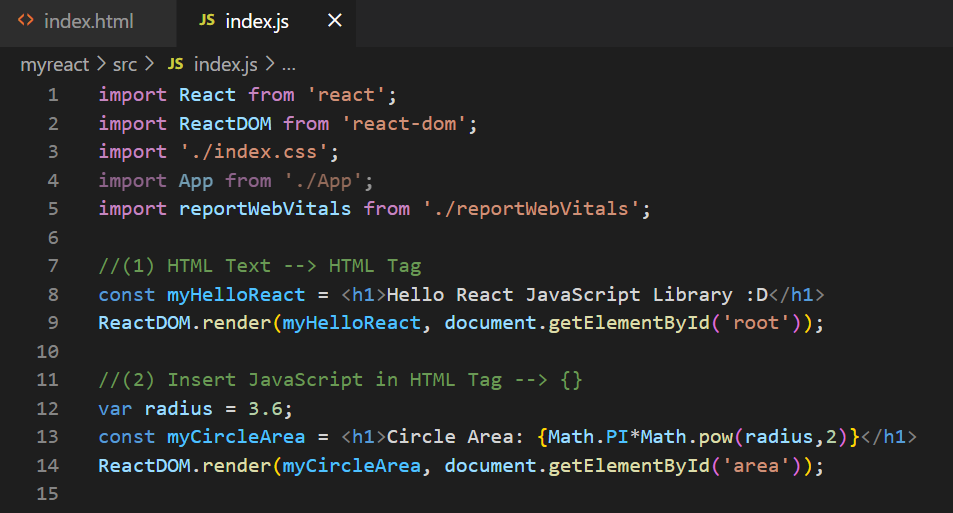
Lab 2: เรียนรู้การเขียนโปรแกรมแทรก JavaScript ใน HTML
สามารถแทรก JavaScript ใส่ใน HTML โดยการใช้ {คำสั่ง JavaScript}
1. ใช้ไฟล์ index.js เดิม เขียนโปรแกรมดังนี้
//(2) Insert JavaScript in HTML Tag --> {}
var radius = 3.6;
const myCircleArea = <h1>Circle Area: {Math.PI*Math.pow(radius,2)}</h1>
ReactDOM.render(myCircleArea, document.getElementById('area'));
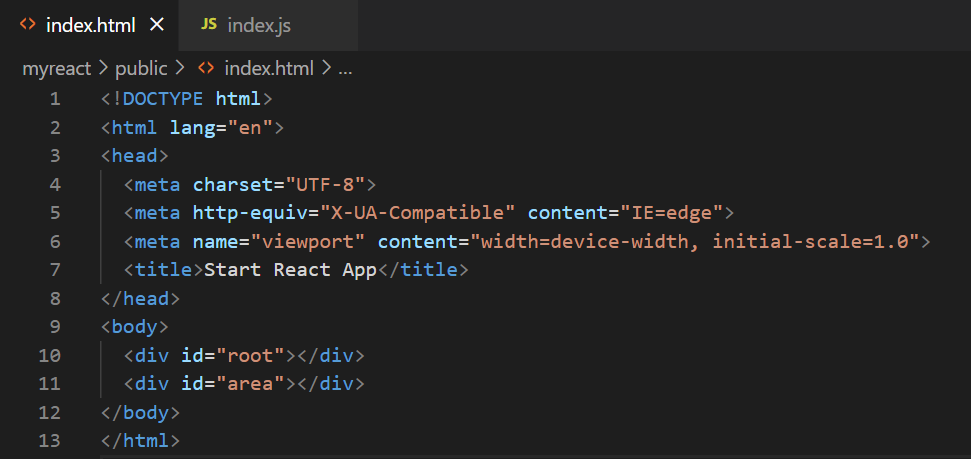
2. เปิดไฟล์ public/index.html เขียนโปรแกรมเพิ่มในส่วน <body> ตั้งชื่อ id = “area”
<body>
  <div id="root"></div>
  <div id="area"></div>
</body>
3. แสดงผลลัพธ์ที่ได้จากการทดลอง เปิด Terminal ใช้คำสั่ง npm start เพื่อเปิด Server
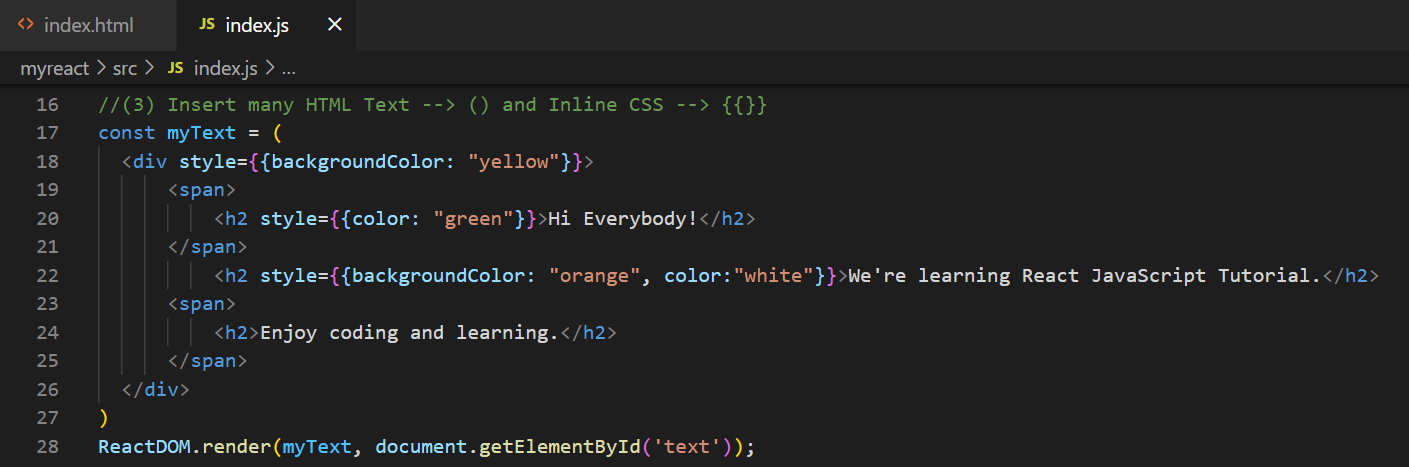
Lab 3: เรียนรู้การเขียนโปรแกรม Insert many HTML Text and Inline CSS
สามารถสร้าง HTML Tag หลาย ๆ คำสั่งโดยใช้เครื่องหมาย (คำสั่ง HTML) และ CSS ใช้คำสั่ง style = {{selector: “value”}}
1. ใช้ไฟล์ index.js เดิม เขียนโปรแกรมดังนี้
//(3) Insert many HTML Text --> () and Inline CSS --> {{}}
const myText = (
    <div style={{backgroundColor: "yellow"}}>
        <span>
            <h2 style={{color: "green"}}>Hi Everybody!</h2>
        </span>
            <h2 style={{backgroundColor: "orange", color:"white"}}>We're learning React JavaScript Tutorial.</h2>
        <span>
            <h2>Enjoy coding and learning.</h2>
        </span>
    </div>
)
ReactDOM.render(myText, document.getElementById('text'));
2. เปิดไฟล์ public/index.html เขียนโปรแกรมเพิ่มในส่วน <body> ตั้งชื่อ id = “text”
<body>
  <div id="root"></div>
  <div id="area"></div>
  <div id="text"></div>
</body>
3. แสดงผลลัพธ์ที่ได้จากการทดลอง เปิด Terminal ใช้คำสั่ง npm start เพื่อเปิด Server
Lab 4: เรียนรู้การเขียนโปรแกรม Components in Components แบบ Functions
React Components ใช้ในการแบ่งส่วนการทำงาน สามารถสร้างได้แบบ Function และ Class ขึ้นอยู่กับการนำไปใช้งาน และจะ return ออกมากเหมือน HTML Element
1. ใช้ไฟล์ index.js เดิม เขียนโปรแกรมดังนี้
//(4) Components in Components --> Functions
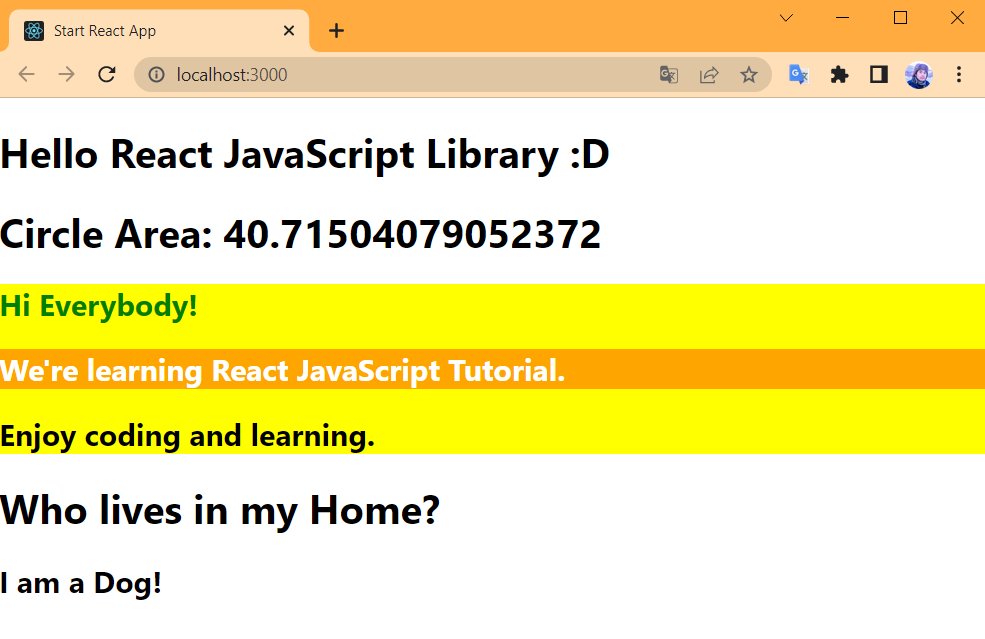
function Dog(){
return <h2>I am a Dog!</h2>
}
function Home(){
return(
<>
<h1>Who lives in my Home?</h1>
<Dog/>
</>
)
}
ReactDOM.render(<Home/>, document.getElementById('dog'));
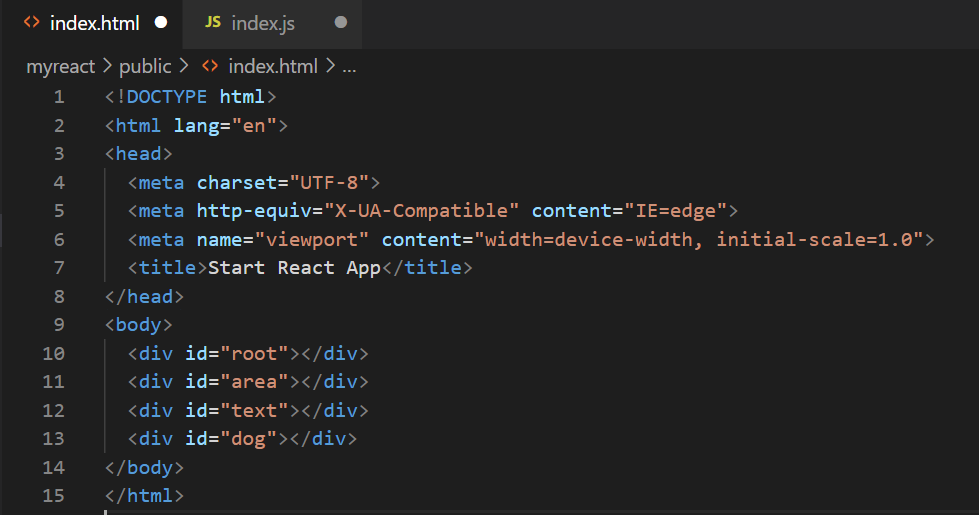
2. เปิดไฟล์ public/index.html เขียนโปรแกรมเพิ่มในส่วน <body> ตั้งชื่อ id = “dog”
<body>
  <div id="root"></div>
  <div id="area"></div>
  <div id="text"></div>
  <div id="dog"></div>
</body>
3. แสดงผลลัพธ์ที่ได้จากการทดลอง เปิด Terminal ใช้คำสั่ง npm start เพื่อเปิด Server
Lab 5: เรียนรู้การเขียนโปรแกรม Function Components in Class Components และ React Props (Properties) สำหรับส่งค่าภายใน React Components
React Props ทำให้ React Component สามารถ pass ข้อมูลต่าง ๆ ไปอีก Component นึงได้
1. ใช้ไฟล์ index.js เดิม เขียนโปรแกรมดังนี้
//(5) Function Components in Class Components and React Props for send value to React Components
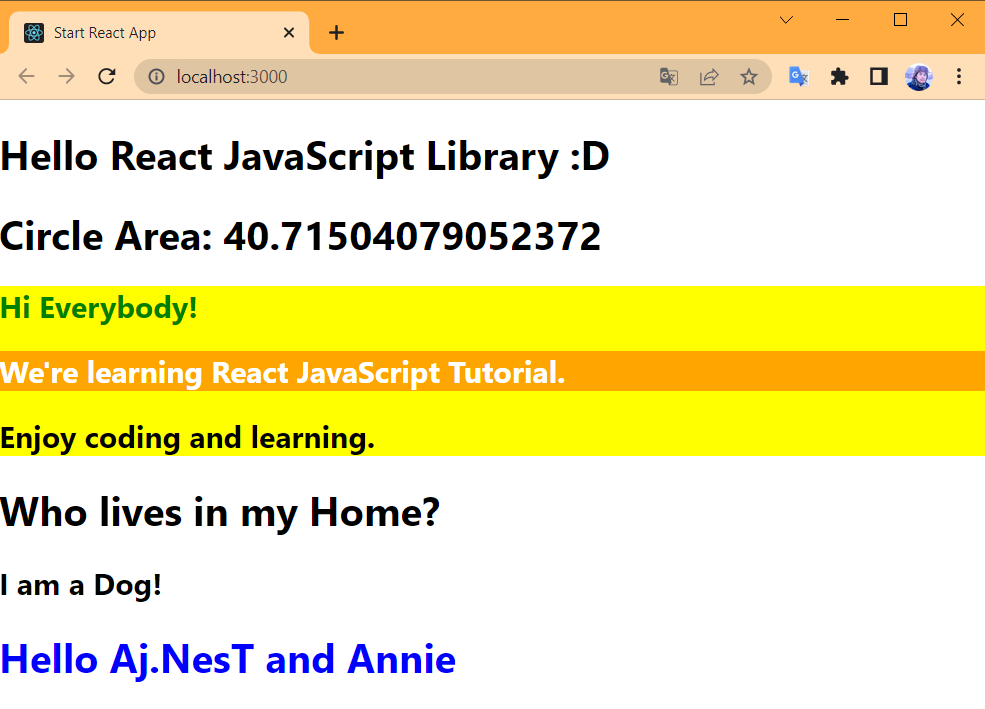
function Student(){
const student_list = ['NesTA', 'Patrick', 'Annie'];
var random_student = student_list[Math.floor(Math.random()*student_list.length)];
return<span> and {random_student} </span>;
}
class Hello extends React.Component{
render(){
return(
<div>
<h1 style={{color:"blue"}}>Hello{this.props.name}<Student/></h1>
</div>
)
}
}
ReactDOM.render(<Hello name=" Aj.NesT"/>, document.getElementById('student'))

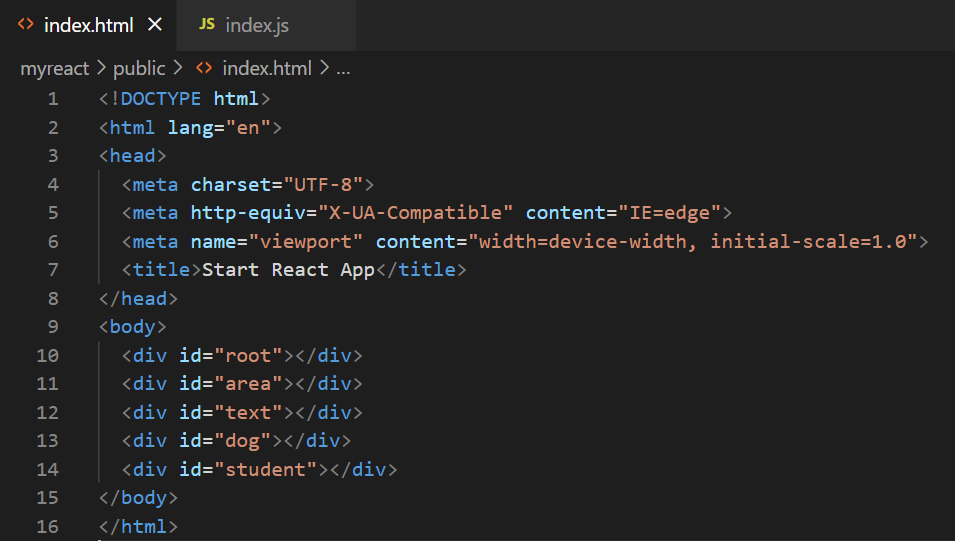
2. เปิดไฟล์ public/index.html เขียนโปรแกรมเพิ่มในส่วน <body> ตั้งชื่อ id = “student”
<body>
  <div id="root"></div>
  <div id="area"></div>
  <div id="text"></div>
  <div id="dog"></div>
  <div id="student"></div>
</body>
3. แสดงผลลัพธ์ที่ได้จากการทดลอง เปิด Terminal ใช้คำสั่ง npm start เพื่อเปิด Server
Lab 6: เรียนรู้การเขียนโปรแกรม React State และ Components
React State เป็นตัวแปรเก็บค่าต่าง ๆ ที่ใช้ภายใน Component นั้น ๆ คล้าย Local Variable
สามารถสร้าง State เพื่อใช้งานได้ใน constructure ของ Class Component
State Object สามารถเรียกใช้งานได้ทุกที่ใน Component โดยใช้รูปแบบ this.state.AttributeName
การแก้ไขข้อมูล State จะทำผ่านฟังก์ชัน setState ของ React และ State นั้นจะเป็น JavaScritp Object
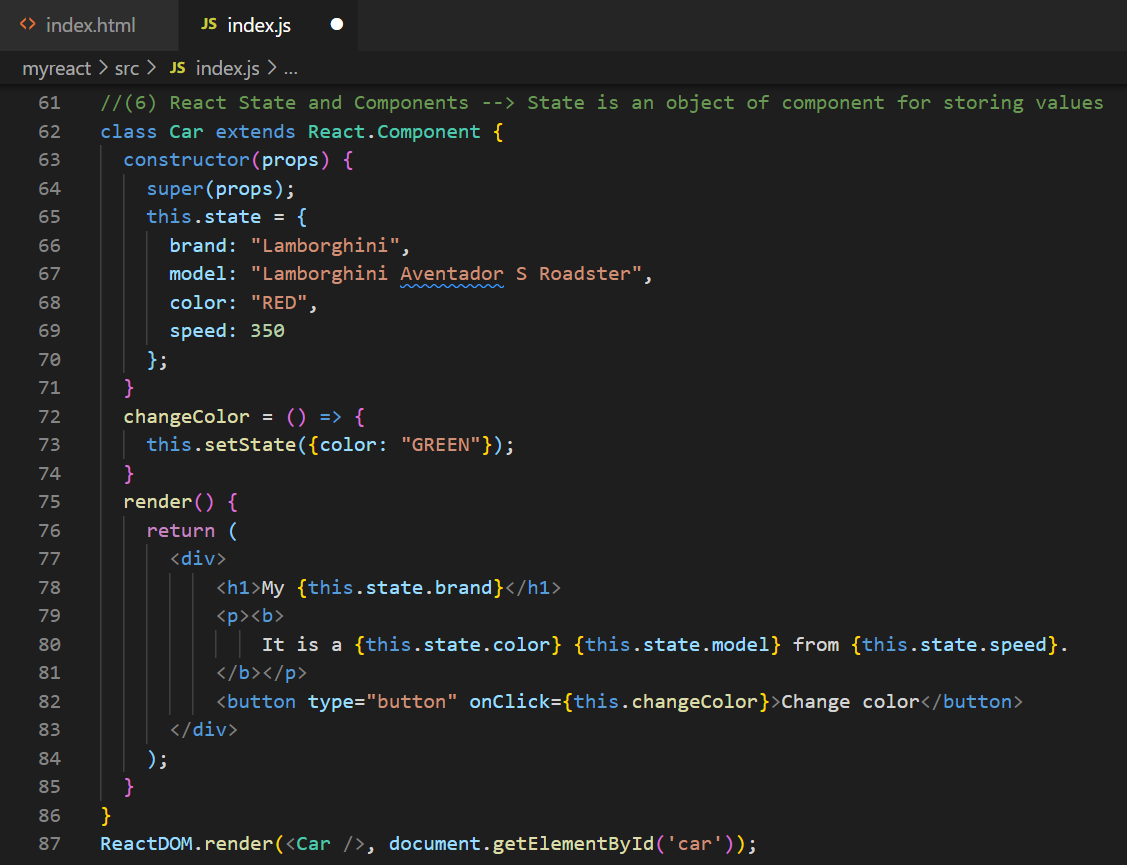
1. ใช้ไฟล์ index.js เดิม เขียนโปรแกรมดังนี้
//(6) React State and Components --> State is an object of component for storing values
class Car extends React.Component {
    constructor(props) {
      super(props);
      this.state = {
        brand: "Lamborghini",
        model: "Lamborghini Aventador S Roadster",
        color: "RED",
        speed: 350
      };
    }
    changeColor = () => {
      this.setState({color: "GREEN"});
    }
    render() {
      return (
        <div>
            <h1>My {this.state.brand}</h1>
            <p><b>
                It is a {this.state.color} {this.state.model} from {this.state.speed}.
            </b></p>
            <button type="button" onClick={this.changeColor}>Change color</button>
        </div>
      );
    }
}
ReactDOM.render(<Car />, document.getElementById('car'));
2. เปิดไฟล์ public/index.html เขียนโปรแกรมเพิ่มในส่วน <body> ตั้งชื่อ id = “car”
<body>
  <div id="root"></div>
  <div id="area"></div>
  <div id="text"></div>
  <div id="dog"></div>
  <div id="student"></div>
  <div id="car"></div>
</body>
3. แสดงผลลัพธ์ที่ได้จากการทดลอง เปิด Terminal ใช้คำสั่ง npm start เพื่อเปิด Server